
By Design Bundles
Affinity Tutorials9 min
How to Use Clipping Masks with Photos and Text in Affinity Designer
Clipping Masks in Affinity Designer are clipped to the boundaries of the parent layer. These masks can be something like a photo clipped to a text layer. The photo then takes the shape of the text non-destructively. In this tutorial you will learn how to use Clipping Masks with photos and text.
We will be using a tulip stock photo by Maryna Konoplytska and a quirky font called Top Knot.
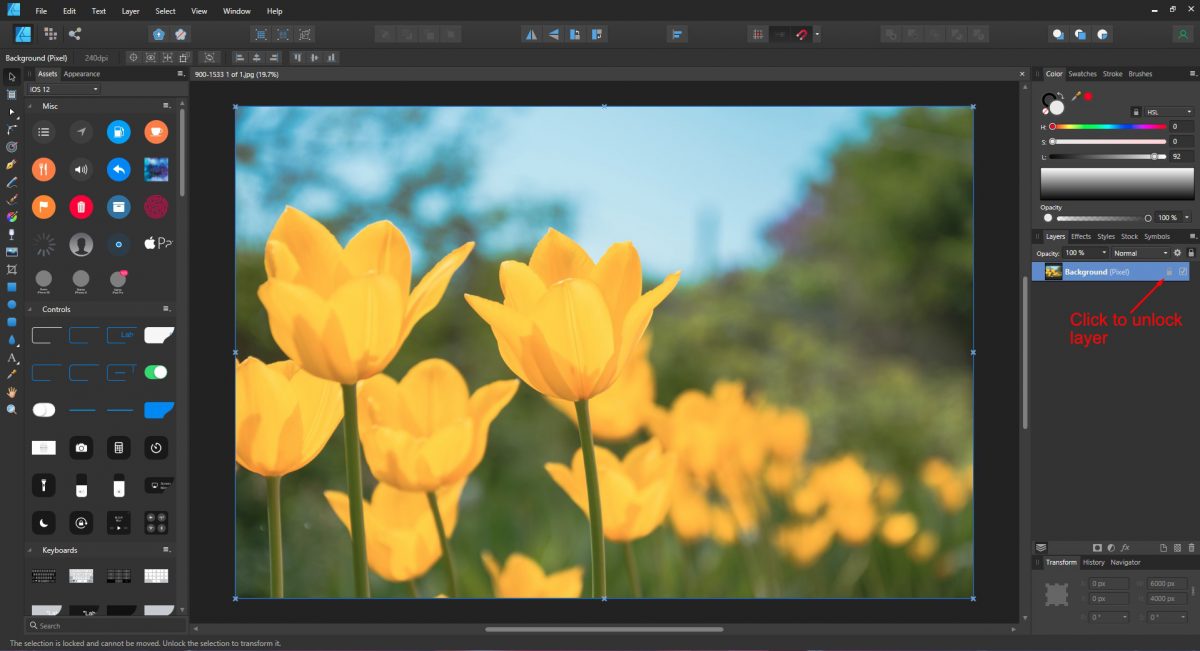
When you open Affinity Designer click Close on the Welcome Menu. Click on File, then Open and choose your photo. Under Layers on the right you will see the photo on its own layer. Click on the lock next to the thumbnail to unlock the layer so it can be moved.
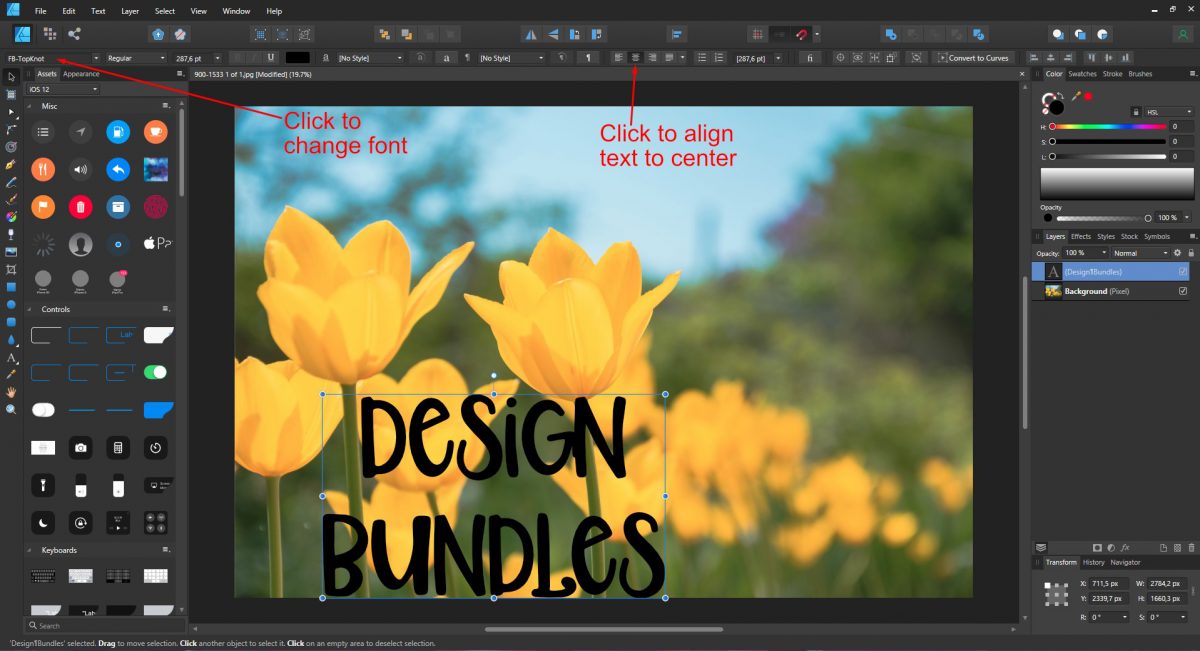
On the left side panel click on the Text Tool and select Artistic Text Tool. Click and drag out to a desired size and type out your text. Align the text to center and change the font. Position the text where you think it works best.
You can adjust the Transparency of the font above the Layers panel if it helps to position.
In this step we will be creating a parent and child layer relationship. The text will be the parent or main layer. The child layer is the photo which will clip beneath the text layer.
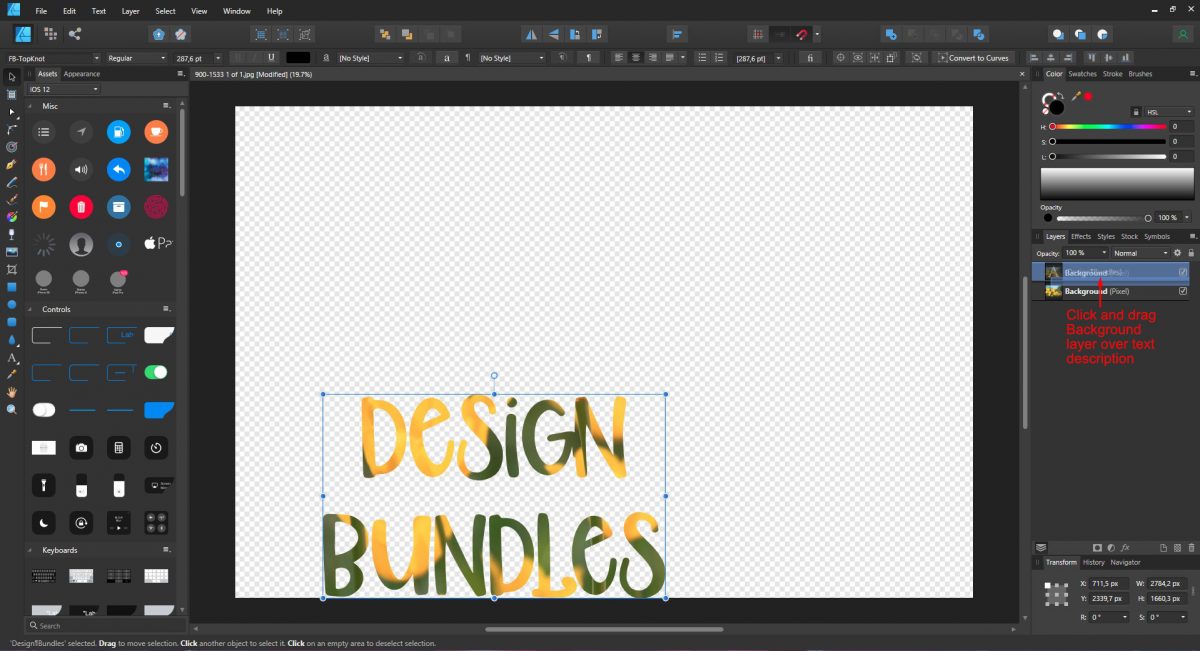
In order to clip the photo layer it has to be placed correctly. Click and drag the photo layer up and place your mouse over the text description. A blue line shows between the two layers. Release the mouse button. Do not place your mouse over the thumbnail else you will create a mask.
You can take your text design further by adding back parts of the photo. For this to work we need to remove the photo from the text layer. Click on the arrow of the text layer to expand. Click and drag the photo down onto its own layer.
Next, we will use the pen tool. We have a great guide on using the pen tool in Affinity Designer if you are new to it.
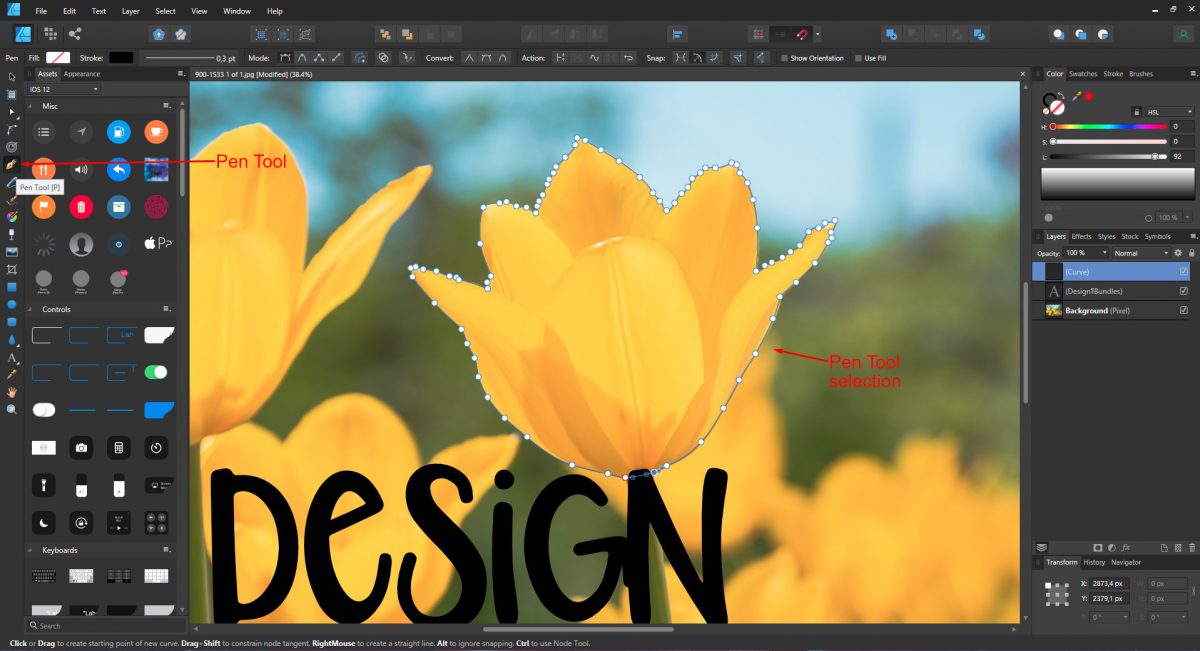
Click on the Pen Tool on left side panel and draw a selection around the area you want. We chose to add the one Tulip back in.
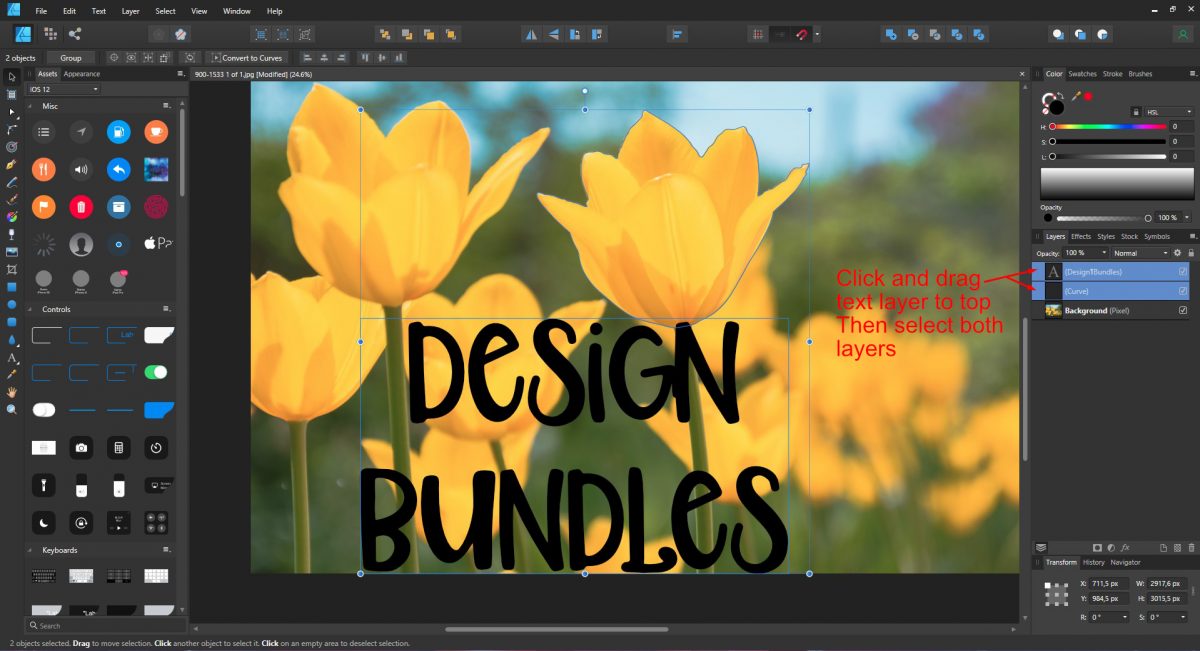
To combine the curve and text layer we need to use the Boolean operations at the top panel. But first, click and drag the text layer to the top of all the layers. Click on the text layer and then Ctrl + Click on the curve layer to select both.
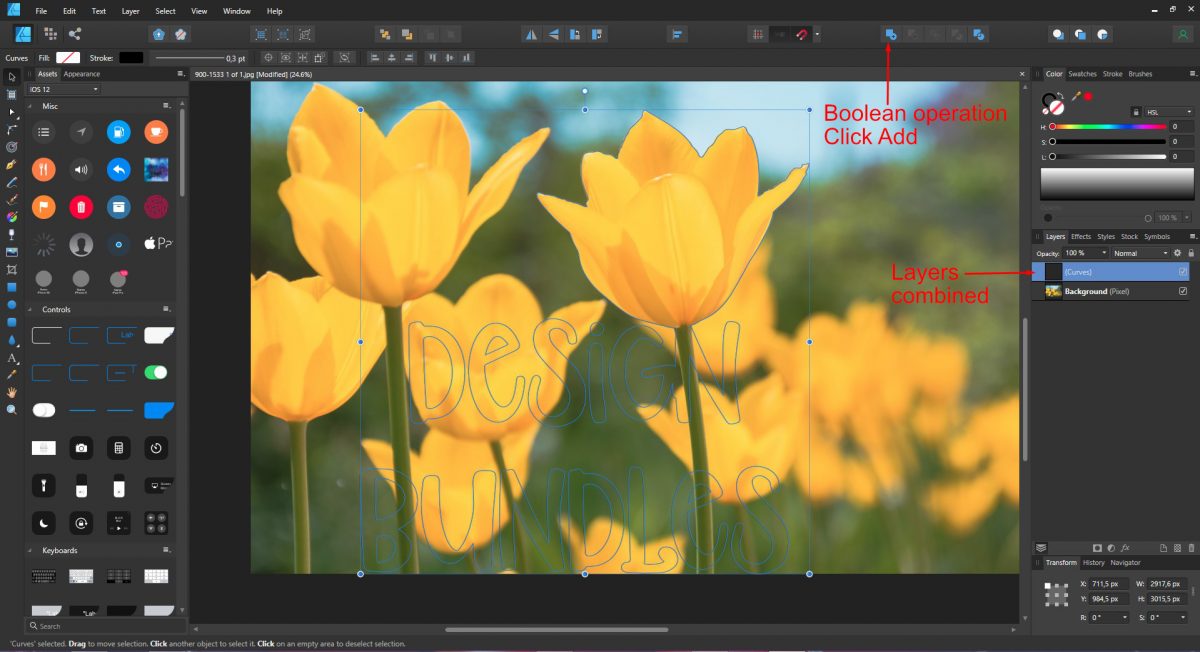
Click on the Add button at the top of the screen. Both layers will be combined into one.
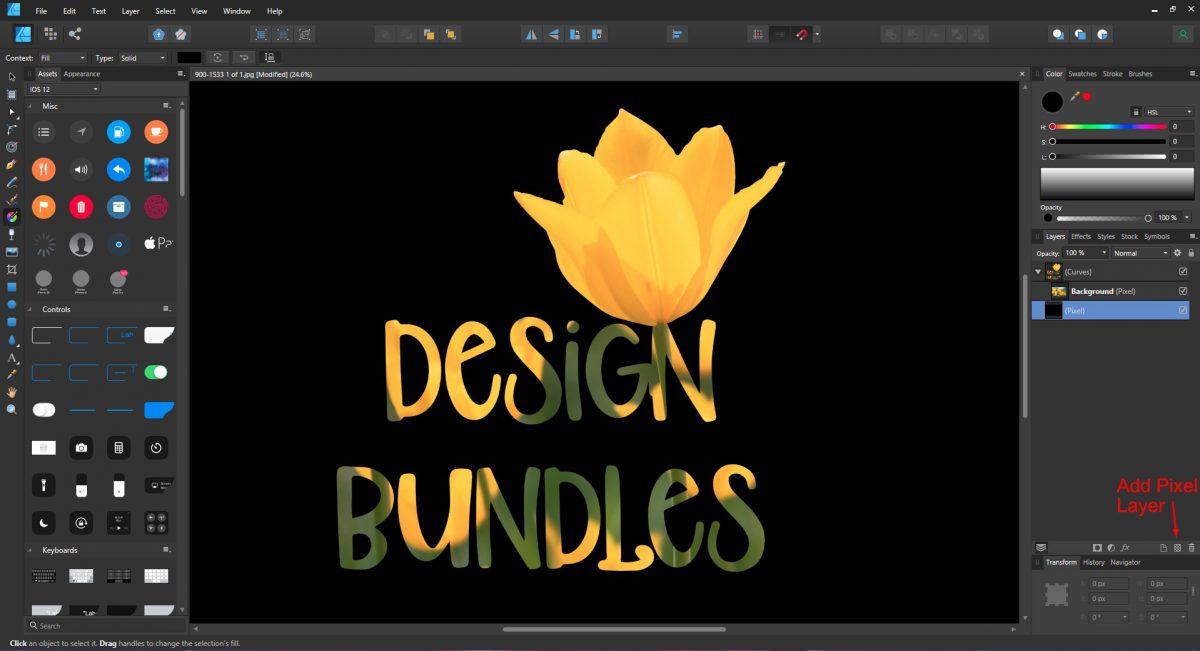
Now click and drag the photo up to clip to the new Curves layer. Add a background layer for more effect. Click on Add Pixel layer and fill with a color of your choice.
Text can be creatively edited to stand out more with Clipping Masks. If you enjoyed this tutorial be sure to check out how to add a gradient in Affinity Designer.
We will be using a tulip stock photo by Maryna Konoplytska and a quirky font called Top Knot.
Step 1 - Open the photo and type out text
When you open Affinity Designer click Close on the Welcome Menu. Click on File, then Open and choose your photo. Under Layers on the right you will see the photo on its own layer. Click on the lock next to the thumbnail to unlock the layer so it can be moved.
On the left side panel click on the Text Tool and select Artistic Text Tool. Click and drag out to a desired size and type out your text. Align the text to center and change the font. Position the text where you think it works best.
You can adjust the Transparency of the font above the Layers panel if it helps to position.
Step 2 - Clip photo to text layer
In this step we will be creating a parent and child layer relationship. The text will be the parent or main layer. The child layer is the photo which will clip beneath the text layer.
In order to clip the photo layer it has to be placed correctly. Click and drag the photo layer up and place your mouse over the text description. A blue line shows between the two layers. Release the mouse button. Do not place your mouse over the thumbnail else you will create a mask.
Step 3 - Use the pen tool
You can take your text design further by adding back parts of the photo. For this to work we need to remove the photo from the text layer. Click on the arrow of the text layer to expand. Click and drag the photo down onto its own layer.
Next, we will use the pen tool. We have a great guide on using the pen tool in Affinity Designer if you are new to it.
Click on the Pen Tool on left side panel and draw a selection around the area you want. We chose to add the one Tulip back in.
Step 4 - Add curve to text layer with Boolean operations
To combine the curve and text layer we need to use the Boolean operations at the top panel. But first, click and drag the text layer to the top of all the layers. Click on the text layer and then Ctrl + Click on the curve layer to select both.
Click on the Add button at the top of the screen. Both layers will be combined into one.
Now click and drag the photo up to clip to the new Curves layer. Add a background layer for more effect. Click on Add Pixel layer and fill with a color of your choice.
Text can be creatively edited to stand out more with Clipping Masks. If you enjoyed this tutorial be sure to check out how to add a gradient in Affinity Designer.
Related Tutorials
Affinity Tutorials
How to Use Clipping Masks in Affinity Designer
In this Step-by-Step tutorial learn how to use clipping masks in Affinity Designer.
Affinity Tutorials
How to Use Clipping Masks in Affinity Photo
In this step by step tutorial we will show you how to use clipping masks in Affinity Photo.
Affinity Tutorials
How to Use Affinity Designer Text Styles
Learn how to use Text Styles with this step by step Affinity Designer tutorial.
Affinity Tutorials
How to Use Text Layer Effects in Affinity Designer
Learn how to use text layer effect in Affinity Designer with this step by step tutorial.
Affinity Tutorials
How to Use Textures in Affinity Designer
Learn how to use textures in this Affinity Designer tutorial to create beautiful and unique images.
Affinity Tutorials
How to Curve Text in Affinity Designer
In this tutorial learn how to curve text in Affinity Designer in only 5 steps!