By Design Bundles
Cricut Tutorials12 min
How to Print then Cut in Cricut Design Space
In this tutorial we will learn how to use the print and cut feature in Cricut Design Space.This feature can be used to create beautiful projects using watercolors design and much more. To demonstrate this process I'll be using a watercolor kitten clipart from Design Bundles. If you're using the mobile version of Cricut, make sure to check out this guide on using the Print Then Cut feature in Design Space.
To begin, log in to Cricut Design Space and open the canvas page.
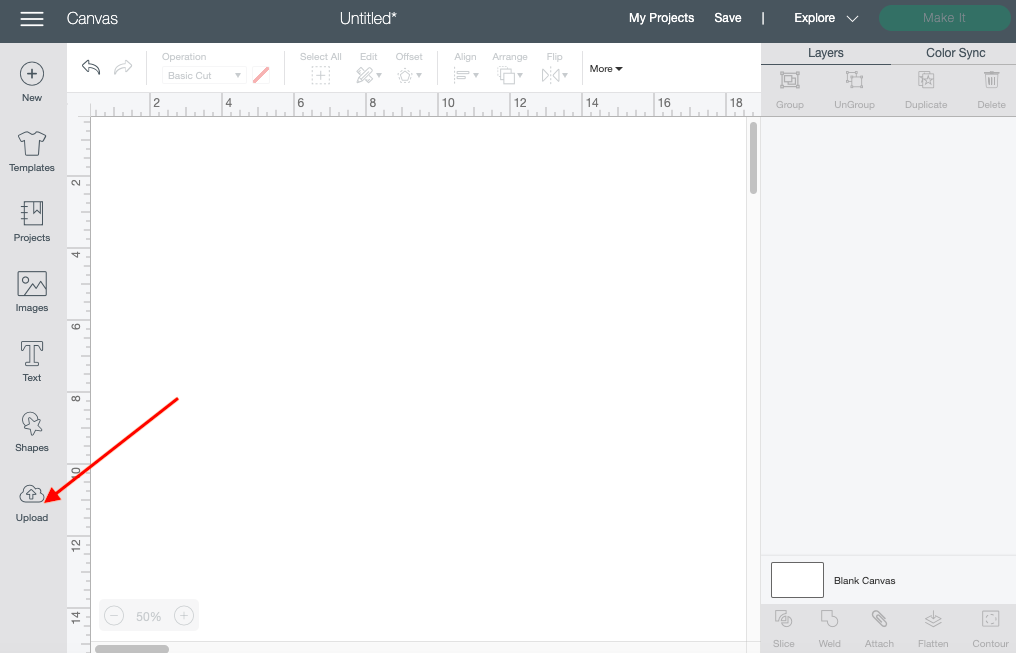
Start by clicking the upload button on the left side of your canvas page. This will start your upload process, and will direct you to the upload page. On this page click the upload image button.
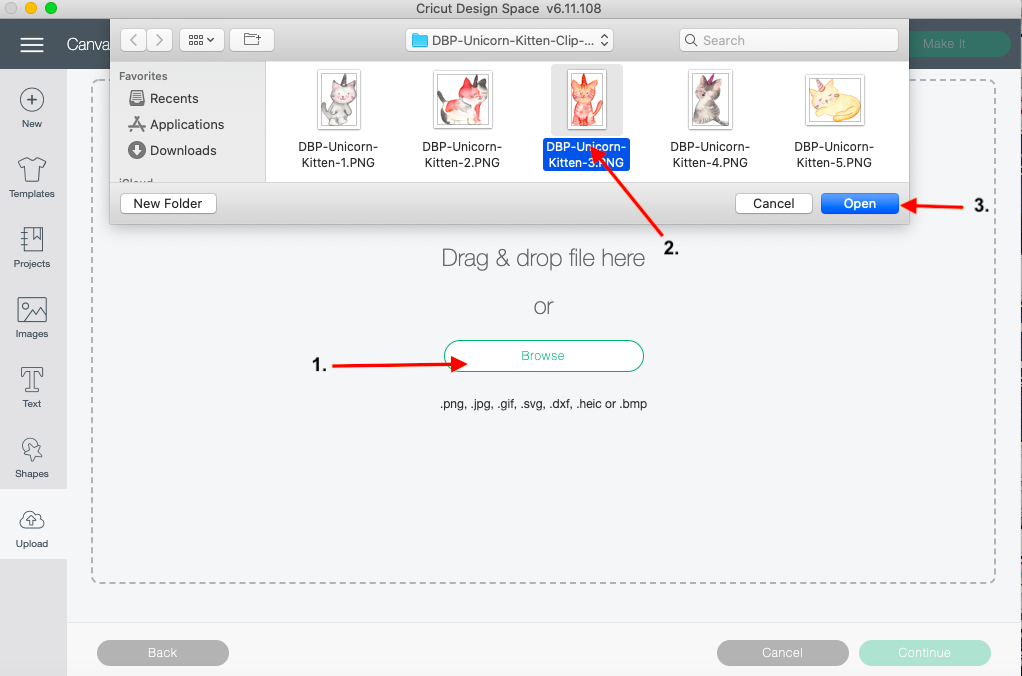
Next, search for your file by clicking the green Browse button in the center of your screen. A window will pop up, and you can then locate the file you want. Finally, click Open on the lower right corner.
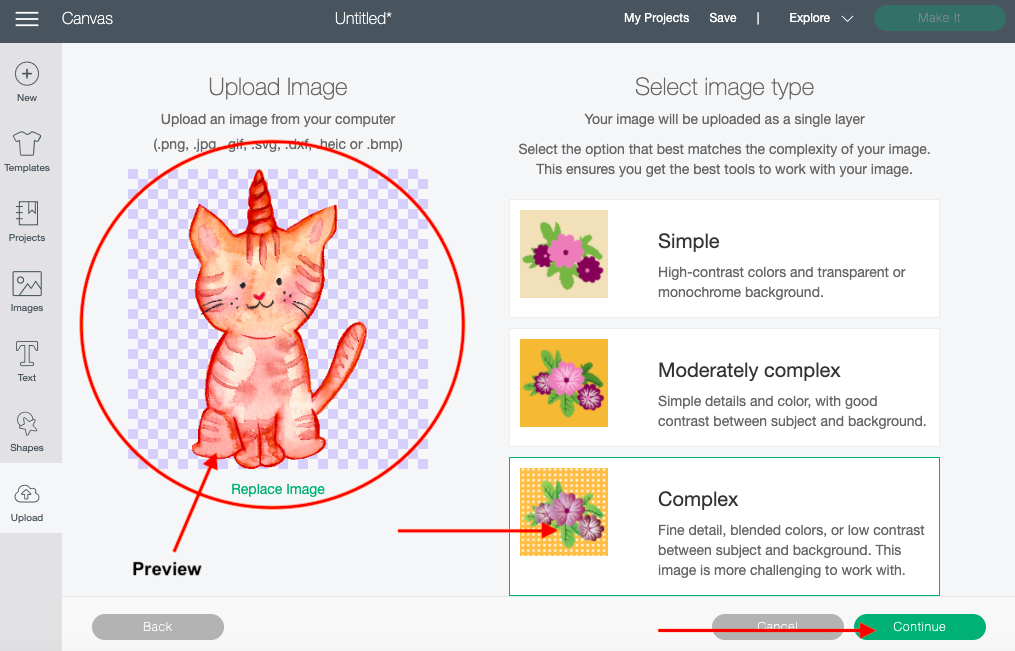
After selecting the image, the next page will appear. This is where you can preview the design. You will also need to choose the complexity of your design on this page. The image can range from Simple to Complex.
Read each description and select which one works best for your design, and then click continue. I'll be choosing Complex for this scenario due to the amount of shading in the image.
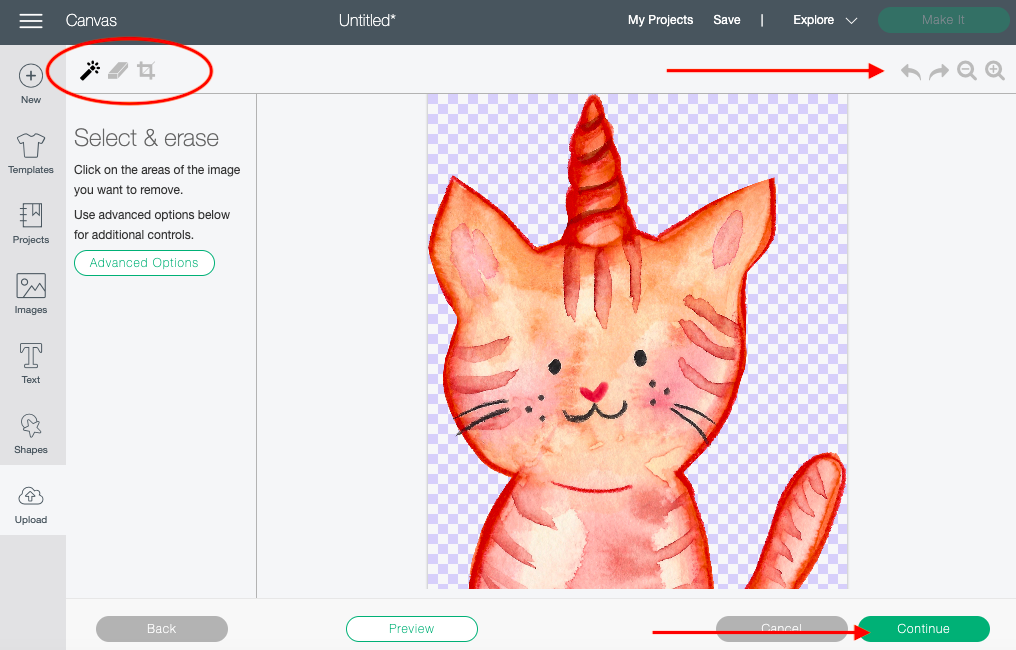
After clicking continue, you will be directed to the cleanup page. On this page, you can clean up your image using the tools in the upper left-hand corner. This process may be necessary if your image still contains a background or to make any further changes to the design. Select between the remover tool, erase tool, or the crop tool. Then click on the area of the image you want to remove.
If you make a mistake and want to go back to the last step, use the arrows in the upper right-hand corner. The zoom feature is located in the right-hand corner as well. Now that you have cleaned up the image, click Continue.
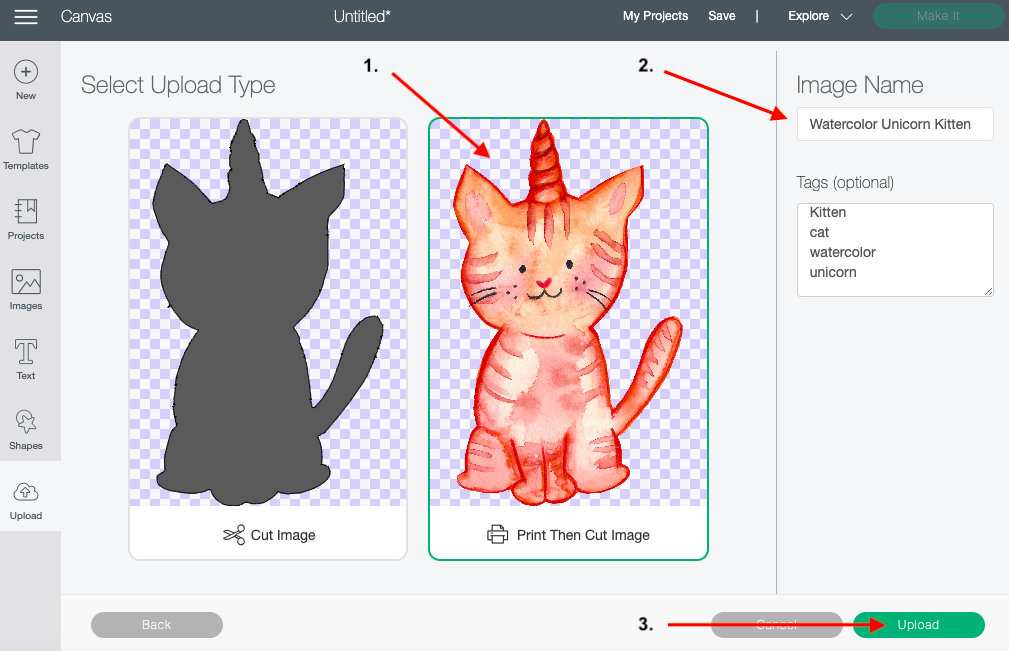
On the final page, select the print then cut image. Next, give the image a detailed title so it’s easier to find when needed. To further help you in the feature add keywords that describe your image. Doing this is not necessary but is helpful. To finish, click the Upload button on the lower right hand corner.
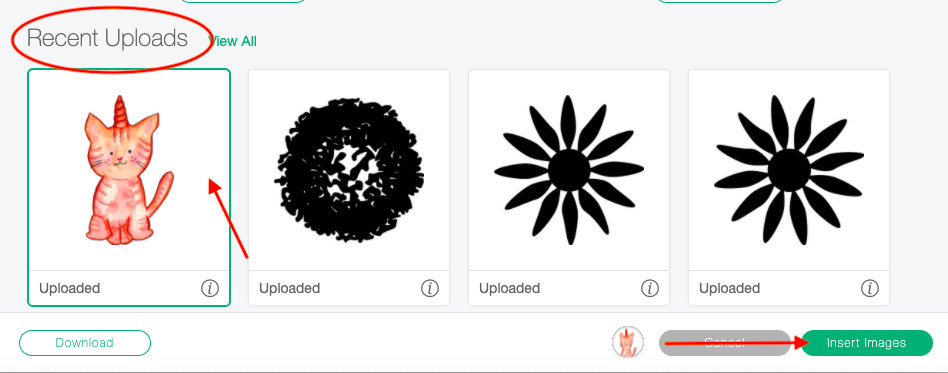
Now we need to prepare the design. First, insert the uploaded image to the canvas page. You can do this by clicking on the image under recent uploads and then click Insert.
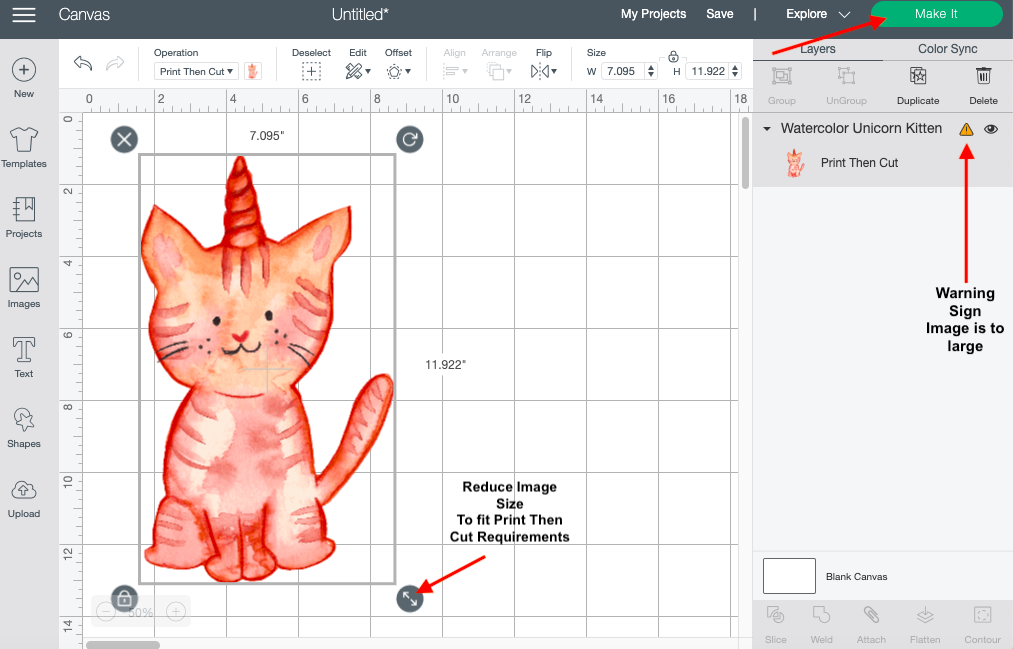
On the canvas page, you can now resize and add additional items to the Clipart. Please be aware that the Print Then Cut feature can not exceed 6.75” by 9.25” for a single project. You will get a warning if it does.
To resize the image, select the image and use the circle on the lower right side to drag it in or out. Click the Make It button on the upper right-hand corner of the canvas screen to finish the process.
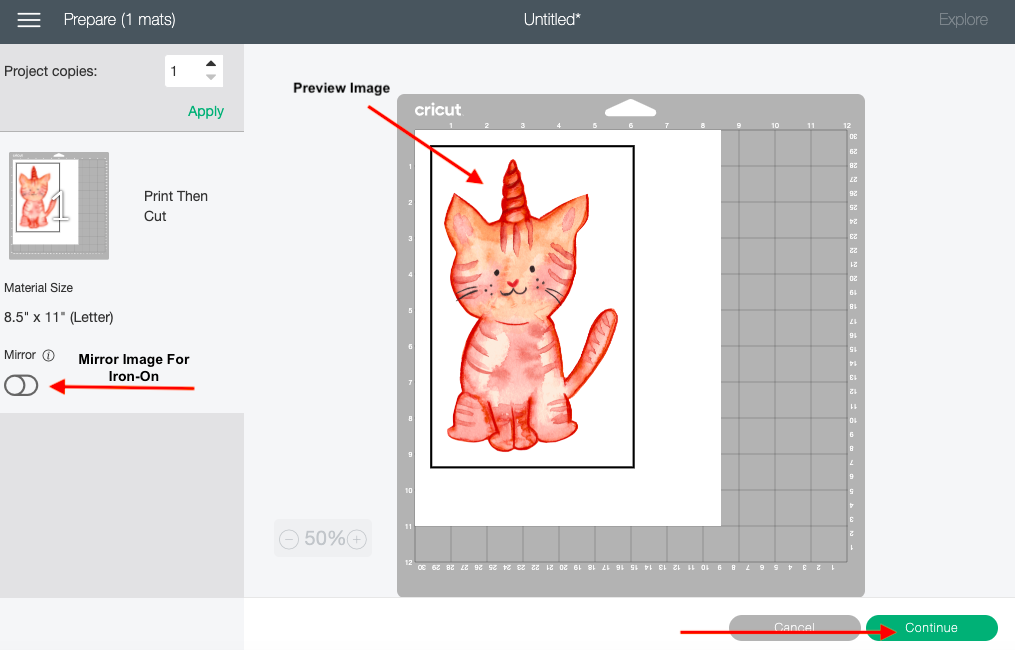
On the next page, you can see a preview of the print and cut project. If everything looks good, click Continue on the lower right-hand corner. Please note that you have to mirror your image when working with iron-on material.
On the following page click Send To Printer to bring up your print settings.

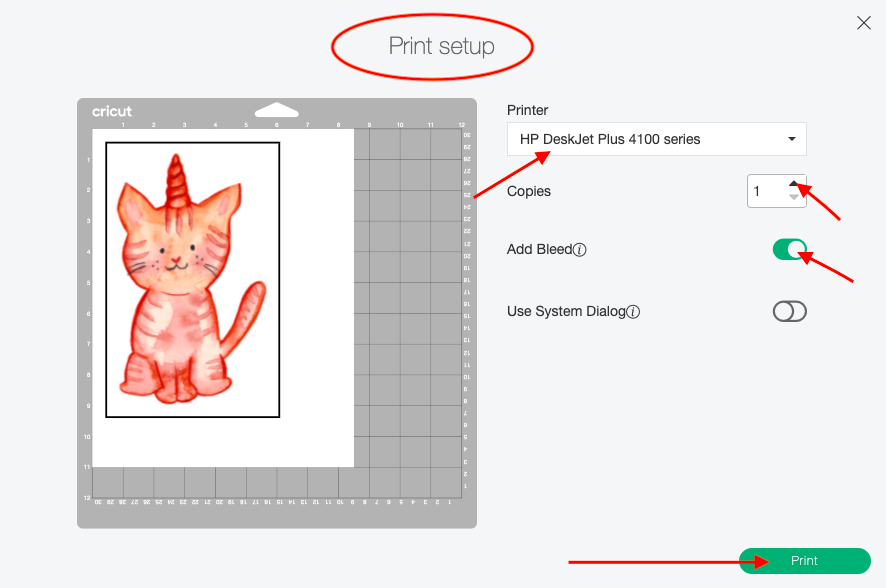
Now, select the printer you will be using for this project. Adjust the amount of copies if necessary and make sure that the bleed is turned on. Load your printer with the preferred printing material and click Print.
After printing, place material on a Cricut cutting mat and cut according to your project cut settings. Follow the program prompts to finish the cutting process using your Cricut cutting machine.
Using the Print and Cut feature is just that easy. If you like this tutorial make sure you don't miss out on our other easy to follow guides on creating a layered image from a png, using the slice tool and editing default material settings in Cricut Design Space.
To begin, log in to Cricut Design Space and open the canvas page.
Step 1 - Upload Your Image
Start by clicking the upload button on the left side of your canvas page. This will start your upload process, and will direct you to the upload page. On this page click the upload image button.
Next, search for your file by clicking the green Browse button in the center of your screen. A window will pop up, and you can then locate the file you want. Finally, click Open on the lower right corner.
After selecting the image, the next page will appear. This is where you can preview the design. You will also need to choose the complexity of your design on this page. The image can range from Simple to Complex.
Read each description and select which one works best for your design, and then click continue. I'll be choosing Complex for this scenario due to the amount of shading in the image.
After clicking continue, you will be directed to the cleanup page. On this page, you can clean up your image using the tools in the upper left-hand corner. This process may be necessary if your image still contains a background or to make any further changes to the design. Select between the remover tool, erase tool, or the crop tool. Then click on the area of the image you want to remove.
If you make a mistake and want to go back to the last step, use the arrows in the upper right-hand corner. The zoom feature is located in the right-hand corner as well. Now that you have cleaned up the image, click Continue.
On the final page, select the print then cut image. Next, give the image a detailed title so it’s easier to find when needed. To further help you in the feature add keywords that describe your image. Doing this is not necessary but is helpful. To finish, click the Upload button on the lower right hand corner.
Step 2 - Prepare the Design
Now we need to prepare the design. First, insert the uploaded image to the canvas page. You can do this by clicking on the image under recent uploads and then click Insert.
On the canvas page, you can now resize and add additional items to the Clipart. Please be aware that the Print Then Cut feature can not exceed 6.75” by 9.25” for a single project. You will get a warning if it does.
To resize the image, select the image and use the circle on the lower right side to drag it in or out. Click the Make It button on the upper right-hand corner of the canvas screen to finish the process.
Step 3 - Print Then Cut Design
On the next page, you can see a preview of the print and cut project. If everything looks good, click Continue on the lower right-hand corner. Please note that you have to mirror your image when working with iron-on material.
On the following page click Send To Printer to bring up your print settings.
Now, select the printer you will be using for this project. Adjust the amount of copies if necessary and make sure that the bleed is turned on. Load your printer with the preferred printing material and click Print.
After printing, place material on a Cricut cutting mat and cut according to your project cut settings. Follow the program prompts to finish the cutting process using your Cricut cutting machine.
Using the Print and Cut feature is just that easy. If you like this tutorial make sure you don't miss out on our other easy to follow guides on creating a layered image from a png, using the slice tool and editing default material settings in Cricut Design Space.
Related Tutorials
Cricut Tutorials
How to Print then Cut in Cricut Design Space Mobile App
Learn how to easily use the Print then Cut Feature in Cricut Design Space Mobile App.
Cricut Tutorials
How to Center Your Designs to Cut in Cricut Design Space
Learn how to center your designs to cut in Cricut Design Space.
Cricut Tutorials
How to Cut Projects Larger Than Your Cutting Mat in Cricut Design Space
Learn how to cut projects larger than you cutting mat in Cricut Design Space.
Cricut Tutorials
How to Change Cut Lines to Score Lines in Cricut Design Space
In this Design Space tutorial we show you how to change a cut line to a score line.
Cricut Tutorials
How to foil and cut stickers in cricut design space
In this tutorial discover how to foil and cut stickers in Cricut Design Space.
Cricut Tutorials
How to Create a Layered Image in Cricut Design Space
In this tutorial, you will learn how to create a layered image in Cricut Design Space.