By Design Bundles
Inkscape Tutorials10 min
How to Create a Mosaic Using Voronoi Pattern in Inkscape
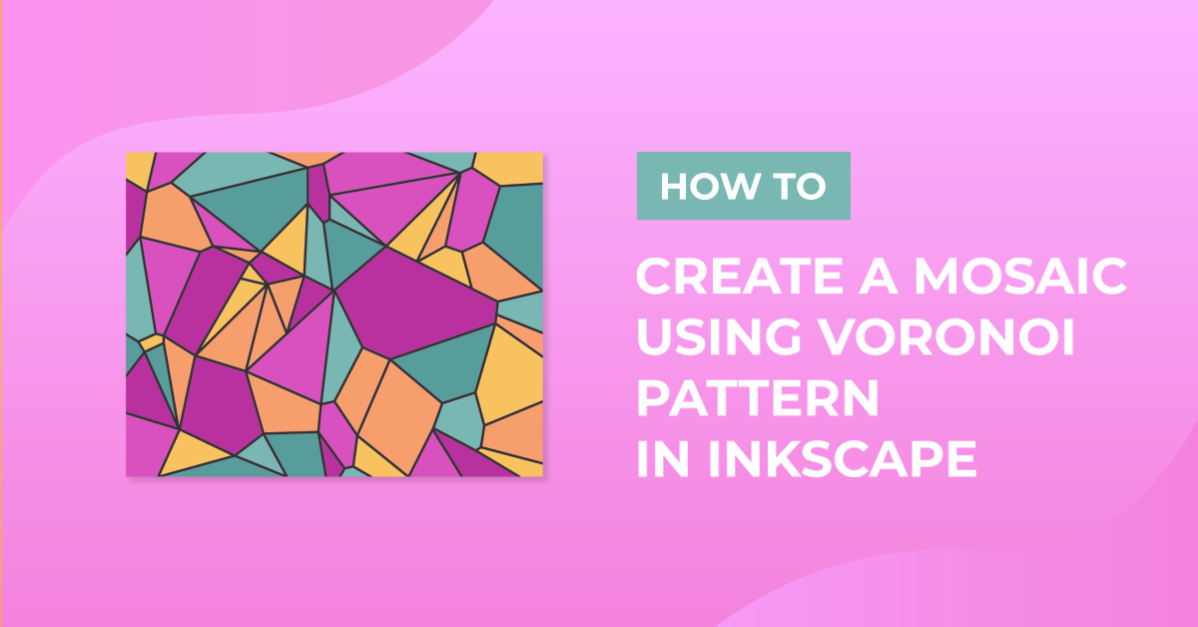
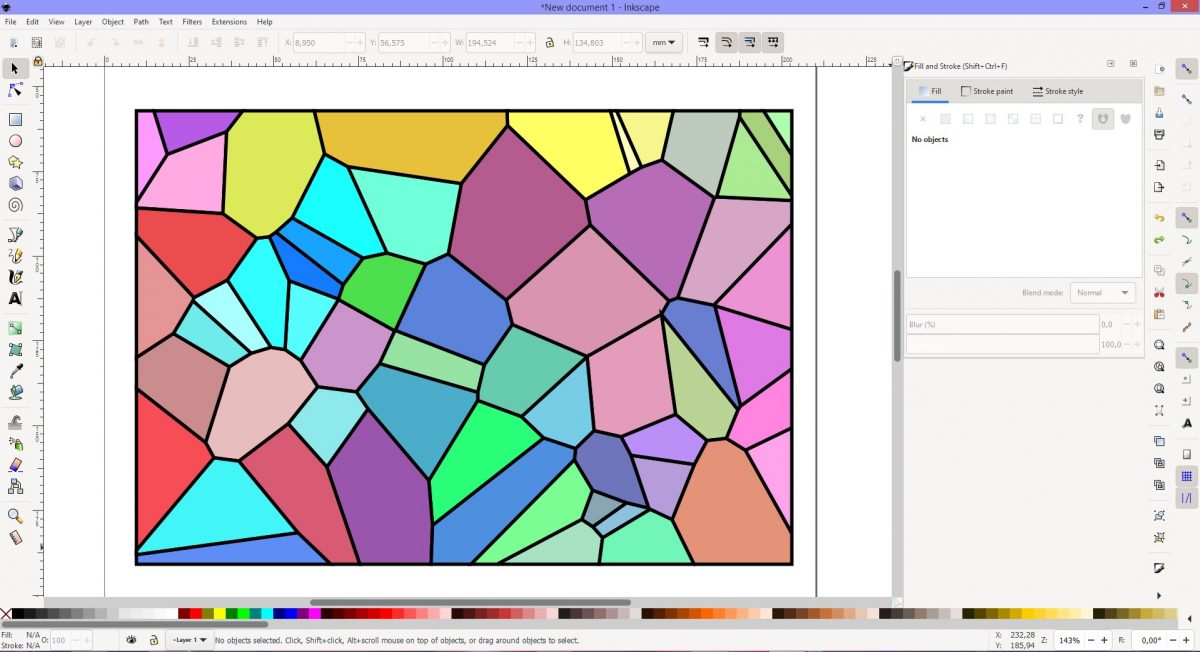
Voronoi patterns are found everywhere across nature. Recreating this pattern in vector software is super easy. In this tutorial we will be making a mosaic pattern in Inkscape by using the Voronoi Pattern tool. We will also use the Tweak Tool to give color shade variations.
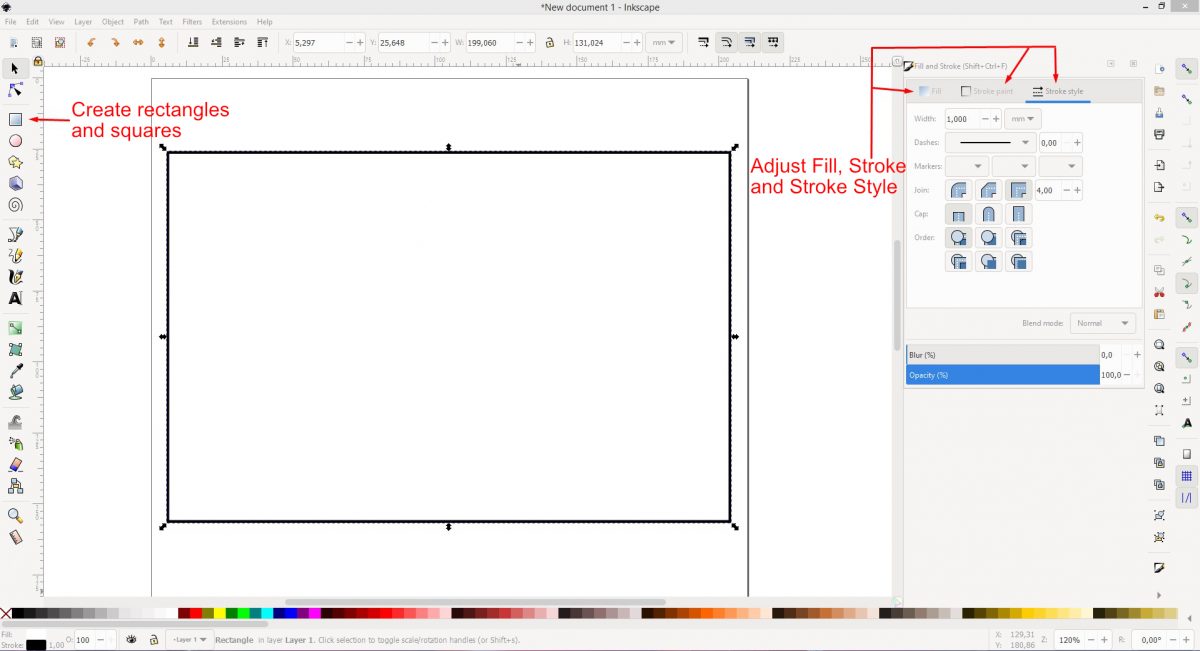
Begin by opening Inkscape and draw out the shape for the Voronoi pattern. On the left side click on Create Rectangles and Squares. Draw out the rectangle to the size you want.
The color and stroke need to be changed. Click on the Object menu at the top and select Fill and Stroke. The menu will open on the right hand side. Adjust the Fill to white and change the Stroke to black. The thickness of the Stroke can be adjusted to what you choose.
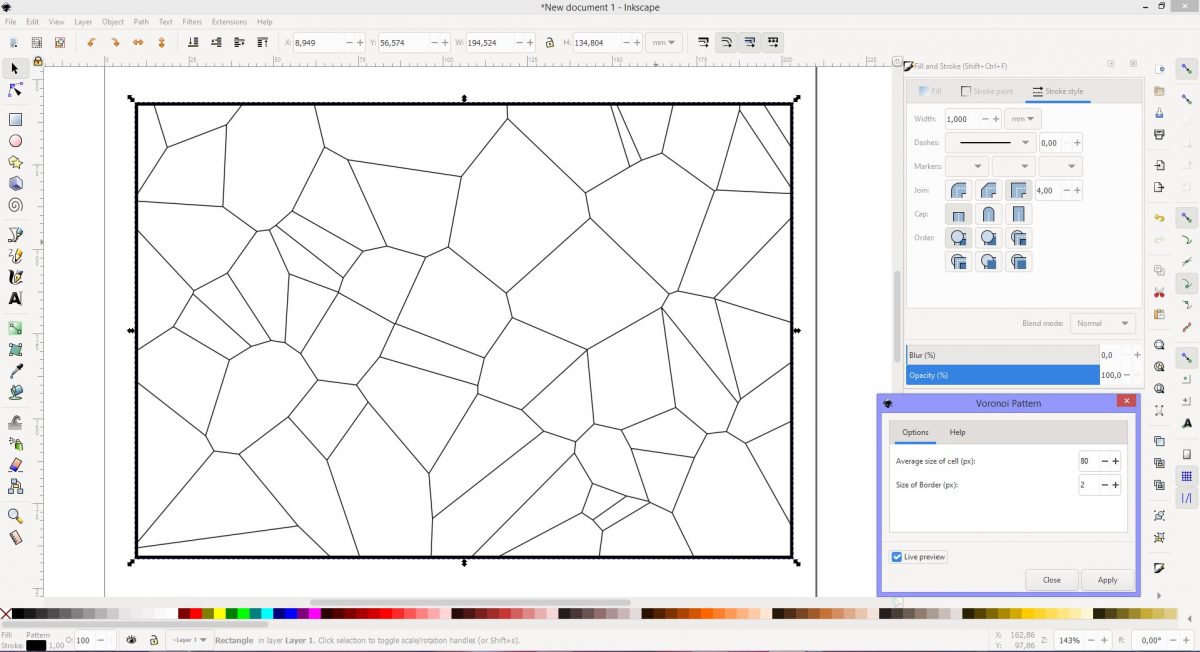
With the rectangle selected go to the Extension menu at the top. Select Generate from path and click Voronoi Pattern. Change the number for the Average size of cell to between 40 and 80. This number will depend on the size of your rectangle. If the number goes too low it may slow your software down. The Size of Border number was set to 2. Click Apply then click Close.
Activating the Live Preview should give you a quick look at the result. However, sometimes this doesn't want to play along.
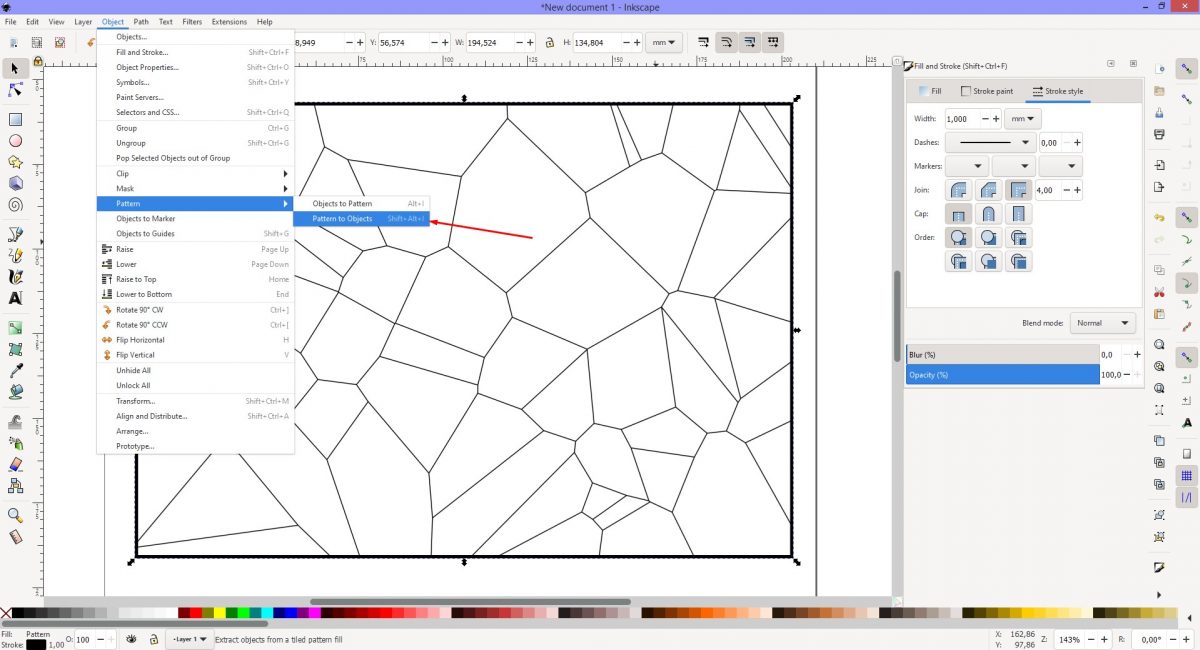
In order to use the Tweak Tool we need to turn the pattern into individual parts. While the pattern is still selected, click Objects then Pattern and click Patterns to Object. Be sure only the pattern is selected when you do this.
Again, with only the pattern selected, click on the Path menu at the top and select Combine.
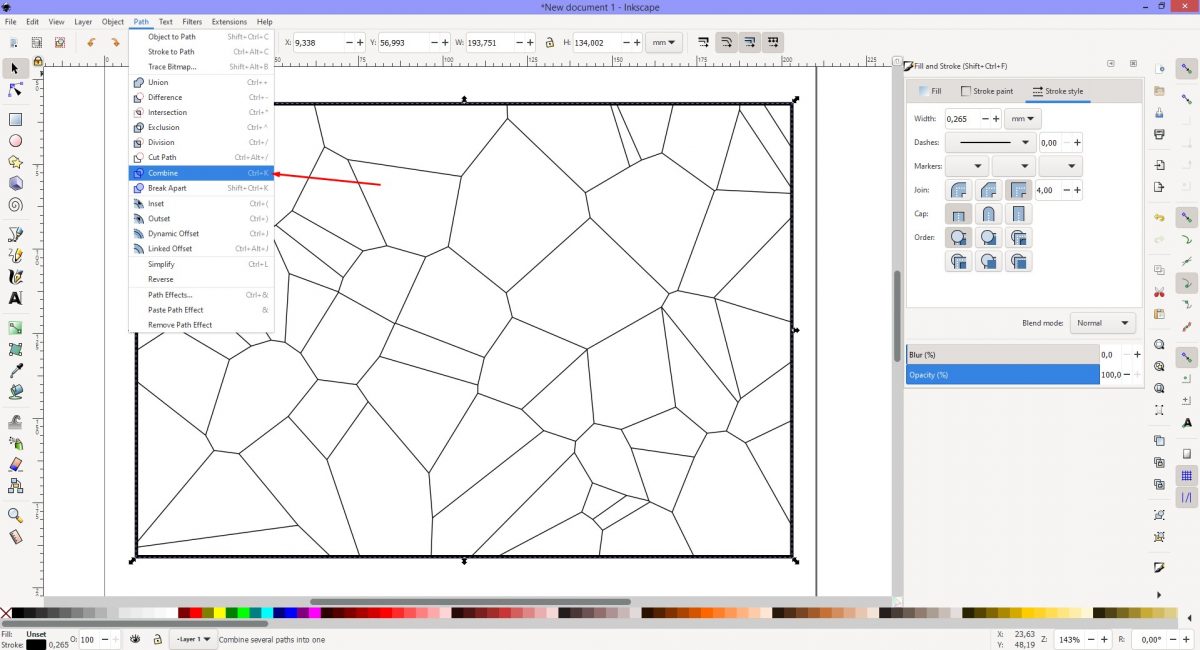
Now select both the pattern and the rectangle, click the Path menu again and select Division. The pattern separates into individual shapes. The Width can be changed under the Stroke Style.
An important adjustment is needed for the next step to work. The mosaic needs to be filled with a white color. Select all and use the Fill panel on the right hand side. Alternatively click on white on the bottom color palette.
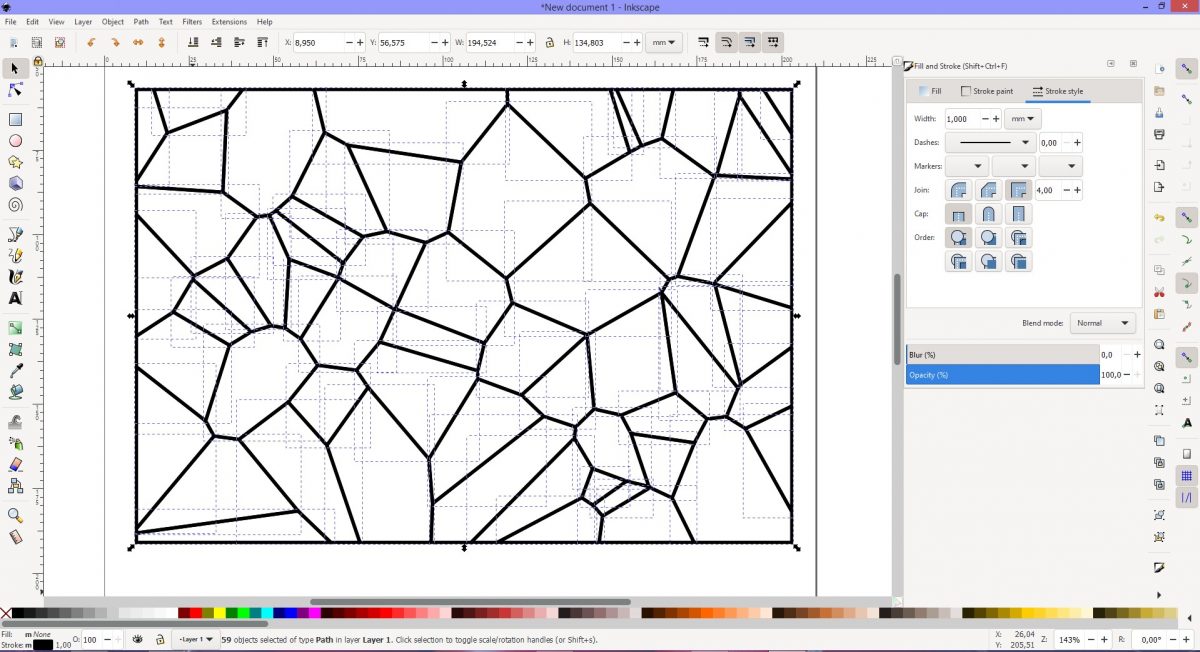
The Tweak Tool or Tweak objects by sculpting or painting Tool is a multifunctional tool. We will use the coloring option that allows a variation in shades.
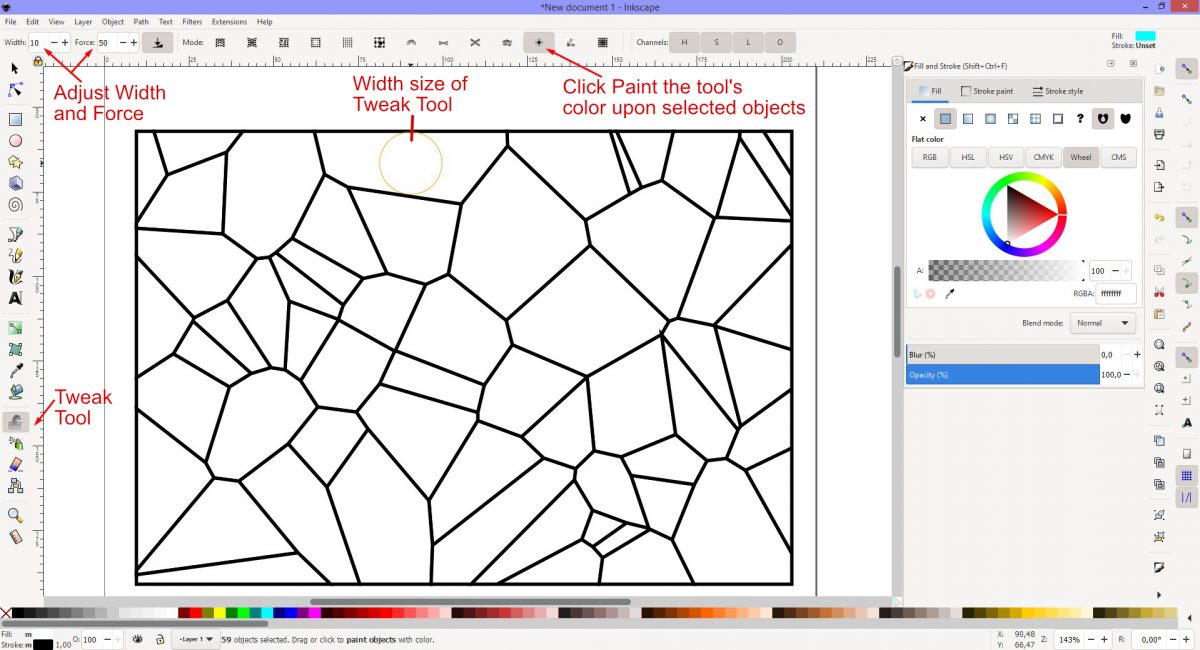
Click the Tweak Tool on the left side. At the top of the screen will be the editing options. Click on the mode at the top: Paint the tool's color upon selected objects. Adjust the Width and Force at the top left. If you want a brighter color increase the Force number. To paint a smaller area decrease the Width.
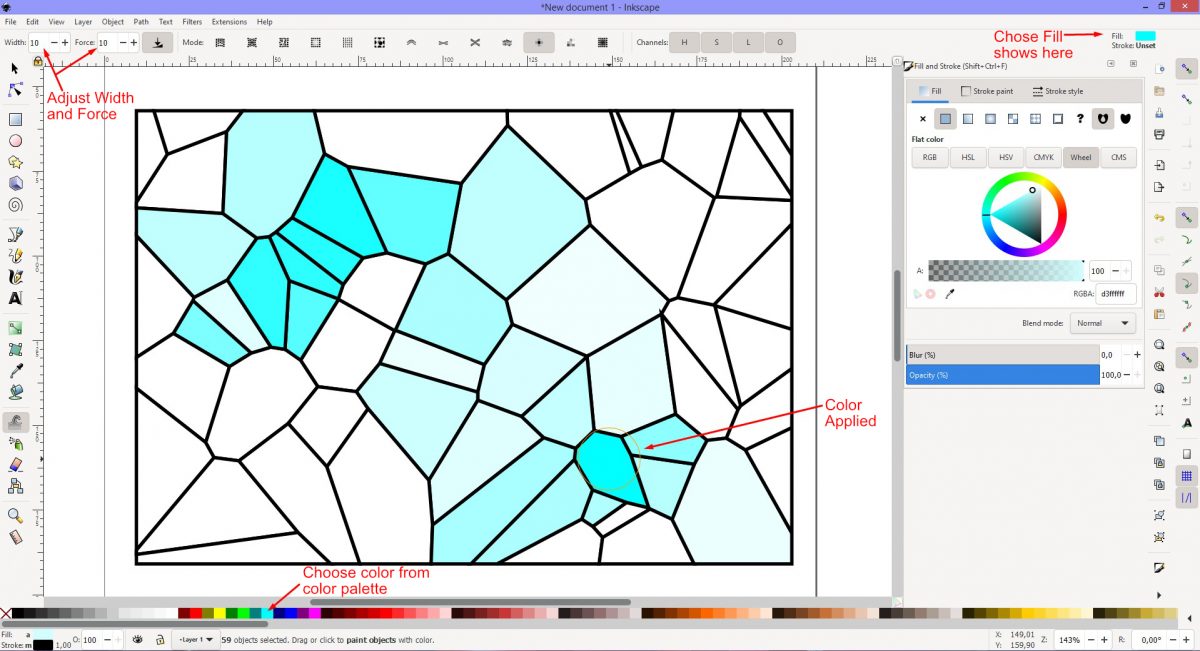
Choose a color from the bottom paint palette. You can also see the color choice top right. Now click and drag your mouse over the mosaic. As you click + drag, the color will be added in varying shades. Moving your mouse repeatedly over an area increases the color strength. Adjust the Width and Force as you paint to change the area covered and intensity.
Create a colorful mosaic by alternating between colors.
If you liked this tutorial make sure to check out our guides on warping text in Inkscape, creating an offset in Inkscape, and using digital papers in Inkscape.
Step 1 - Draw a rectangle pattern
Begin by opening Inkscape and draw out the shape for the Voronoi pattern. On the left side click on Create Rectangles and Squares. Draw out the rectangle to the size you want.
The color and stroke need to be changed. Click on the Object menu at the top and select Fill and Stroke. The menu will open on the right hand side. Adjust the Fill to white and change the Stroke to black. The thickness of the Stroke can be adjusted to what you choose.
Step 2 - Use the Voronoi extension
With the rectangle selected go to the Extension menu at the top. Select Generate from path and click Voronoi Pattern. Change the number for the Average size of cell to between 40 and 80. This number will depend on the size of your rectangle. If the number goes too low it may slow your software down. The Size of Border number was set to 2. Click Apply then click Close.
Activating the Live Preview should give you a quick look at the result. However, sometimes this doesn't want to play along.
Step 3 - Convert object to pattern
In order to use the Tweak Tool we need to turn the pattern into individual parts. While the pattern is still selected, click Objects then Pattern and click Patterns to Object. Be sure only the pattern is selected when you do this.
Again, with only the pattern selected, click on the Path menu at the top and select Combine.
Now select both the pattern and the rectangle, click the Path menu again and select Division. The pattern separates into individual shapes. The Width can be changed under the Stroke Style.
An important adjustment is needed for the next step to work. The mosaic needs to be filled with a white color. Select all and use the Fill panel on the right hand side. Alternatively click on white on the bottom color palette.
Step 4 - Apply color with the Tweak Tool
The Tweak Tool or Tweak objects by sculpting or painting Tool is a multifunctional tool. We will use the coloring option that allows a variation in shades.
Click the Tweak Tool on the left side. At the top of the screen will be the editing options. Click on the mode at the top: Paint the tool's color upon selected objects. Adjust the Width and Force at the top left. If you want a brighter color increase the Force number. To paint a smaller area decrease the Width.
Choose a color from the bottom paint palette. You can also see the color choice top right. Now click and drag your mouse over the mosaic. As you click + drag, the color will be added in varying shades. Moving your mouse repeatedly over an area increases the color strength. Adjust the Width and Force as you paint to change the area covered and intensity.
Create a colorful mosaic by alternating between colors.
If you liked this tutorial make sure to check out our guides on warping text in Inkscape, creating an offset in Inkscape, and using digital papers in Inkscape.
Related Tutorials
Inkscape Tutorials
How to Create Decorative Borders in Inkscape
Discover how to create a decorative border with this step-by-step Inkscape tutorial.
Inkscape Tutorials
How to Make a Seamless Pattern in Inkscape
Discover how to make a seamless pattern Inkscape using a template.
Inkscape Tutorials
How to Create and Save Color Palettes in Inkscape
Discover how to create and save color palettes in Inkscape with this tutorial.
Inkscape Tutorials
How to Create Perspective Text in Inkscape
Add dimension to your design with Perspective Text in Inkscape with this step by step tutorial.
Inkscape Tutorials
How to Trace in Inkscape Using Single Scan
In this in-depth tutorial, discover how to trace in Inkscape using Single Scan
Inkscape Tutorials
How to Create an Offset in Inkscape
If you need a font to be thicker, we'll show you how to create an offset in Inkscape.