By Design Bundles
Inkscape Tutorials11 min
How to Make a Knockout Design in Inkscape
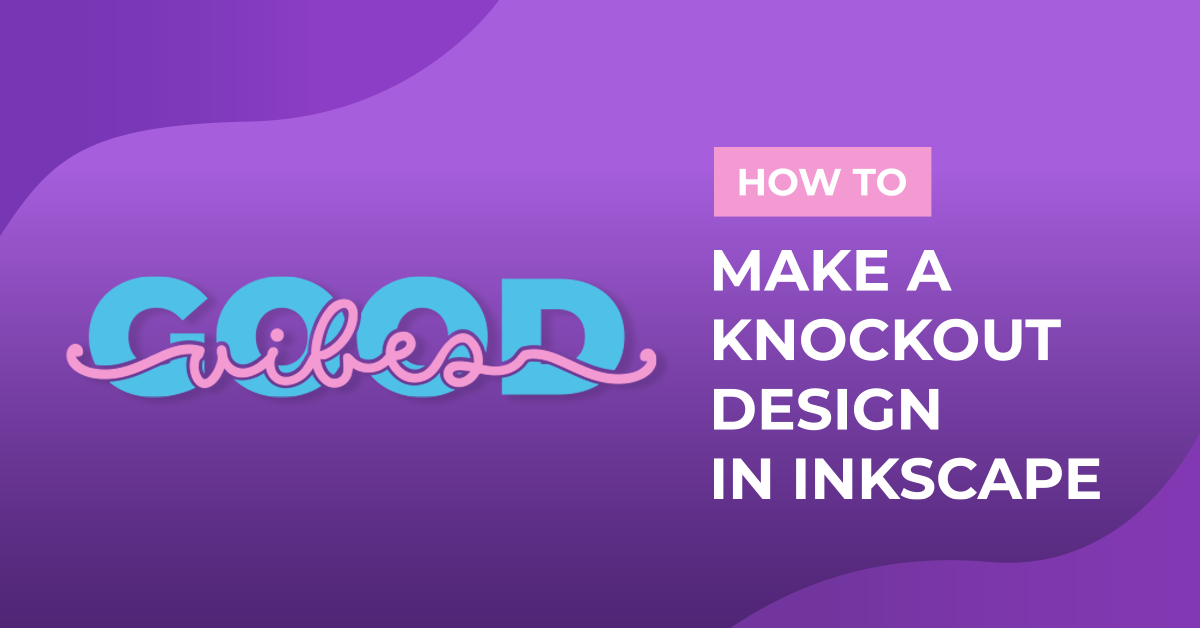
Inkscape is a great free open source program for creating a knockout design. The knockout method is where two designs overlap and one is knocked out of the other. This method is very popular with layering vinyl projects.
In this tutorial we are using a heart script font called Heart You, and bold sans serif font called Foxy.
To begin, click on Inkscape to open and click on New Document.
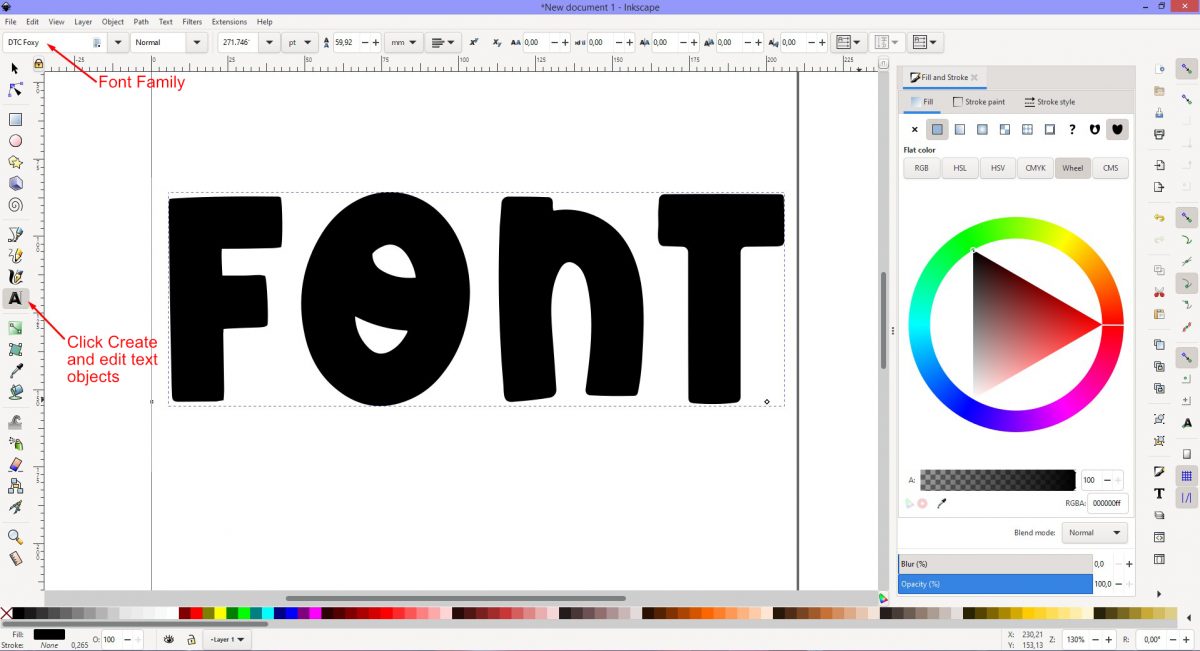
For this knockout method, two text objects will be used. For the main text object, click on the Create and edit text object tool (symbol A). This can be found on the left side panel.
On the canvas click anywhere and type out your text. Choose a thick, bold font from the Font Family top left of the screen. For the main text the font Foxy was used.
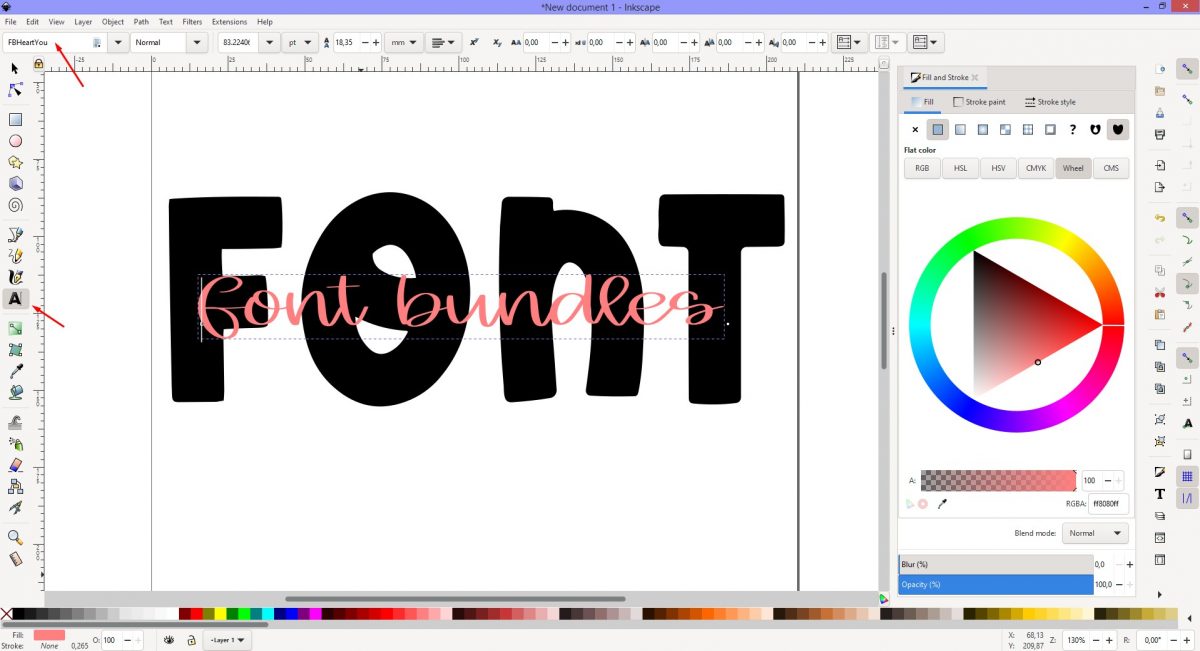
For the second text, we will use the Heart You font. This text will be smaller and fit over the main text. We will also be adding glyphs in the next step.
Click the Create and edit text objects tool and type out your second text. Change the font and color then resize the text.
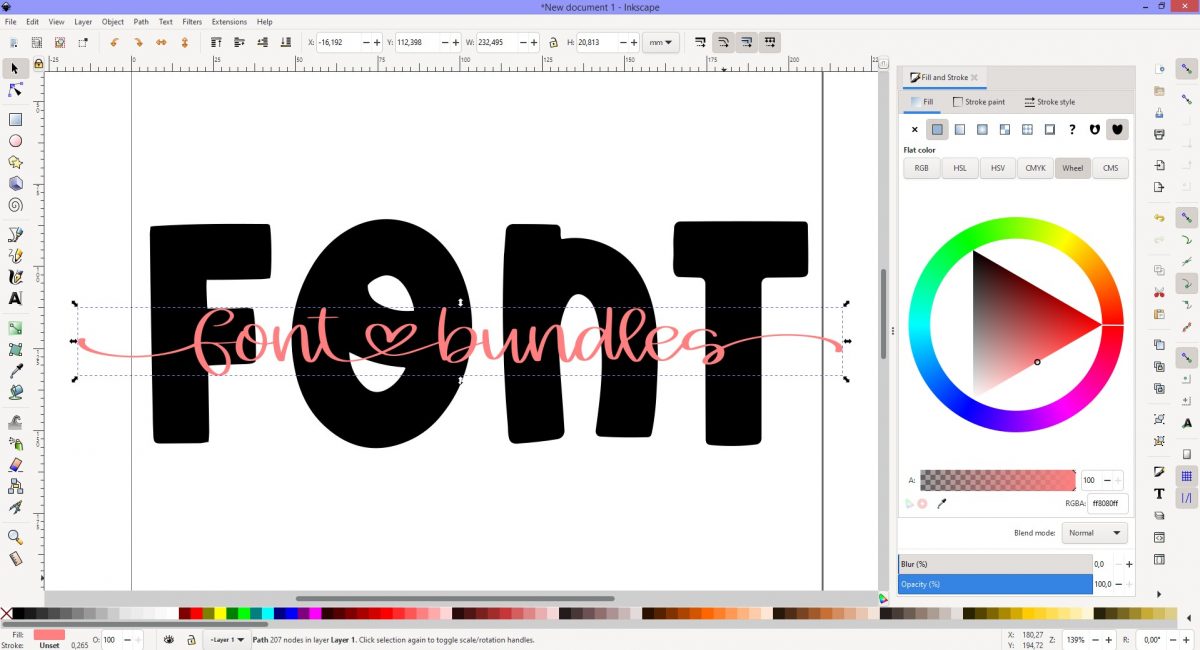
A glyph is a shape like a heart either on its own or attached to a letter. There are many Valentine fonts available with lovely glyphs for knockout projects.
Use the Character Map to access a glyph and use it in Inkscape. The Character Map tool is used for viewing installed font characters. Follow our excellent tutorial on accessing font glyphs in Inkscape.
Select a glyph in Character Map and copy it. Go back to Inkscape and click the text to enter Text Edit mode. Paste the glyph either by right-clicking and Paste or Ctrl + V. Repeat this for as many glyphs as you want. Some glyphs will add length to the text so you may need to resize.
To create the knockout effect we use the Linked Offset option. We first need to convert both texts to paths. Select the main text, click Path top left of the screen, and select Object to Path. Repeat this for the second smaller text.
Move the Font Bundles text below the main text. Select the Font Bundles text, click on the Path menu, and then Linked Offset. While the offset is still selected, change the color. The offset is a duplicate of the text placed beneath it. When changing the color you will see a faint outline.
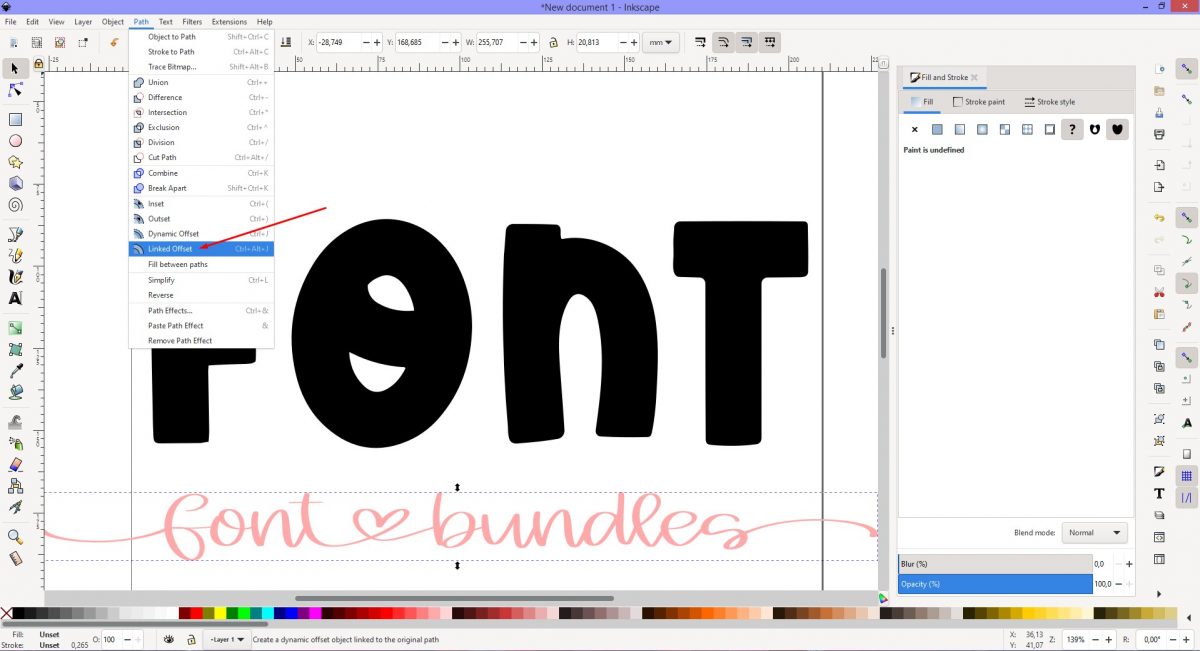
At the top of the offset is a small triangle. Hold down Shift and click + drag this diamond slowly up. The offset will become thicker. Press Escape once you are done editing the offset.
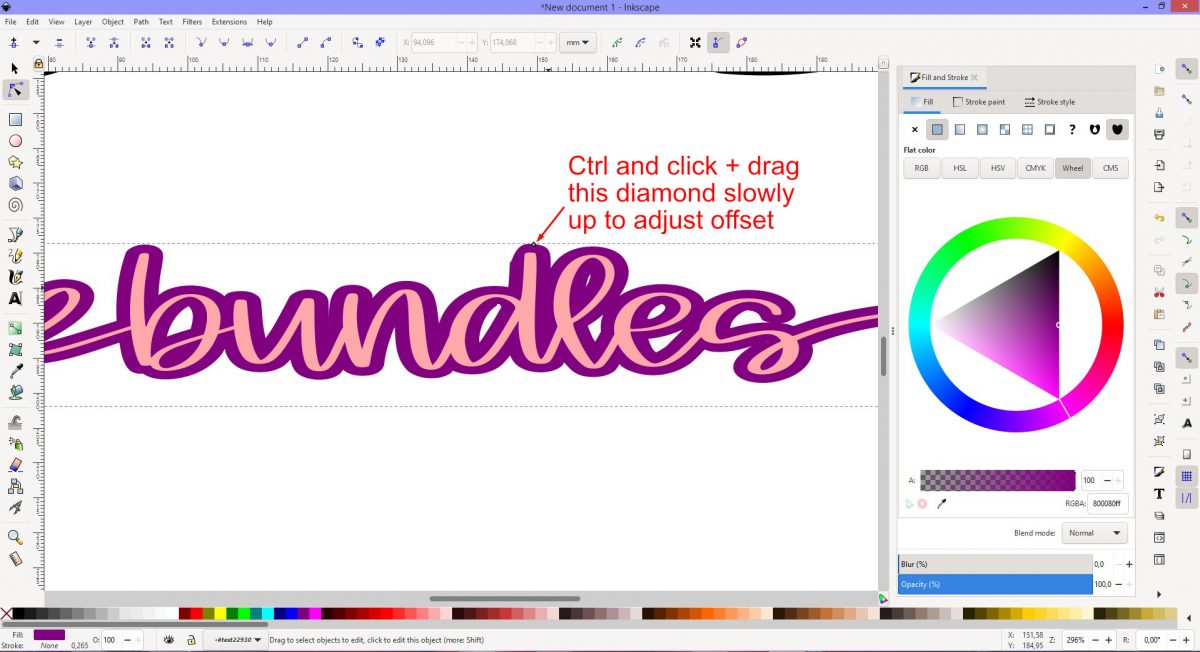
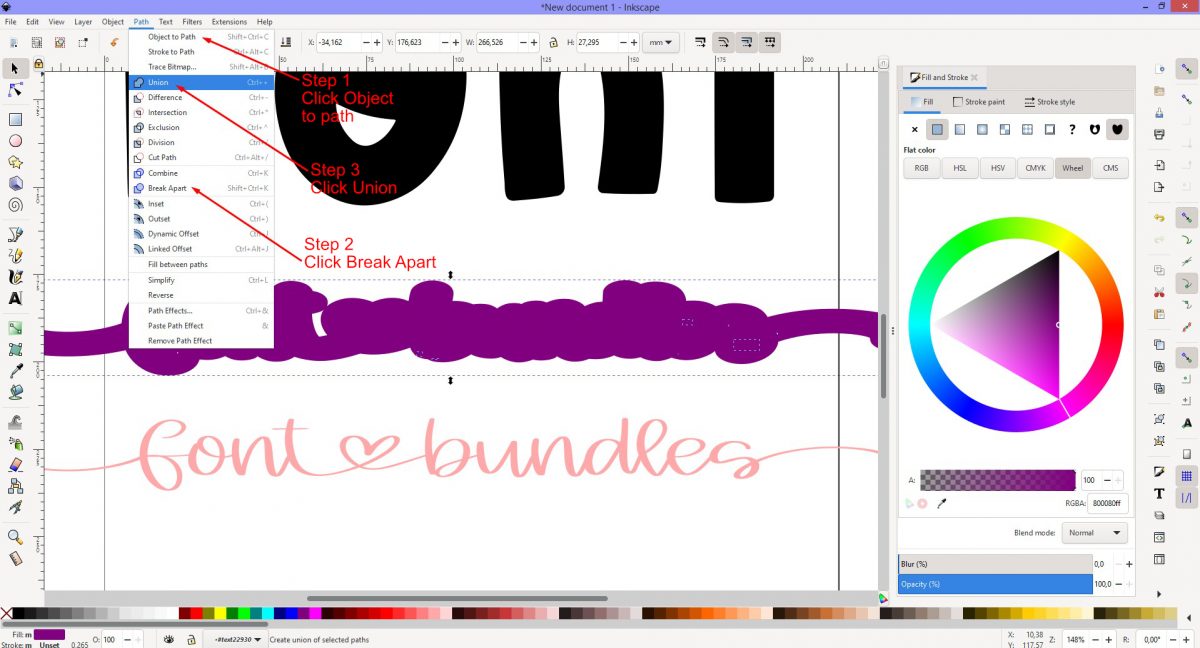
Separate the text and offset and make the offset a single closed path. Select it and click Path then Object to Path. Click the Path menu again and this time select Break Apart.
The offset has been broken up into individual objects. While these objects are still selected, click Path one more time and select Union.
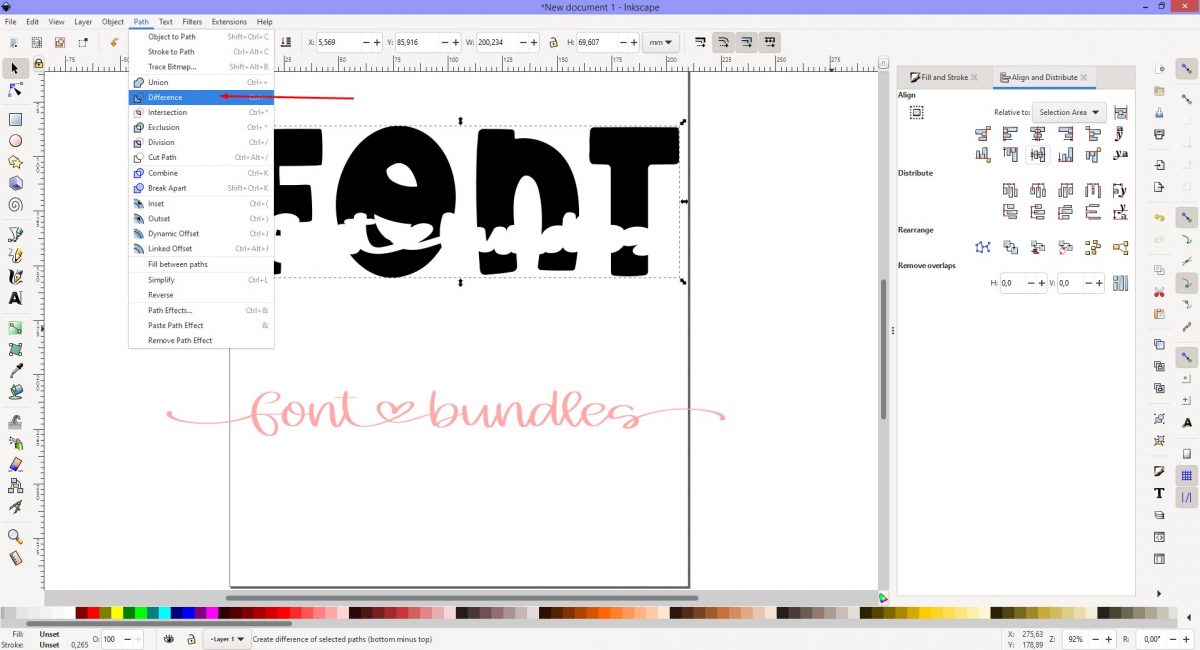
In the final step, we will create the knockout using the Difference tool. Position the offset over the main text. To align the text objects click on the Object menu and click Align and Distribute. Click on the Center on Vertical Axis option.
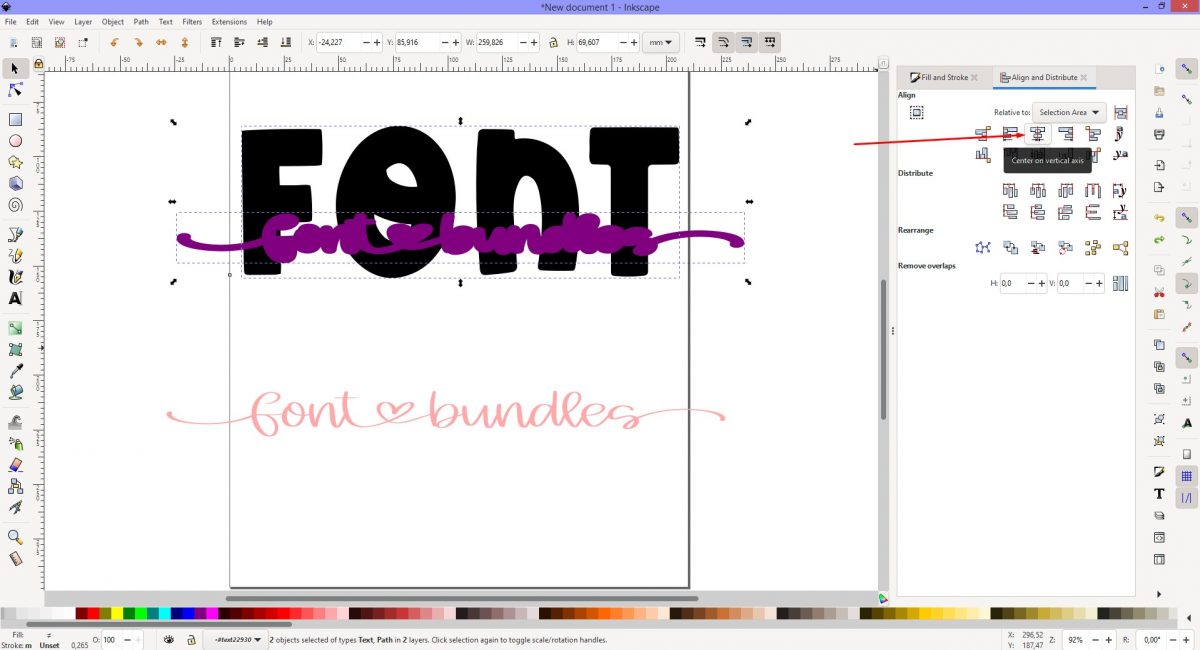
Drag a selection box around the main text and offset. Click on the Path menu and click on Difference.
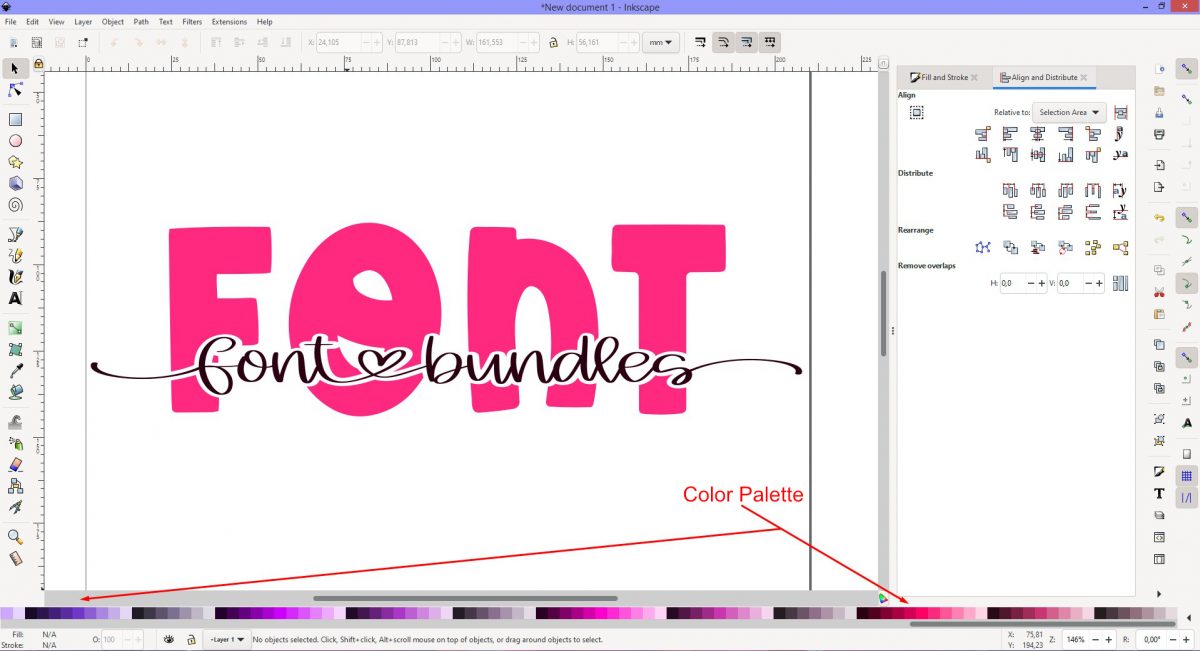
Click on the Font Bundle text and reposition over the knockout space in the main text. Adjust the color of the text objects using the color palette at the bottom of the screen.
Save the design as an SVG in order to use it as a cutting file. Click File and Save As. Under the Save as File Type select Plain SVG.
Your stylish knockout is now ready for your projects from layering HTV to personalized keychains.
Check out our other Inkscape tutorials like how to offset, and how to use digital papers.
In this tutorial we are using a heart script font called Heart You, and bold sans serif font called Foxy.
To begin, click on Inkscape to open and click on New Document.
Step 1 - Type out the text
For this knockout method, two text objects will be used. For the main text object, click on the Create and edit text object tool (symbol A). This can be found on the left side panel.
On the canvas click anywhere and type out your text. Choose a thick, bold font from the Font Family top left of the screen. For the main text the font Foxy was used.
For the second text, we will use the Heart You font. This text will be smaller and fit over the main text. We will also be adding glyphs in the next step.
Click the Create and edit text objects tool and type out your second text. Change the font and color then resize the text.
Step 2 - Add a heart glyph
A glyph is a shape like a heart either on its own or attached to a letter. There are many Valentine fonts available with lovely glyphs for knockout projects.
Use the Character Map to access a glyph and use it in Inkscape. The Character Map tool is used for viewing installed font characters. Follow our excellent tutorial on accessing font glyphs in Inkscape.
Select a glyph in Character Map and copy it. Go back to Inkscape and click the text to enter Text Edit mode. Paste the glyph either by right-clicking and Paste or Ctrl + V. Repeat this for as many glyphs as you want. Some glyphs will add length to the text so you may need to resize.
Step 3 - Create a linked offset
To create the knockout effect we use the Linked Offset option. We first need to convert both texts to paths. Select the main text, click Path top left of the screen, and select Object to Path. Repeat this for the second smaller text.
Move the Font Bundles text below the main text. Select the Font Bundles text, click on the Path menu, and then Linked Offset. While the offset is still selected, change the color. The offset is a duplicate of the text placed beneath it. When changing the color you will see a faint outline.
At the top of the offset is a small triangle. Hold down Shift and click + drag this diamond slowly up. The offset will become thicker. Press Escape once you are done editing the offset.
Separate the text and offset and make the offset a single closed path. Select it and click Path then Object to Path. Click the Path menu again and this time select Break Apart.
The offset has been broken up into individual objects. While these objects are still selected, click Path one more time and select Union.
Step 4 - Create the knockout
In the final step, we will create the knockout using the Difference tool. Position the offset over the main text. To align the text objects click on the Object menu and click Align and Distribute. Click on the Center on Vertical Axis option.
Drag a selection box around the main text and offset. Click on the Path menu and click on Difference.
Click on the Font Bundle text and reposition over the knockout space in the main text. Adjust the color of the text objects using the color palette at the bottom of the screen.
Save the design as an SVG in order to use it as a cutting file. Click File and Save As. Under the Save as File Type select Plain SVG.
Your stylish knockout is now ready for your projects from layering HTV to personalized keychains.
Check out our other Inkscape tutorials like how to offset, and how to use digital papers.
Related Tutorials
Illustrator Tutorials
How to Make a Knockout Design in Illustrator
Using Adobe Illustrator, you can create a Knockout Text Effect.
Cricut Tutorials
How to make a Knockout Design in Cricut Design Space
Affinity Tutorials
How to Make a Knockout Design in Affinity Designer
Inkscape Tutorials
How to Make an SVG in Inkscape
In this tutorial, discover how to make and save a SVG in Inkscape.
Inkscape Tutorials
How to Make a Gradient in Inkscape
Learn how to make a linear or radial gradient with a font in this step-by-step Inkscape tutorial.
Inkscape Tutorials
How to Make a Seamless Pattern in Inkscape
Discover how to make a seamless pattern Inkscape using a template.