By Design Bundles
Photoshop Tutorials18 min
How to Add Light Rays in Photoshop
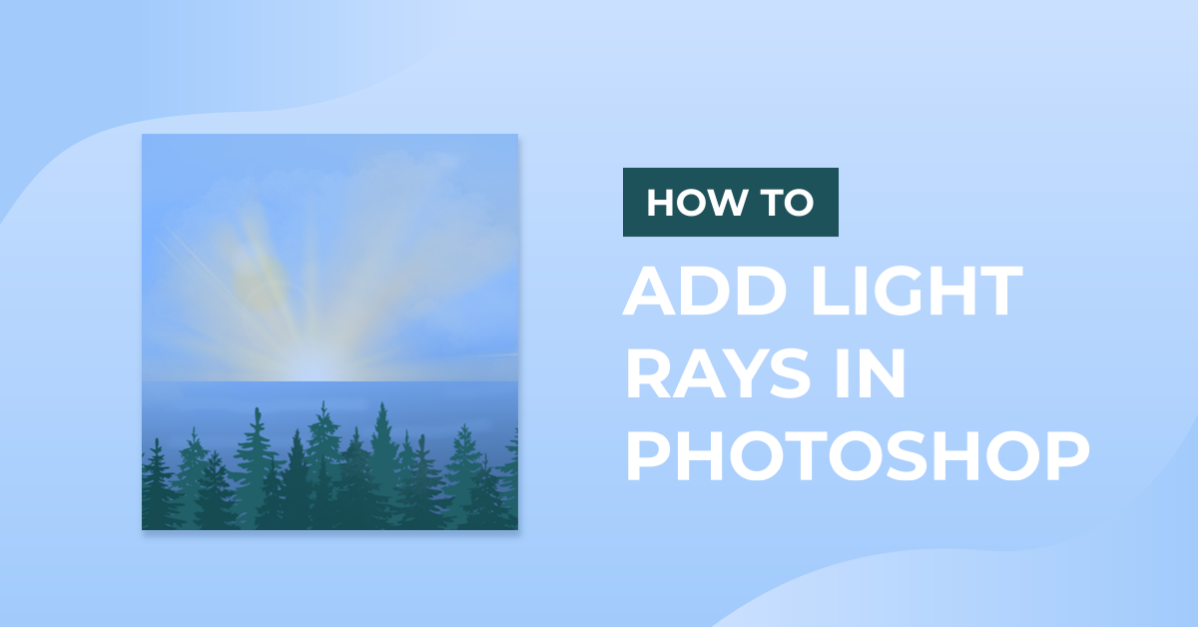
In this tutorial, we will learn how to add rays of sunlight to an image with Photoshop. This technique may prove really useful and can add an extra layer of depth to your images. It will come in handy if you weren’t lucky enough to capture the real ones on camera, or just to help you enhance the look of your image.
It is important to make sure that the image you chose is either lit from the back or from the side. If not, this kind of effect will not work properly.
For this one, we are using a sunset on lake photo from the nature photos collection on Design Bundles.
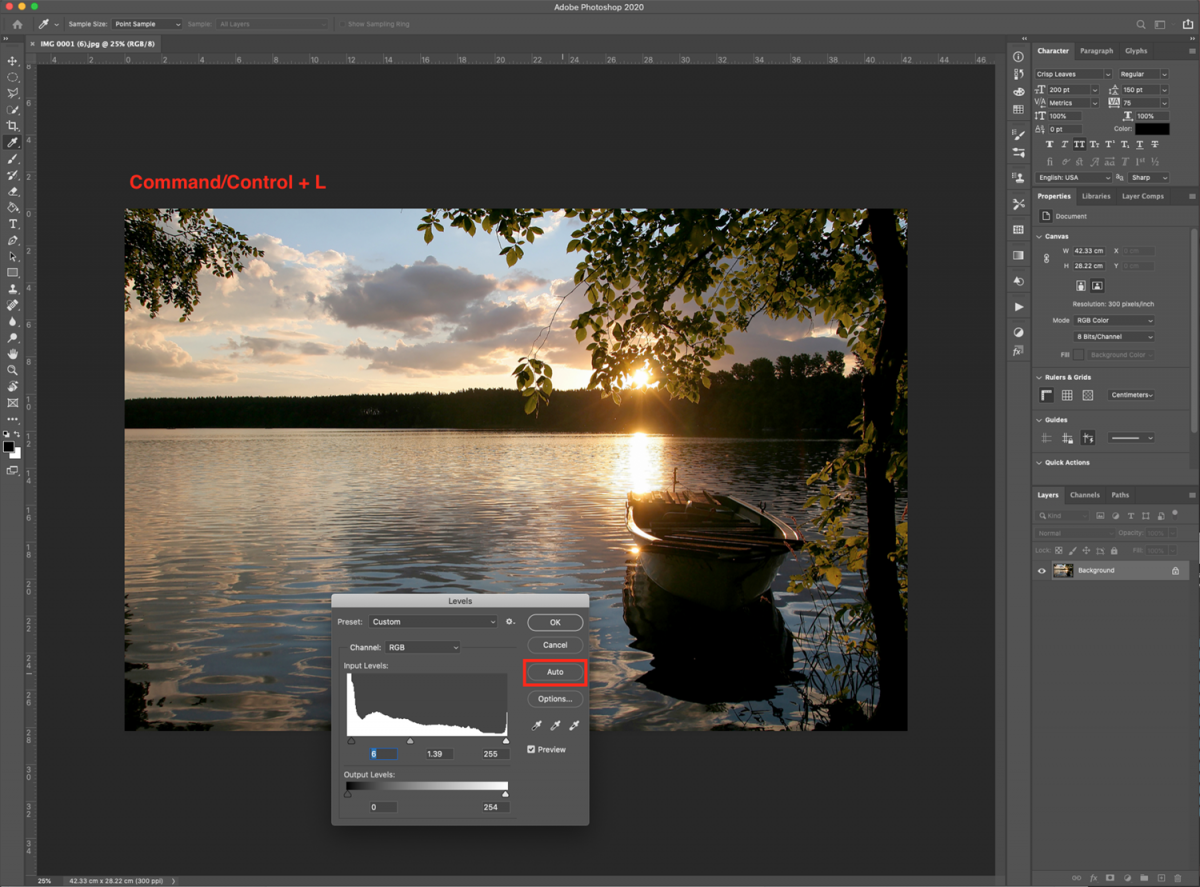
In Photoshop, open the image you chose. If you think that it needs some tweaking, go to Image > Adjustments > Levels (Command/Control + L) and click Auto to adjust it a bit.
It is always a good idea to leave a copy of your image untouched and work on a duplicate. Just in case you need to go back to the original one for any reason.
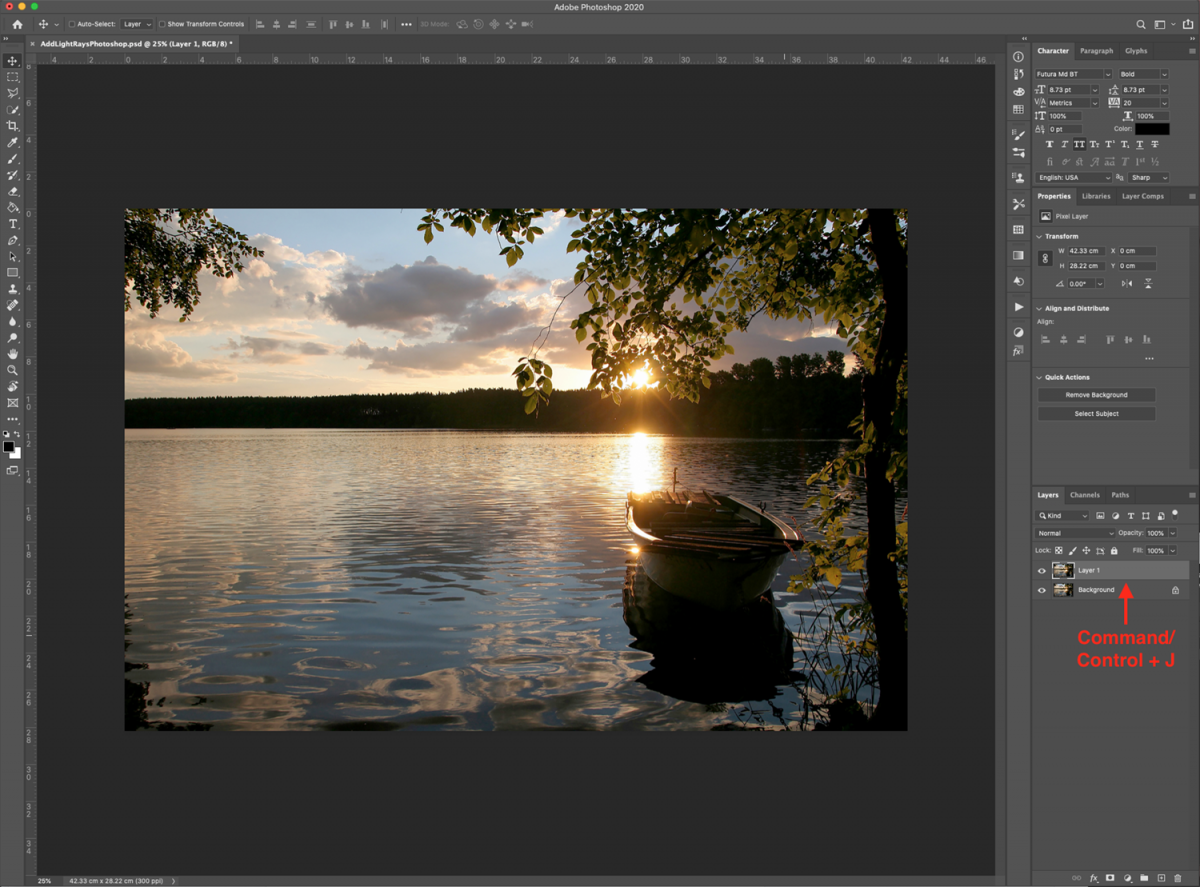
Type Command/Control + J to create the duplicate.
We need to isolate the areas of the image where the light rays will be placed.
To select them, go to Select > Color Range, choose Sampled Colors, and make sure that the Localized Color Clusters box is checked.
Then, click on the spots where the sky is. Use the small eyedropper icon with a + (plus) sign next to it to add to your selection until you have as much of the sky selected as possible.
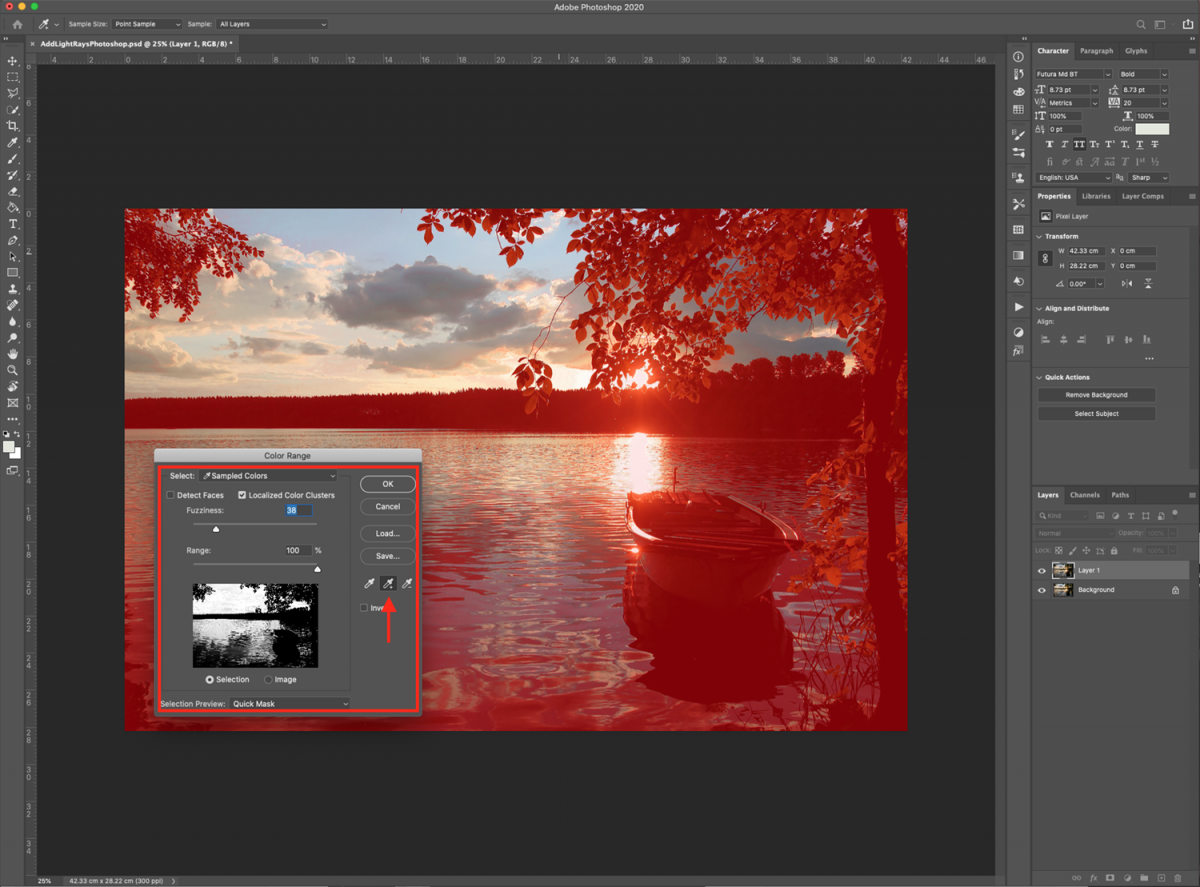
You should end up with a selection of the highlighted areas.
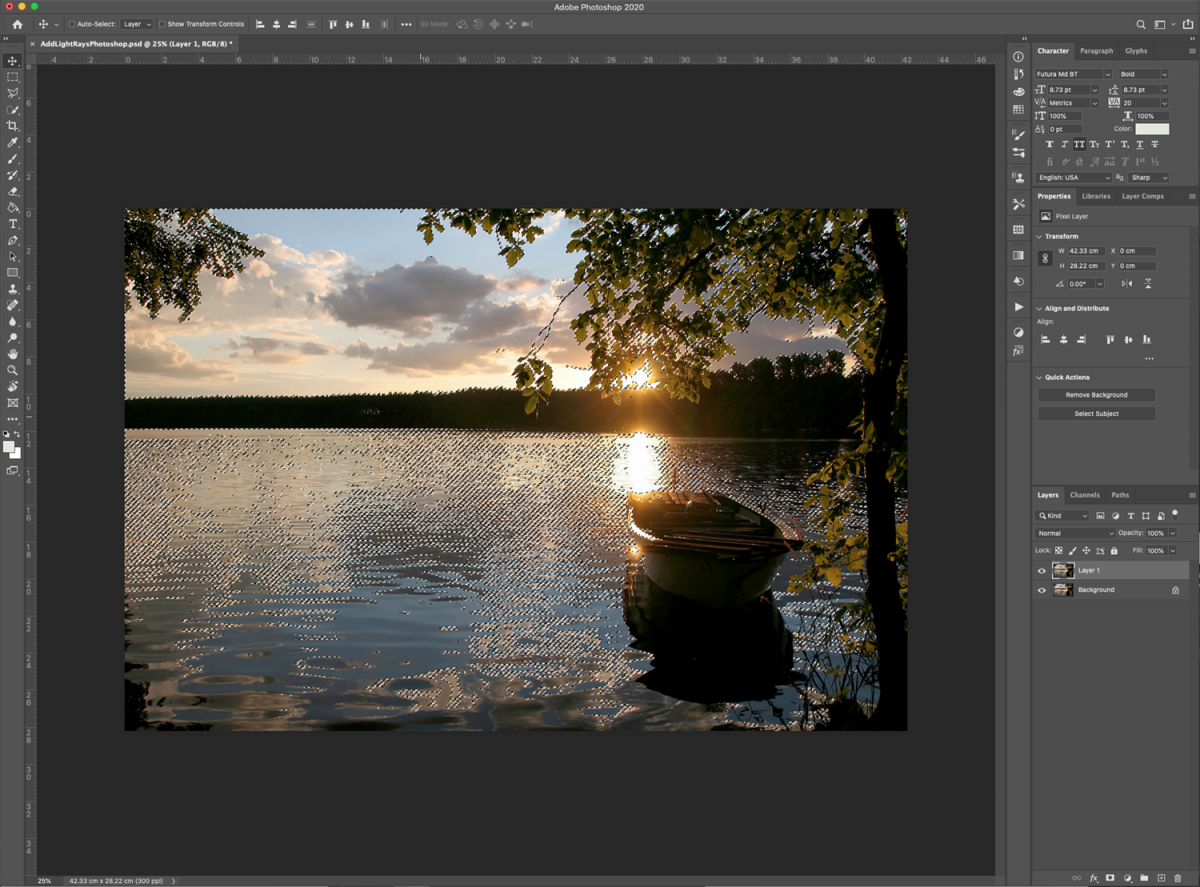
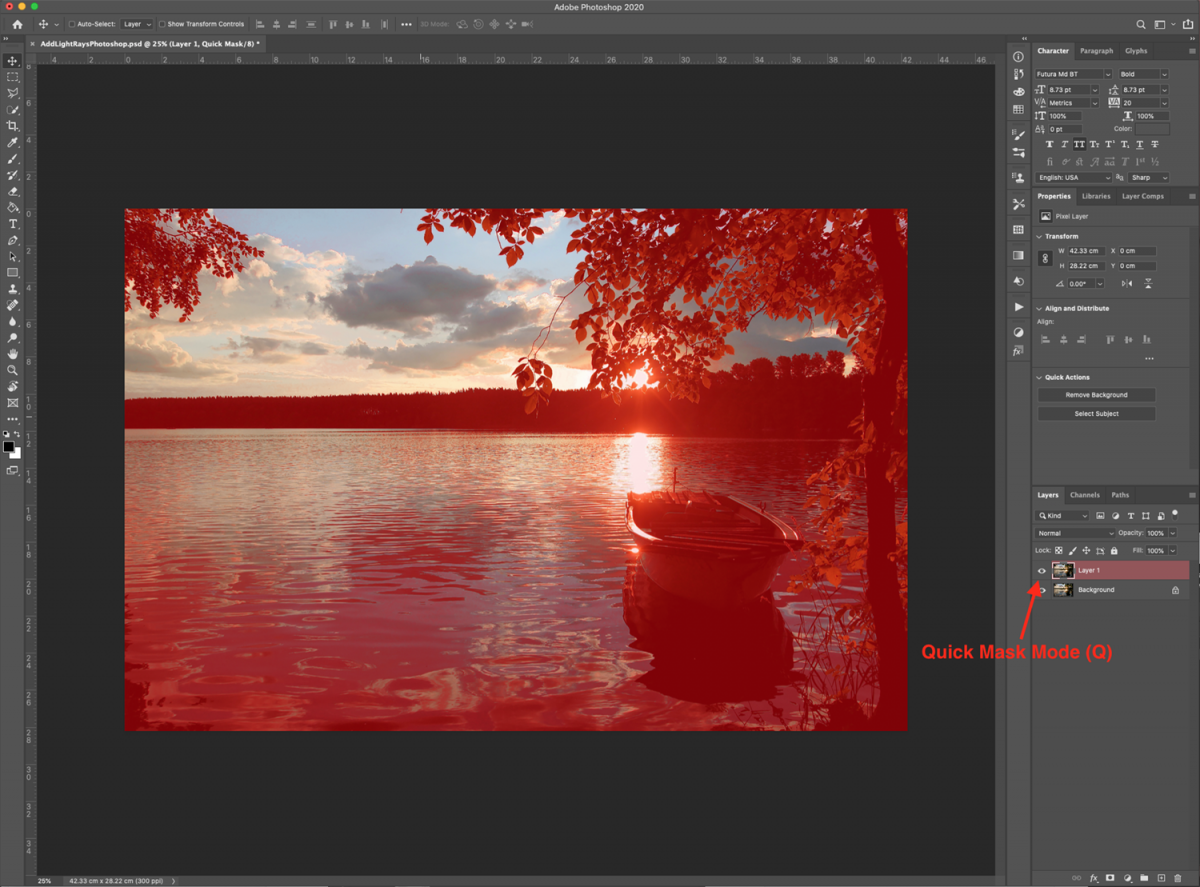
To clean up your selection, enter Quick Mask mode by clicking Q and check if there are some semi transparent spots, etc.
Use the Brush tool (B) with a large and hard brush (about 200 px and 100% hardness). Choose black as your Foreground color and erase the portions that need it.
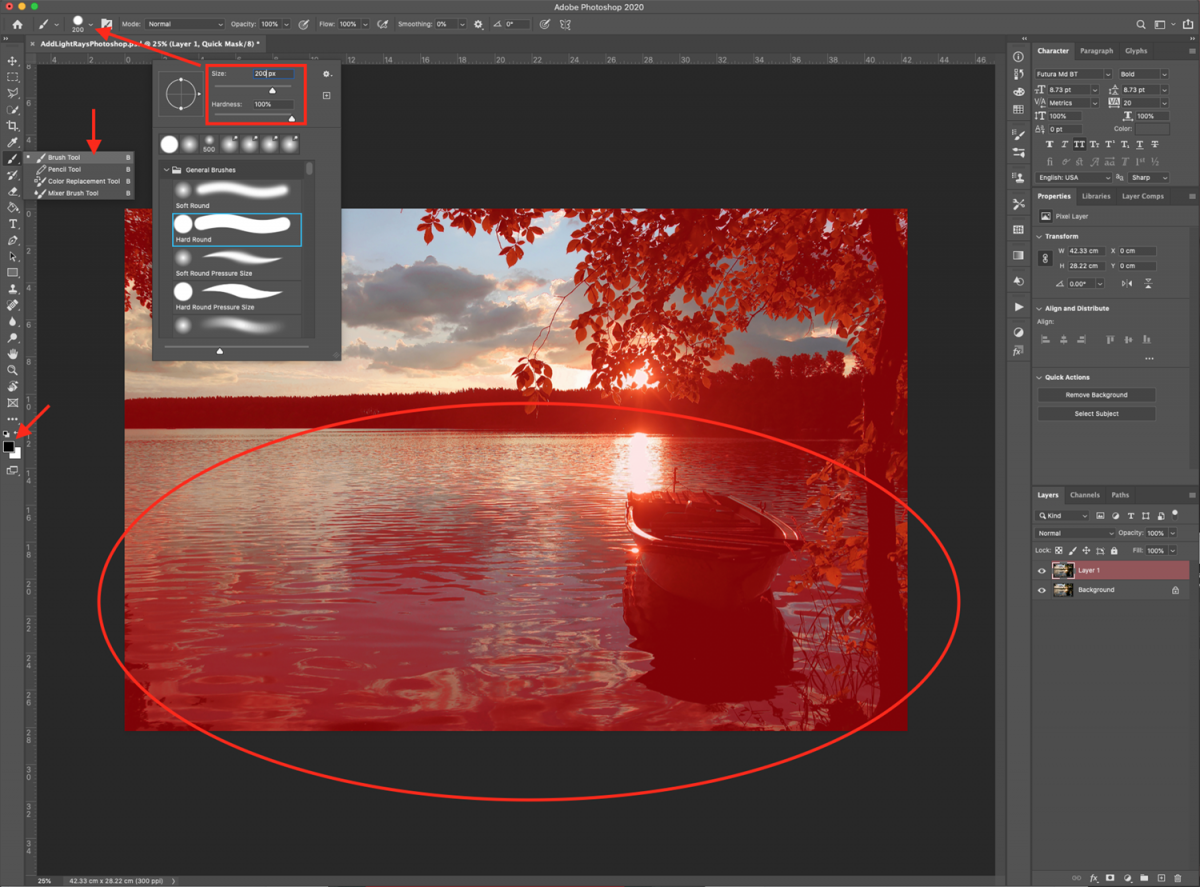
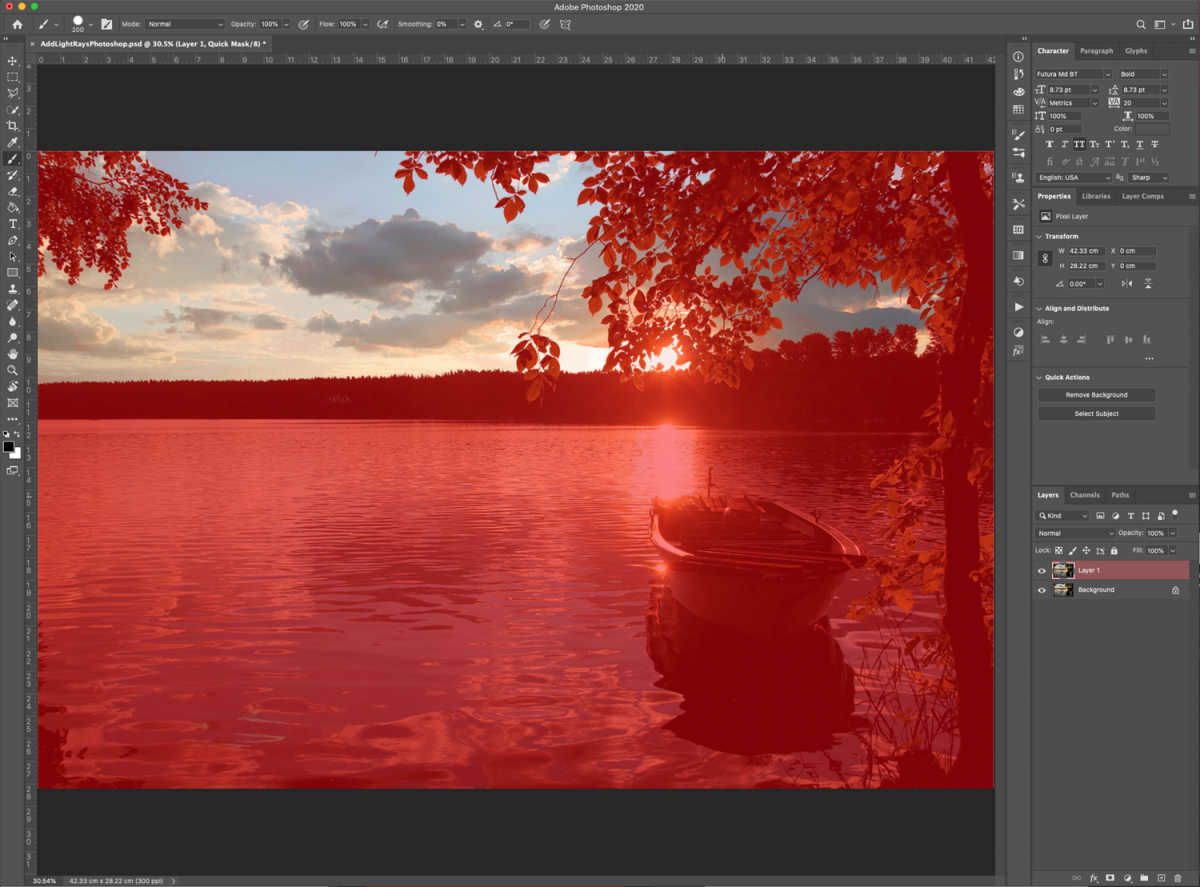
You may need to change the size of the brush and Swap fill and stroke (X) to change the Foreground color to white to add to the selection instead.
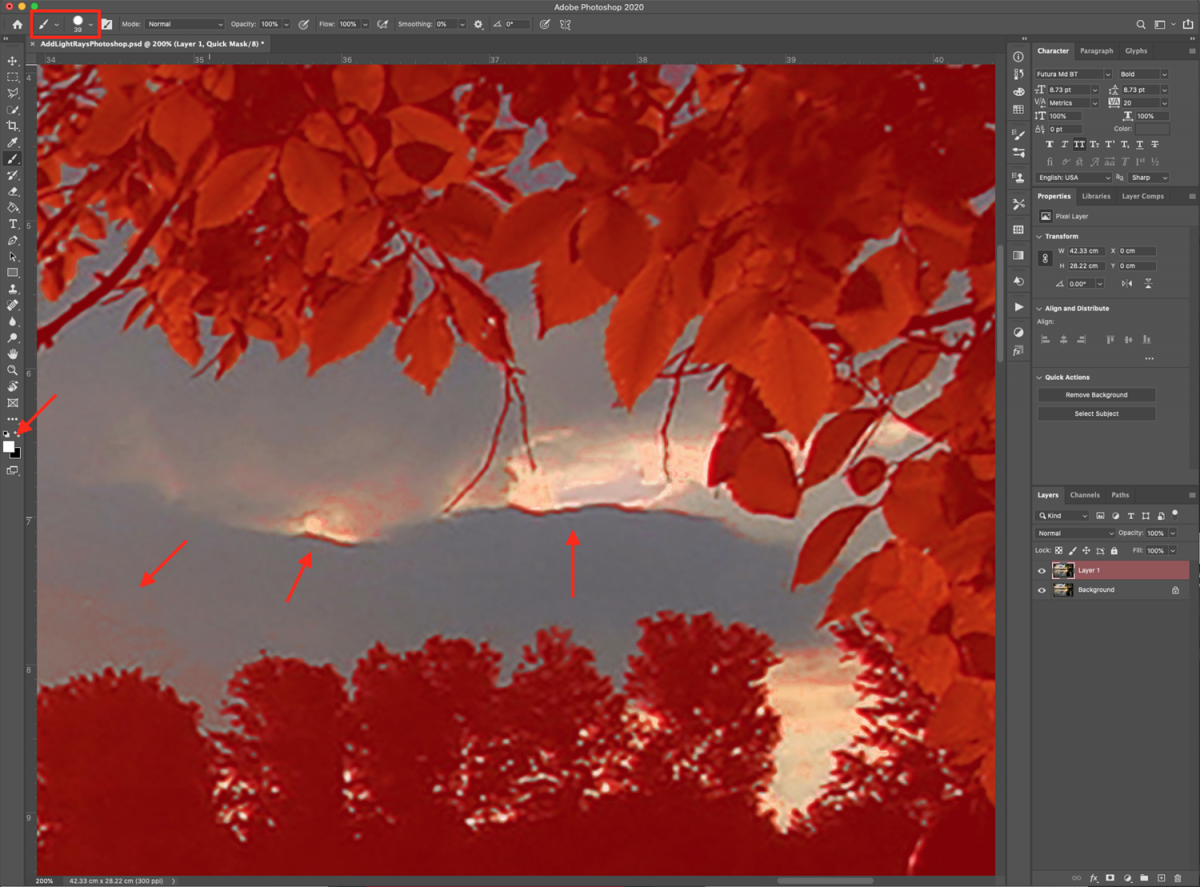
When you are done, click Q again to exit Quick Mask mode.
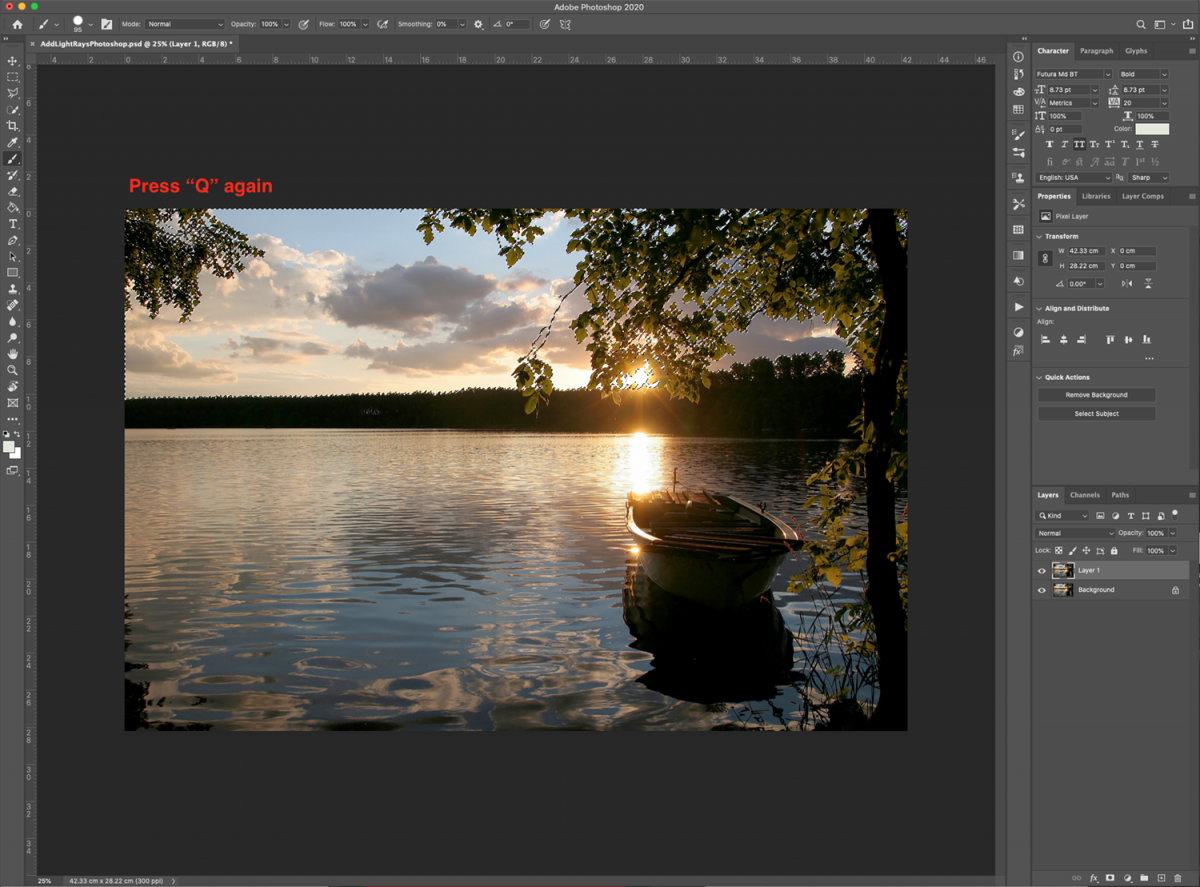
To create the light rays we are going to use a solid color layer with the selection and apply a filter to it.
Click on the small black & white circle at the bottom of the Layers panel and choose Solid Color from the dropdown menu.
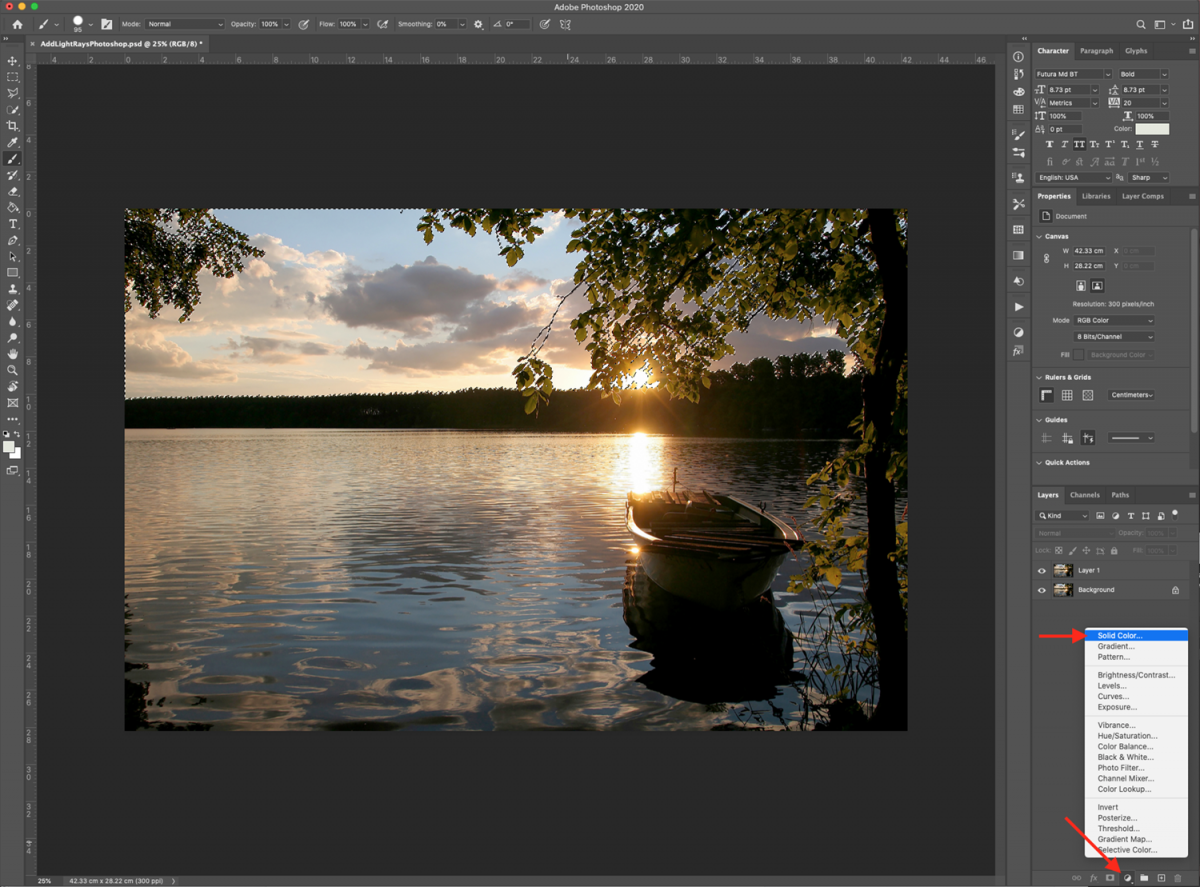
Use white (#ffffff) as Fill and click Ok.
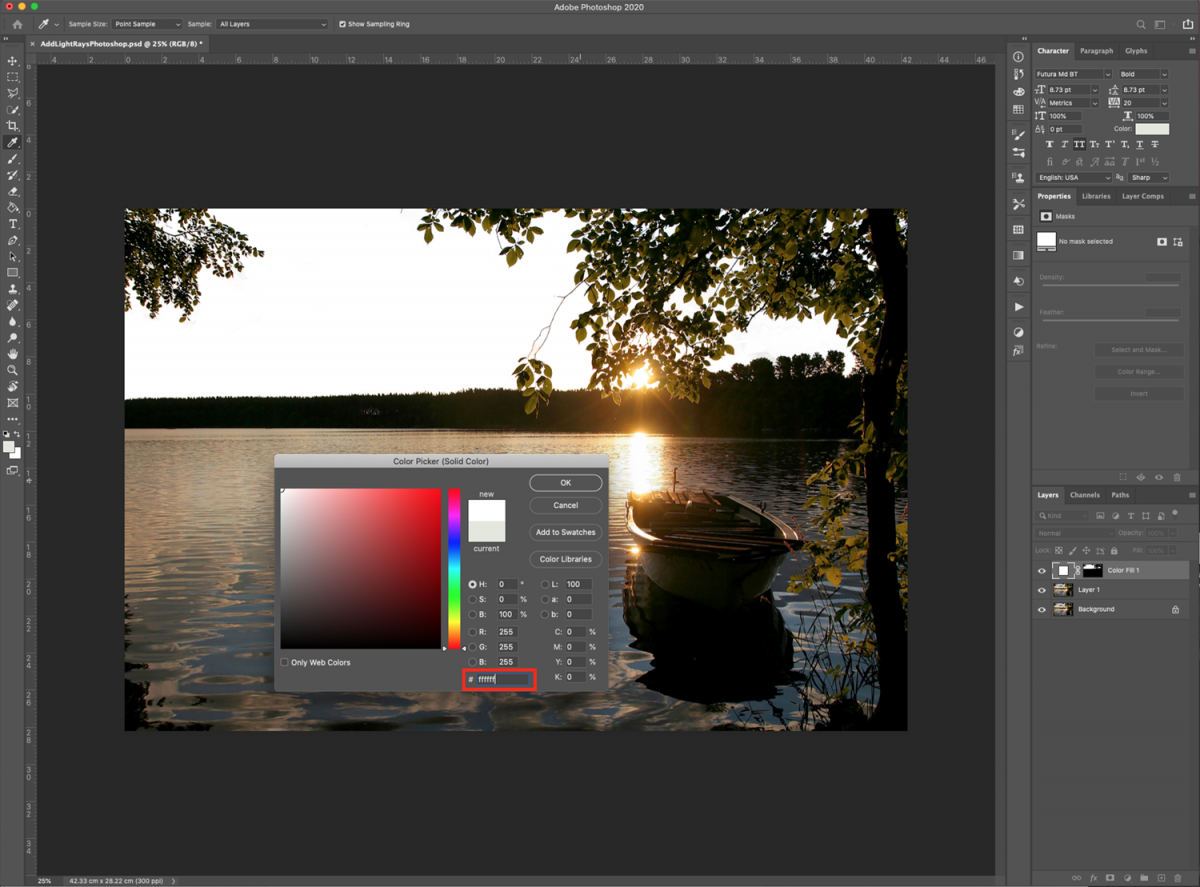
Right-click on top of your new layer’s thumbnail and choose Convert to Smart Object. This will let you apply filters to the color layer in a non destructive fashion.
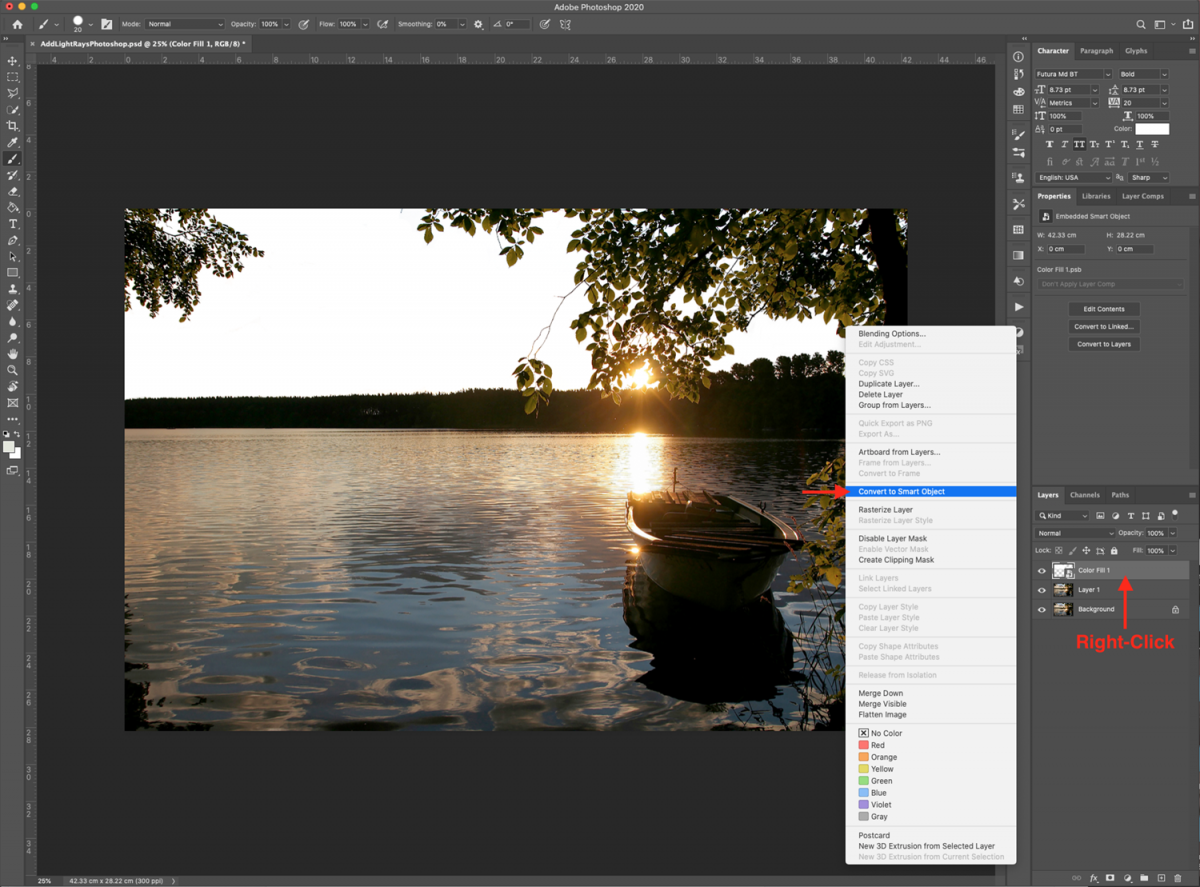
Now, we are going to distort the white color layer so it looks like light rays.
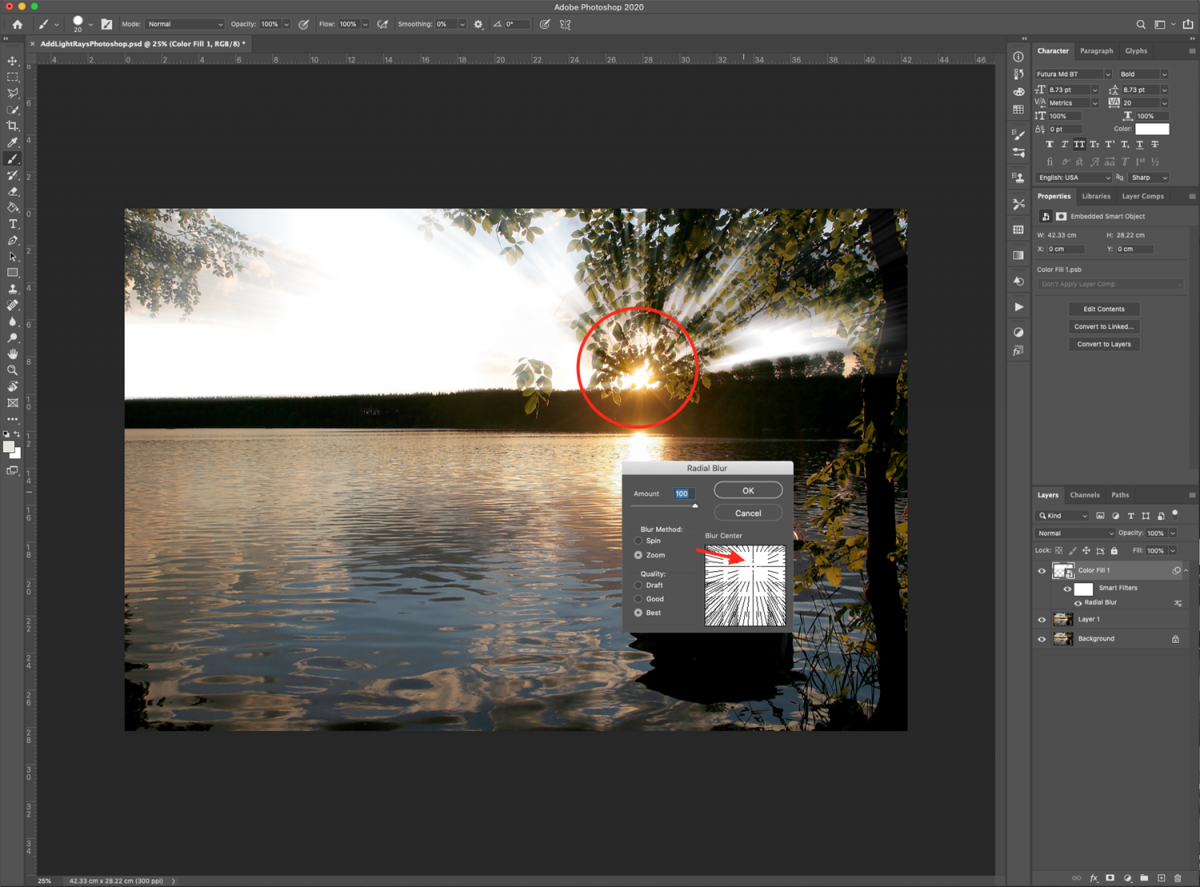
Go to Filter > Blur > Radial Blur. Then, locate the spot where you want the light source to be (in this case the sun) and drag the center of the thumbnail there.
Increase the Amount to around 100% and choose Zoom and Best as your other options.
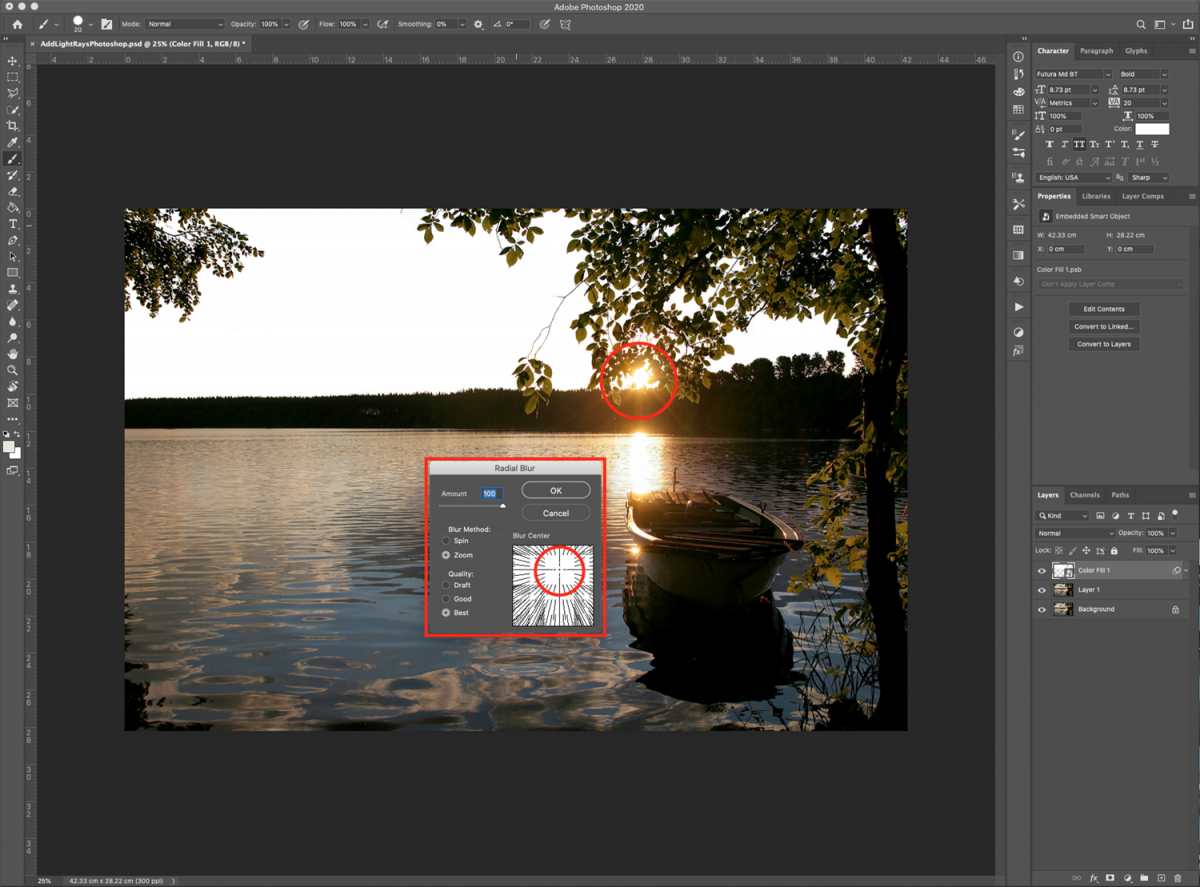
If you think the location of the light source is not right, just double-click on its thumbnail and change the position of the center in the filter.
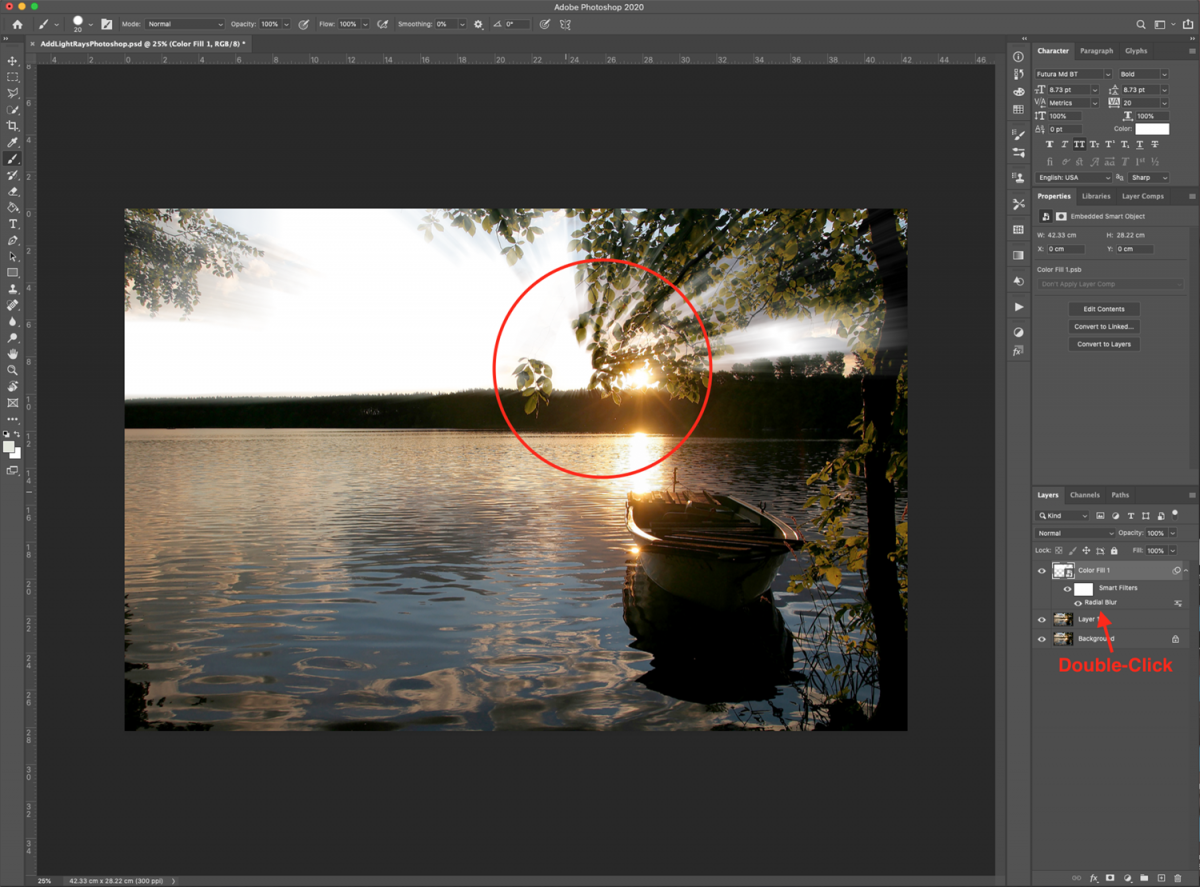
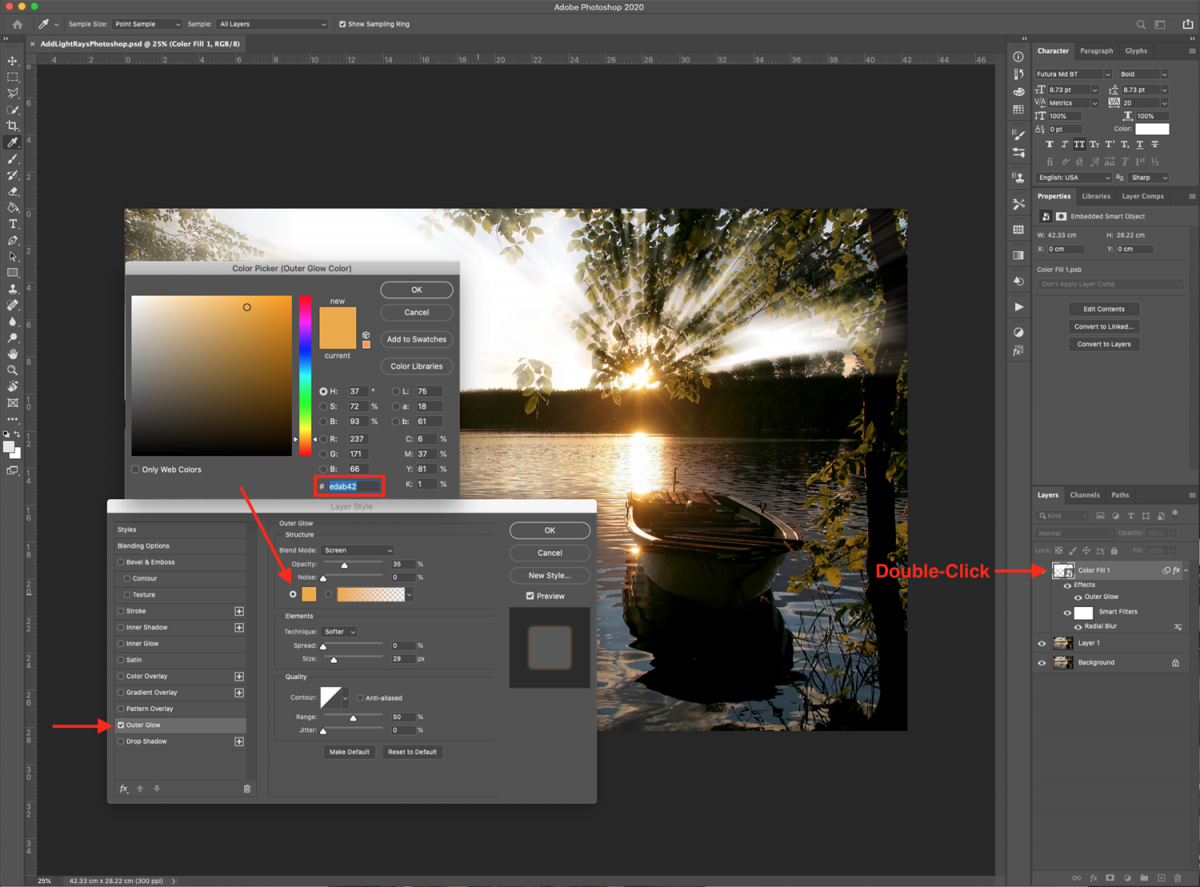
Double-click on top of your layer’s thumbnail and apply the following Layer Styles. In the Outer Glow tab click on the color (#edab42) and leave the other options with the default values. This will add a slight yellowish shine to the light rays.
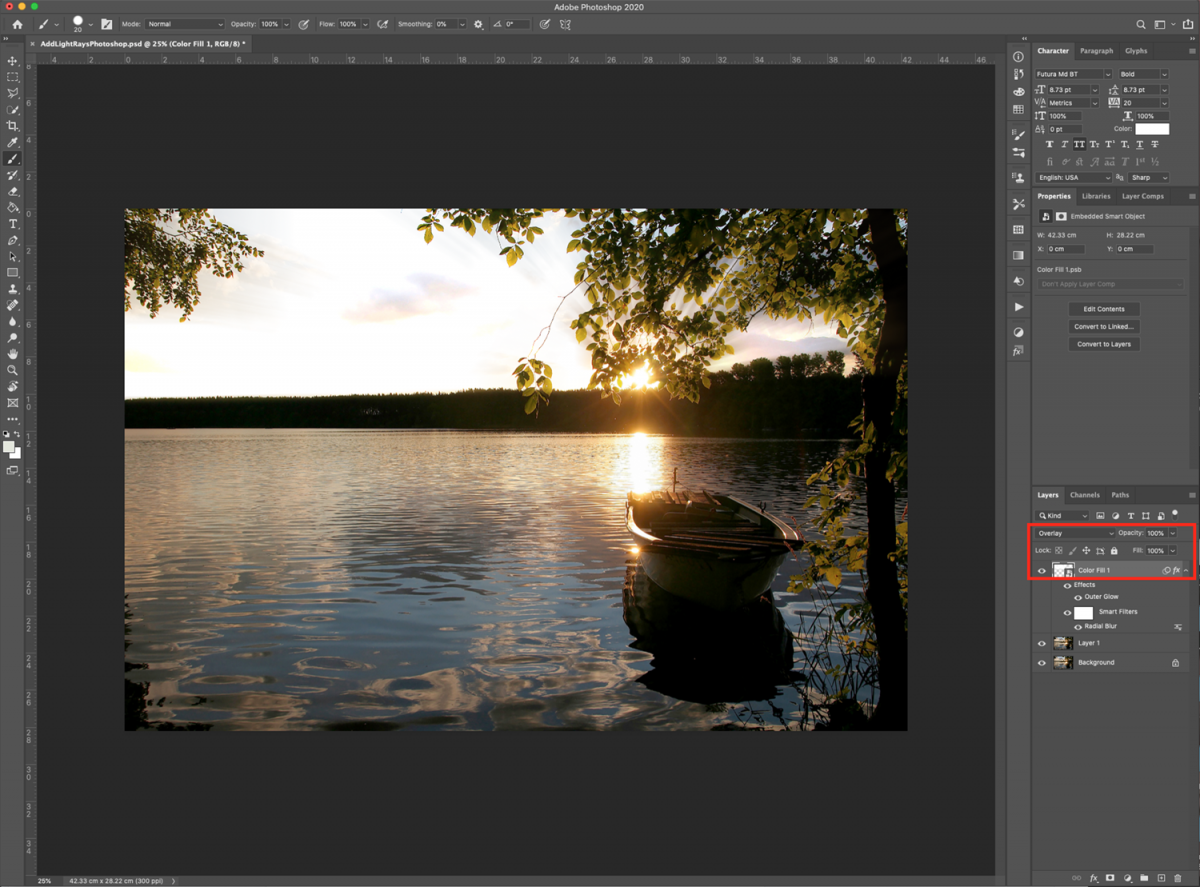
And change the Blending Mode of the layer to Overlay so it blends better with the background.
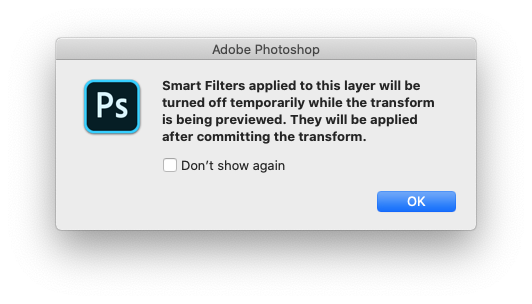
To elongate the rays and add more depth, duplicate your top-most layer (Command/Control + J) and go to Edit > Transform > Perspective. You may get a pop-up telling you that Smart Filters will be temporarily turned off, click Ok.
Pull the lower corners in or out depending on your image to adjust the perspective of the light rays. Don’t commit the changes yet.
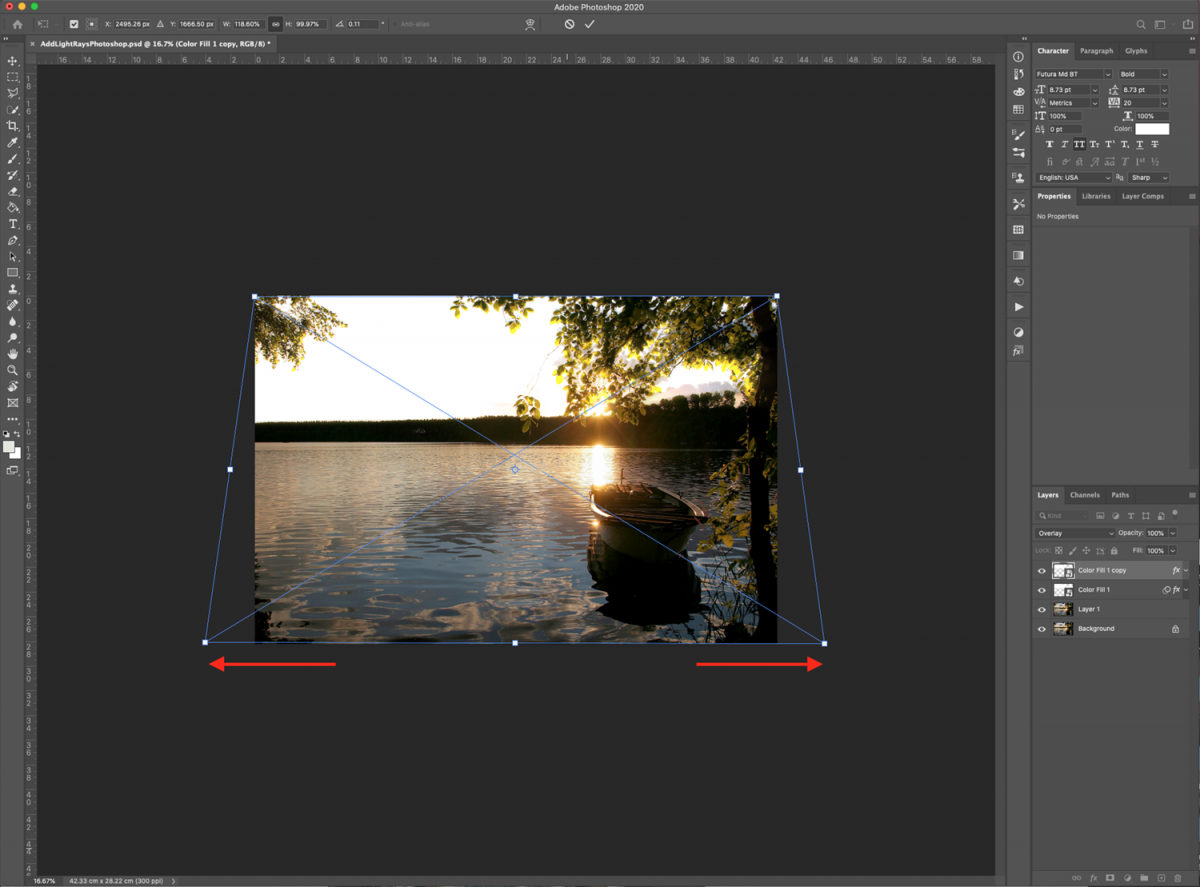
Go back to the Transform menu, and choose Distort this time. Pull down the upper part and flatten the rays. Once you are done, hit Enter or click the check mark on the top menu to commit the changes.
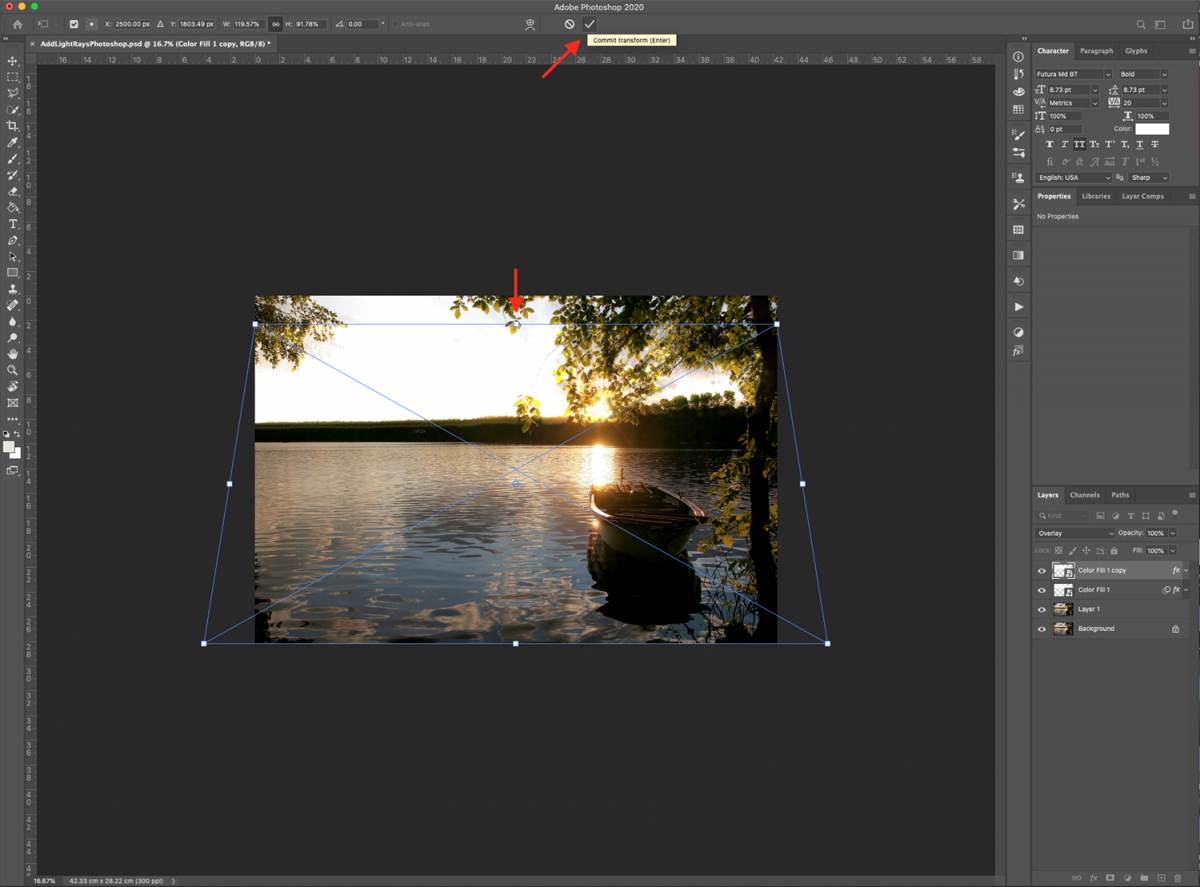
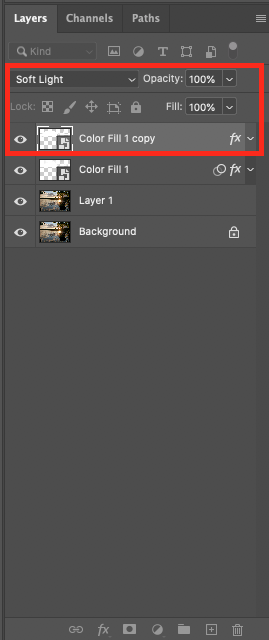
Finally, change the Blending Mode of this layer to Soft Light.
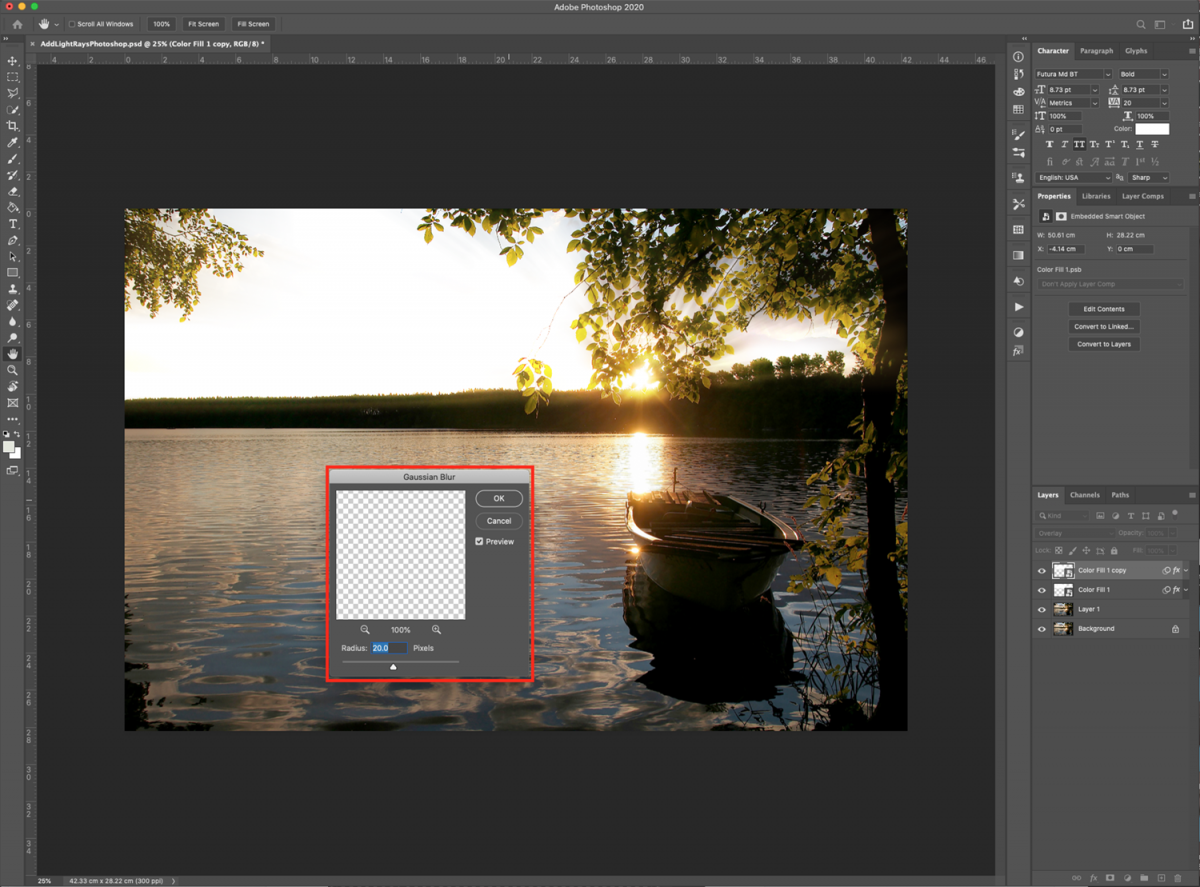
To smooth the rays a bit, go to Filter > Blur > Gaussian Blur, and use a 20 pixels Radius.
Next, we are going to add a flair effect to the image with a filter on a blended layer.
Create a new layer on top of everything by clicking on the small button at the bottom of the Layers panel.
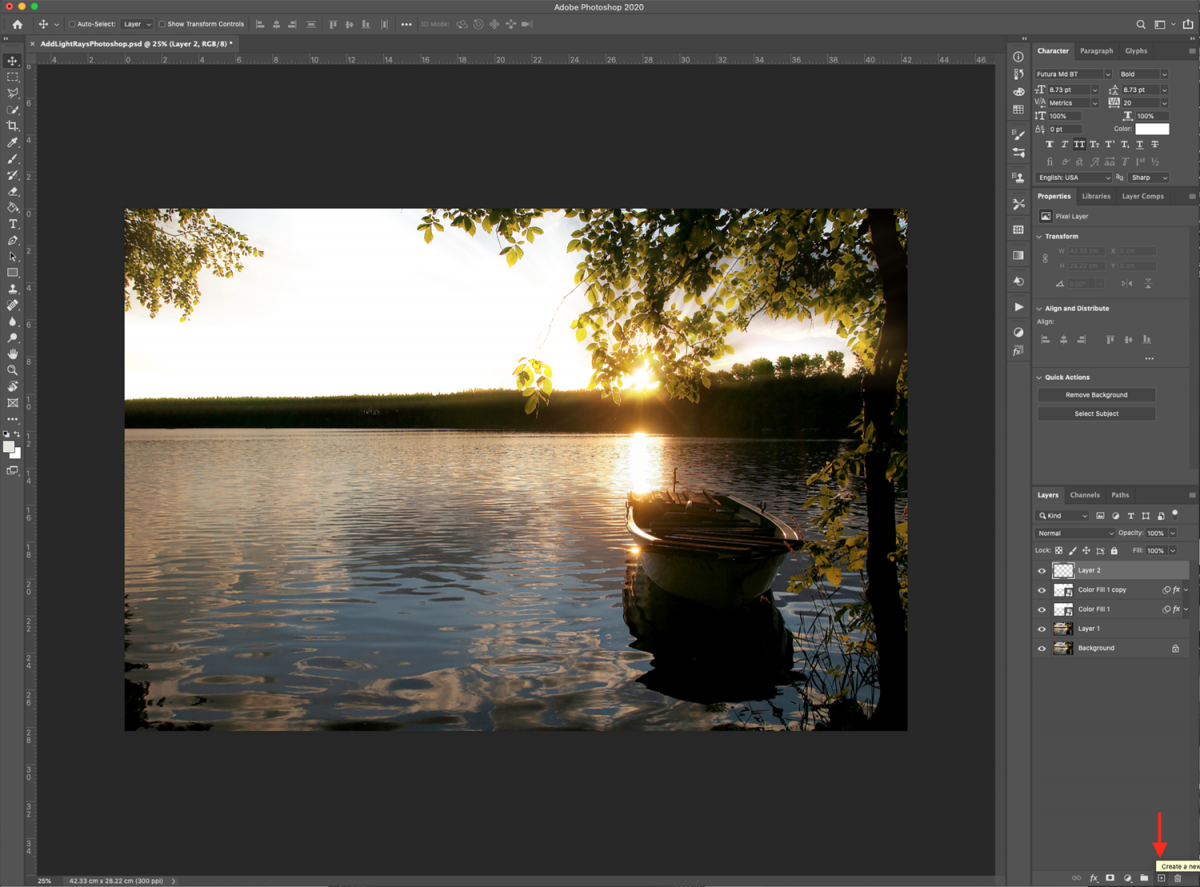
And fill it with color by going to Edit > Fill (Shift + F5), choose black as Contents and click Ok.
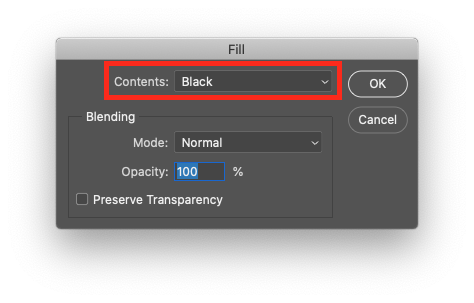
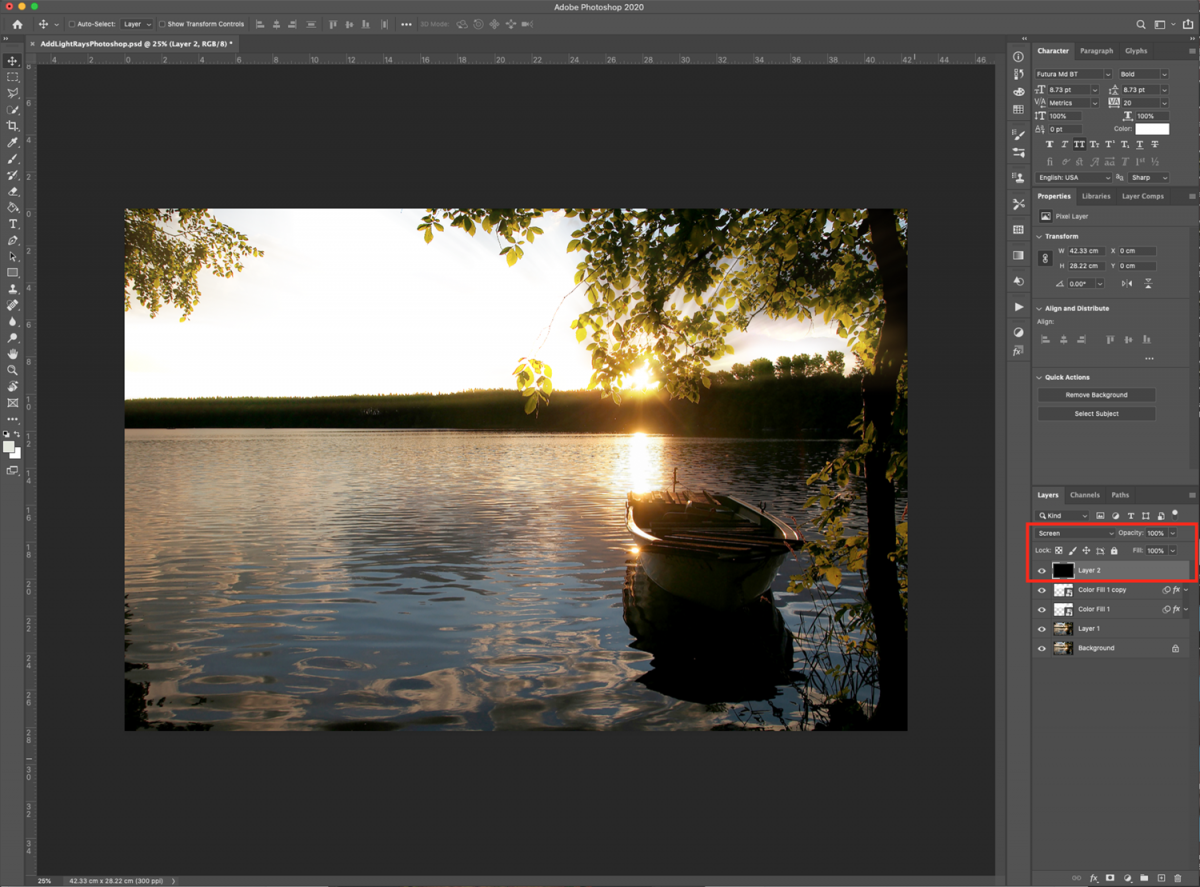
Change the Blending Mode of the layer to Screen.
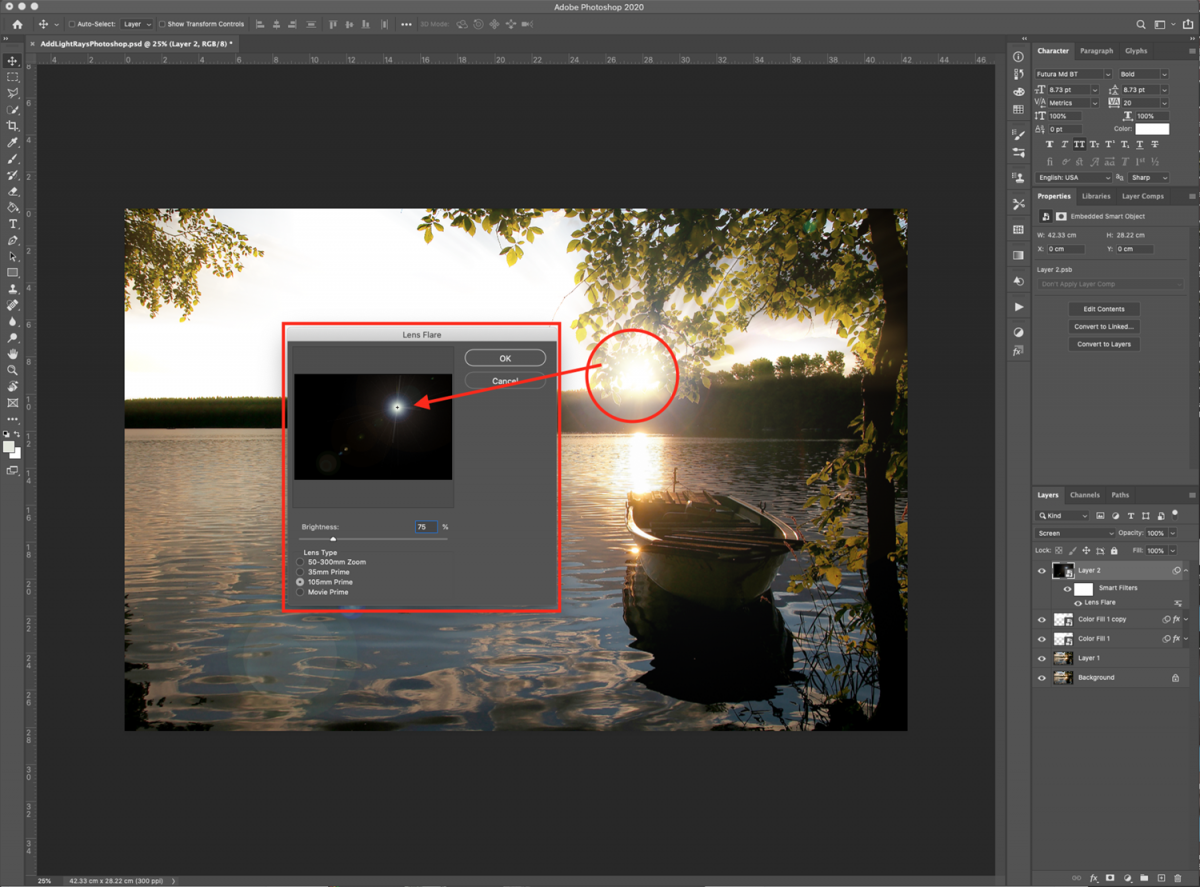
To add a light source to the rays, we will use a filter. If you want, you can convert this layer into a Smart Object before applying the effect so you can edit if needed.
Go to Filter > Render > Lens Flare. With your cursor, click to position the center where your light source should be. Choose 105mm Prime, adjust the Brightness to your liking and click Ok.
To add some finishing touches and crank up the colors of your image.
Go to the Adjustments panel and add a new Hue/Saturation layer on top.
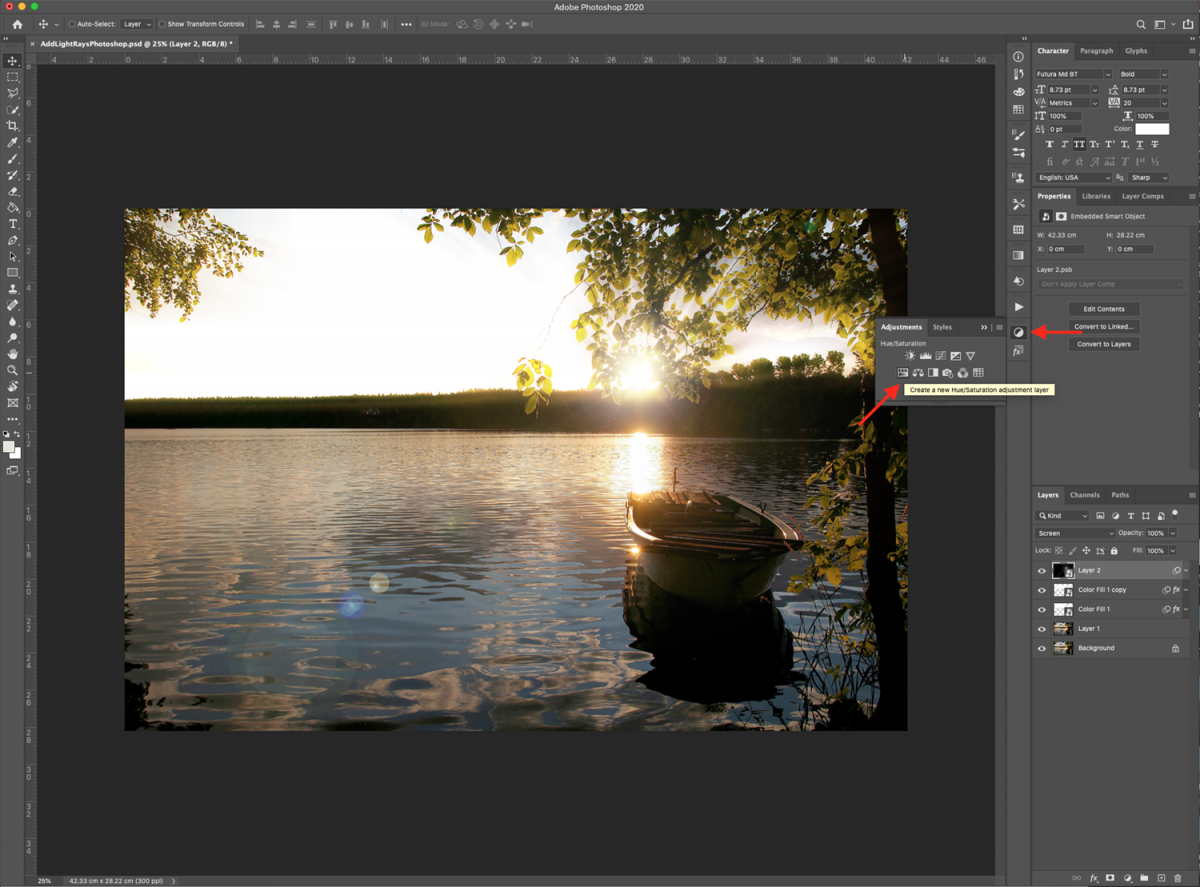
Clip it down by clicking the small button at the bottom of the panel. Check the Colorize box and move the levers until you get a shade that is similar to the one of your background image.
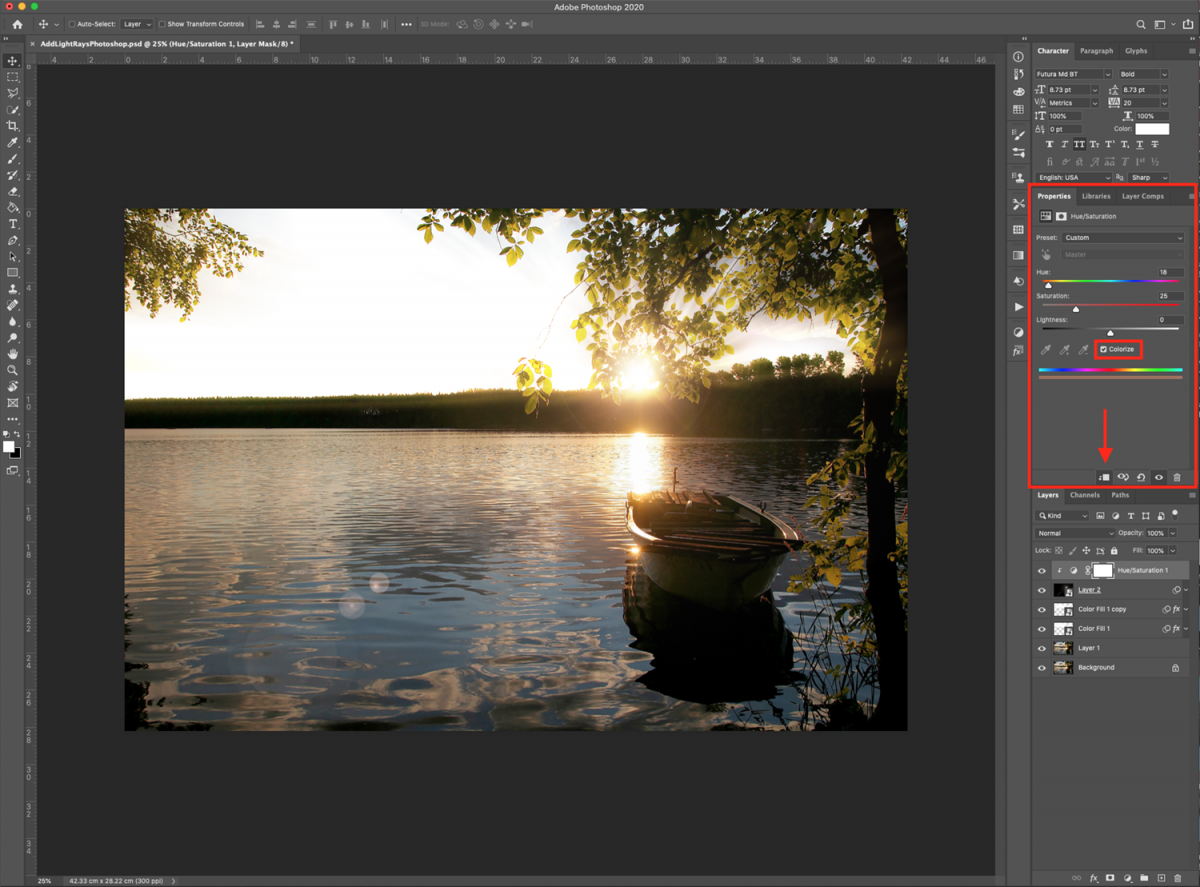
This is how our image looks after applying the effect. The overall look is way nicer and has a slightly dreamy vibe to it!
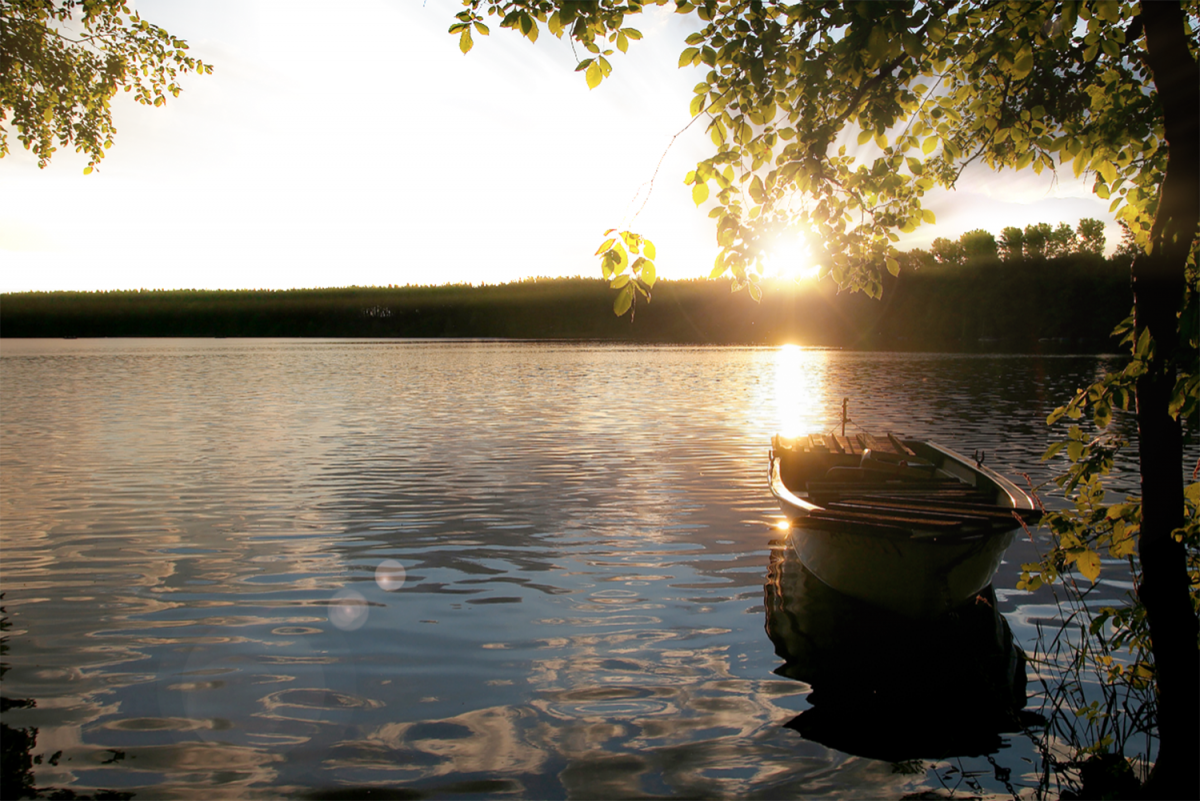
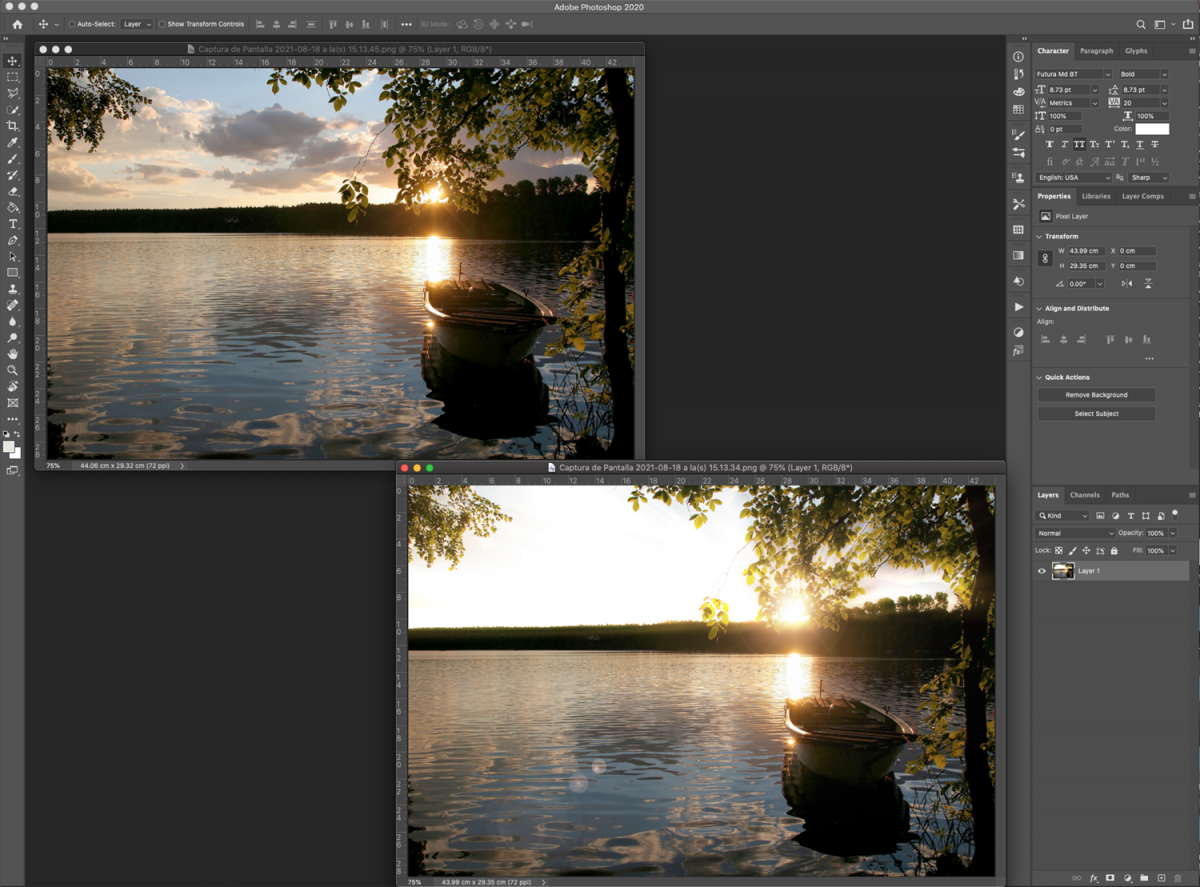
And here’s a before and after view for comparison.
If you liked this tutorial make sure you don't miss our guides on how to change colors of objects, how to create an oil paint effect, and how to create a duotone in Adobe Photoshop.
It is important to make sure that the image you chose is either lit from the back or from the side. If not, this kind of effect will not work properly.
For this one, we are using a sunset on lake photo from the nature photos collection on Design Bundles.
Step 1 - Color correct your image
In Photoshop, open the image you chose. If you think that it needs some tweaking, go to Image > Adjustments > Levels (Command/Control + L) and click Auto to adjust it a bit.
Step 2 - Duplicate your image
It is always a good idea to leave a copy of your image untouched and work on a duplicate. Just in case you need to go back to the original one for any reason.
Type Command/Control + J to create the duplicate.
Step 3 - Create a selection of the sky
We need to isolate the areas of the image where the light rays will be placed.
To select them, go to Select > Color Range, choose Sampled Colors, and make sure that the Localized Color Clusters box is checked.
Then, click on the spots where the sky is. Use the small eyedropper icon with a + (plus) sign next to it to add to your selection until you have as much of the sky selected as possible.
You should end up with a selection of the highlighted areas.
Step 4 - Mask your selection
To clean up your selection, enter Quick Mask mode by clicking Q and check if there are some semi transparent spots, etc.
Use the Brush tool (B) with a large and hard brush (about 200 px and 100% hardness). Choose black as your Foreground color and erase the portions that need it.
You may need to change the size of the brush and Swap fill and stroke (X) to change the Foreground color to white to add to the selection instead.
When you are done, click Q again to exit Quick Mask mode.
Step 5 - Add a Solid Color adjustment layer
To create the light rays we are going to use a solid color layer with the selection and apply a filter to it.
Click on the small black & white circle at the bottom of the Layers panel and choose Solid Color from the dropdown menu.
Use white (#ffffff) as Fill and click Ok.
Step 6 - Make your layer a Smart Object
Right-click on top of your new layer’s thumbnail and choose Convert to Smart Object. This will let you apply filters to the color layer in a non destructive fashion.
Step 7 - Apply a Radial Blur filter
Now, we are going to distort the white color layer so it looks like light rays.
Go to Filter > Blur > Radial Blur. Then, locate the spot where you want the light source to be (in this case the sun) and drag the center of the thumbnail there.
Increase the Amount to around 100% and choose Zoom and Best as your other options.
If you think the location of the light source is not right, just double-click on its thumbnail and change the position of the center in the filter.
Step 8 - Apply Layer Styles
Double-click on top of your layer’s thumbnail and apply the following Layer Styles. In the Outer Glow tab click on the color (#edab42) and leave the other options with the default values. This will add a slight yellowish shine to the light rays.
And change the Blending Mode of the layer to Overlay so it blends better with the background.
Step 9 - Duplicate the layer and transform it
To elongate the rays and add more depth, duplicate your top-most layer (Command/Control + J) and go to Edit > Transform > Perspective. You may get a pop-up telling you that Smart Filters will be temporarily turned off, click Ok.
Pull the lower corners in or out depending on your image to adjust the perspective of the light rays. Don’t commit the changes yet.
Go back to the Transform menu, and choose Distort this time. Pull down the upper part and flatten the rays. Once you are done, hit Enter or click the check mark on the top menu to commit the changes.
Finally, change the Blending Mode of this layer to Soft Light.
Step 10 - Add a Blur filter
To smooth the rays a bit, go to Filter > Blur > Gaussian Blur, and use a 20 pixels Radius.
Next, we are going to add a flair effect to the image with a filter on a blended layer.
Step 11 - Add a black color filled layer
Create a new layer on top of everything by clicking on the small button at the bottom of the Layers panel.
And fill it with color by going to Edit > Fill (Shift + F5), choose black as Contents and click Ok.
Change the Blending Mode of the layer to Screen.
Step 12 - Add a Lens Flare filter
To add a light source to the rays, we will use a filter. If you want, you can convert this layer into a Smart Object before applying the effect so you can edit if needed.
Go to Filter > Render > Lens Flare. With your cursor, click to position the center where your light source should be. Choose 105mm Prime, adjust the Brightness to your liking and click Ok.
Step 13 - Add a Hue/Saturation adjustment layer
To add some finishing touches and crank up the colors of your image.
Go to the Adjustments panel and add a new Hue/Saturation layer on top.
Clip it down by clicking the small button at the bottom of the panel. Check the Colorize box and move the levers until you get a shade that is similar to the one of your background image.
This is how our image looks after applying the effect. The overall look is way nicer and has a slightly dreamy vibe to it!
And here’s a before and after view for comparison.
If you liked this tutorial make sure you don't miss our guides on how to change colors of objects, how to create an oil paint effect, and how to create a duotone in Adobe Photoshop.
Related Tutorials
Photoshop Tutorials
How to Add Lightning to a Photo in Photoshop
Photoshop Tutorials
How to Add Glitter to Images in Photoshop
Learn how to add glitter to your images in Photoshop with this tutorial.
Photoshop Tutorials
Light Trail Effect in Photoshop
Photoshop Tutorials
How to Create a Light Leak in Photoshop
Photoshop Tutorials
Add Rain to images in Photoshop
Photoshop Tutorials