By Design Bundles
Clone stamp tool basics in photoshop
Today we are going to cover the Photoshop Clone Stamp tool basics. The Clone Stamp uses a sampling point from one area to copy portions and colors to cover another area. It can be very effective for covering unwanted areas or moving objects to a different place
For this example, we are using a desk flat lay photo but you can browse from our wide variety of flat lay backgrounds.
Step 1 - Create a Non-destructive Layer
In Photoshop, open the image you want to use. Then, create a new layer by clicking on the small icon at the bottom of the Layers Panel. Name it Retouch.
Is a good idea to make the changes non destructively by keeping them on a separate layer. So if you need to go back, you can do so without problems.
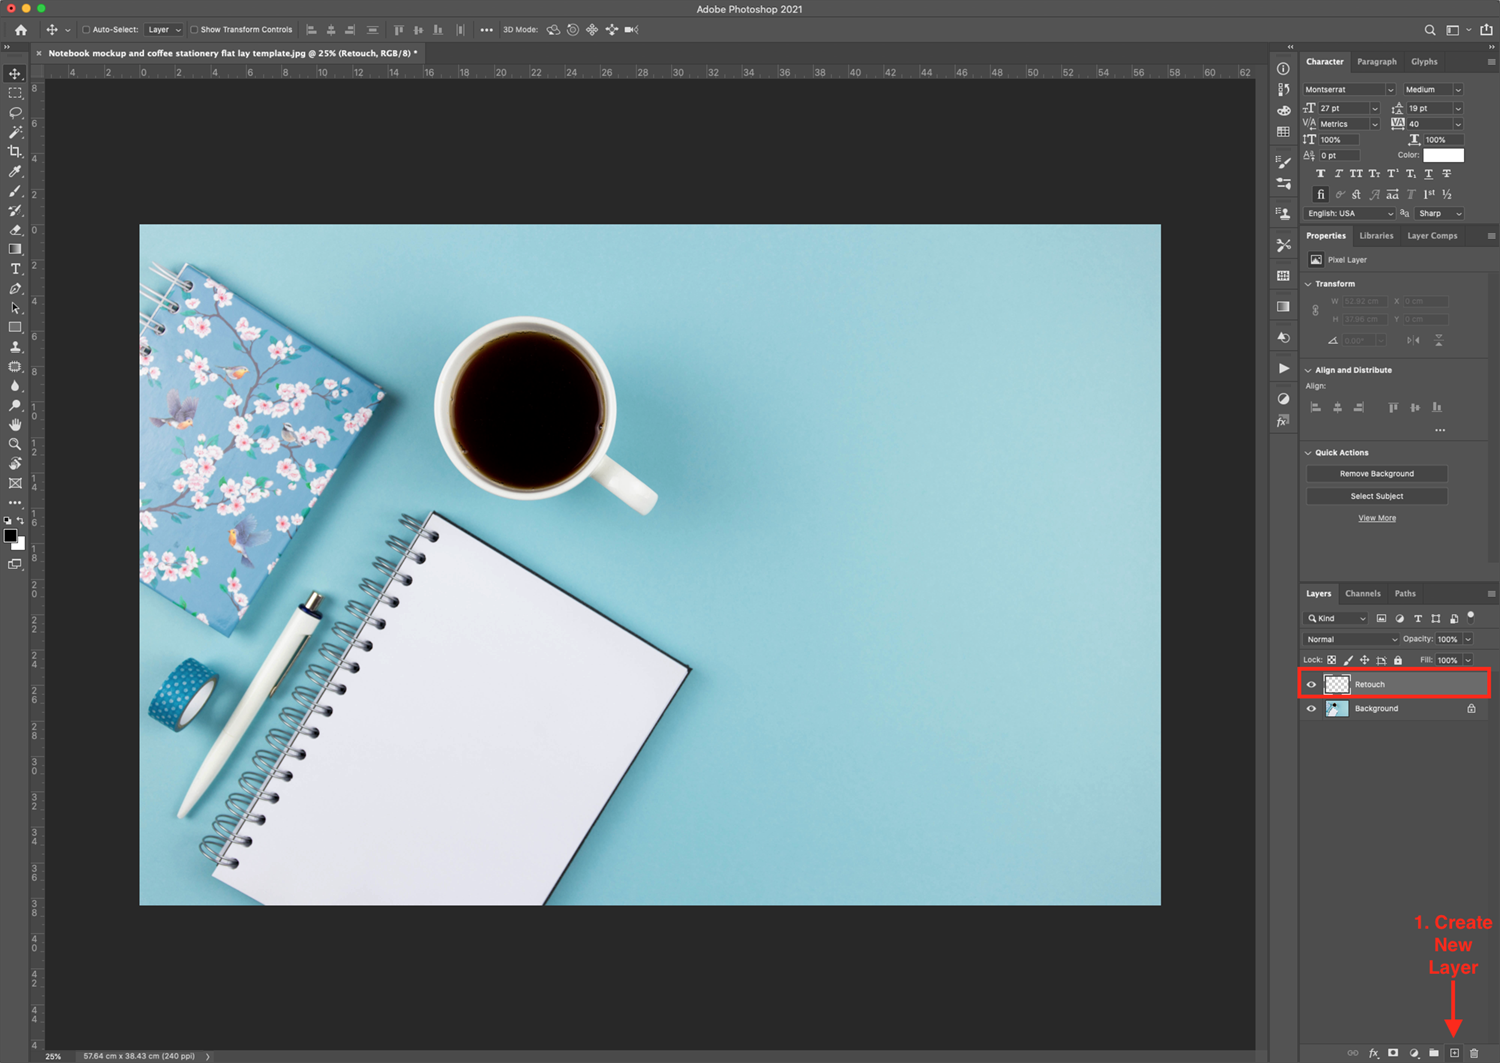
Lock the Retouch layer position to prevent it from accidentally moving by clicking on the small cross on the top section of the Layers Panel.

Step 2 - Use Clone Stamp to Cover Unwanted Areas
We want to clone out some unwanted areas of our image, like the cup in this case.
Adjust the Clone Stamp Tool Settings
Start by selecting the Clone Stamp Tool (S) and adjusting some settings on the top menu to fit your needs. You can adjust the brush size, opacity, flow, and angle.

Make sure that under the Sample option, you are using Current & Below or All Layers. This is so you can sample data from the background layer while working on the retouch layer.
Here, you can also toggle theClone Source Panel by clicking on the small folder icon to get more options.

Set the Sampling Point
Next, you need to set the sampling point. Position your cursor on the portion of your image you want to use as the source and hold Option/Alt + click on it.

Then, making sure that the Retouch layer thumbnail is selected on the Layers Panel, move your mouse over to the area of the image you want to cover.
As you hover theClone Stamp Tool (S) over it, you will see a preview of the sampled pixels inside the pointer. This preview will aid you in aligning the sampled area with other parts of the image.
When happy with the placement, click and drag with your mouse to apply the sampled pixels to cover the target area. A crosshair will show you where the sample pixels are being copied from.

Fix Details
You may need to do some touch-ups to the covered area to get rid of unwanted details from the sampled pixels.
To do it, use smaller brush size and/or opacity or flow values. Next cover up obvious details and color or texture differences.

Step 3 - Use Clone Stamp Tool to Move Objects
Now, we want to move the cup to a different area of our image.
Just select the background layer thumbnail and set the sample point where the cup is. Then, get back to the Retouch layer and move your cursor to the area where you want to place the cup. Now, using the preview as guide, paint the sampled pixels over the target area.

Adjust size and Angle if needed
From the Clone Source Panel you can adjust some other settings, like change the angle and/or size of the cloned image before placing it.

Here’s is a side by side comparison of our image before and after using the clone stamp.

We just learned how easy it is to clone out unwanted areas or move objects, using Photoshop’s Clone Stamp Tool.
Next, you can take a look at our other handy Photoshop tutorials like how to use the clone spot healing brush, how to blend images together or remove objects with content fill.