
By Design Bundles
Photoshop Tutorials9 min
How to Use the Patch Tool in Photoshop
The Patch Tool can be used to repair a selected area with pixels from another area or a pattern. Like the Healing Brush tool, the Patch Tool matches the characteristics (texture, lighting, transparency, and shading) of the sampled pixels to the pixels being healed. You can also use the Patch Tool to clone isolated areas of an image. It works with 8-bits or 16-bits-per-channel images. When repairing with pixels from the image, it’s best to select a small area to produce the best result.
For this tutorial, we will be using a Stock Photo from Design Bundles.
Open your image and select the Patch Tool from the Toolbox.
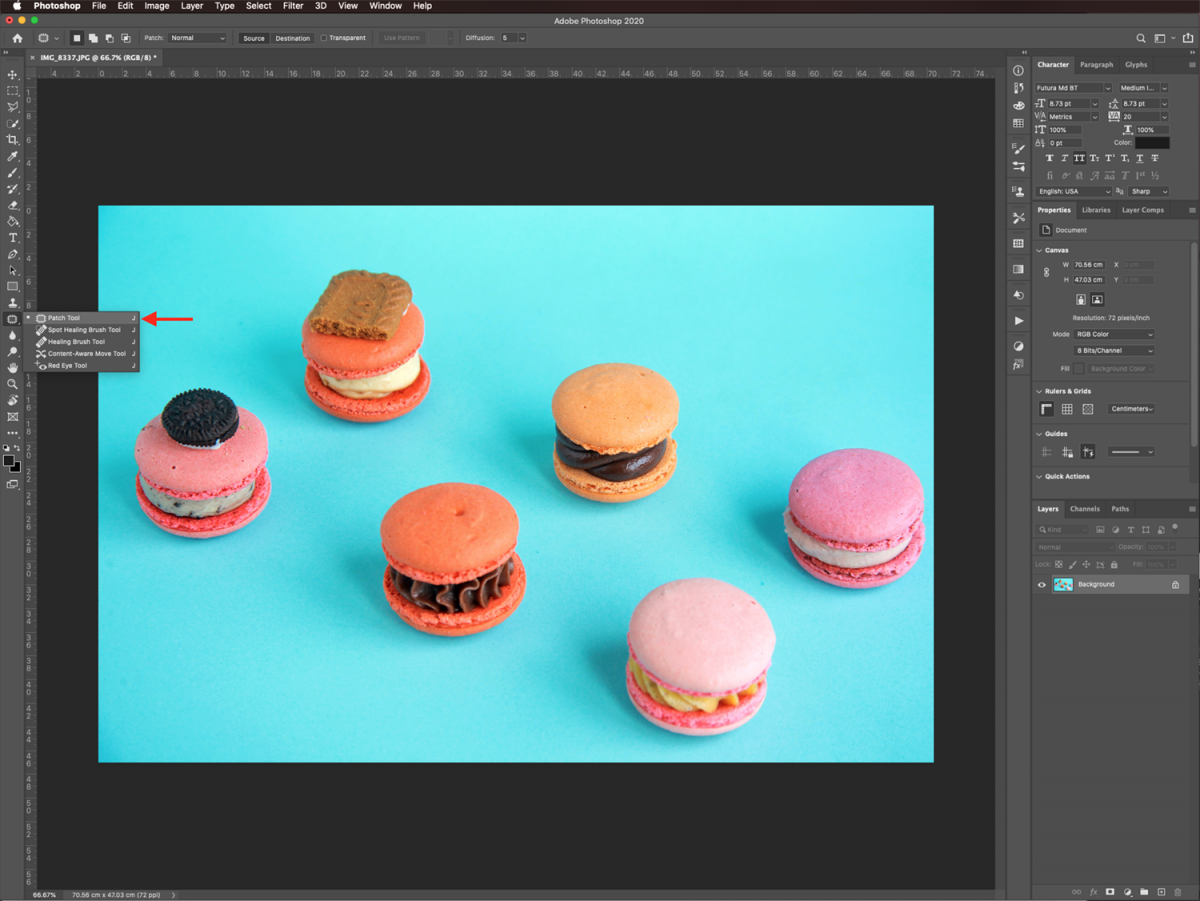
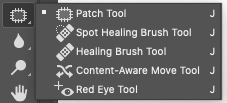
You may need to click either the Healing Brush tool, Spot Healing Brush tool, Red Eye tool, Content-Aware Move tool, or the three small dots at the bottom of the Toolbox to show the hidden tools and make your selection.
You can use the Patch Tool in two ways:
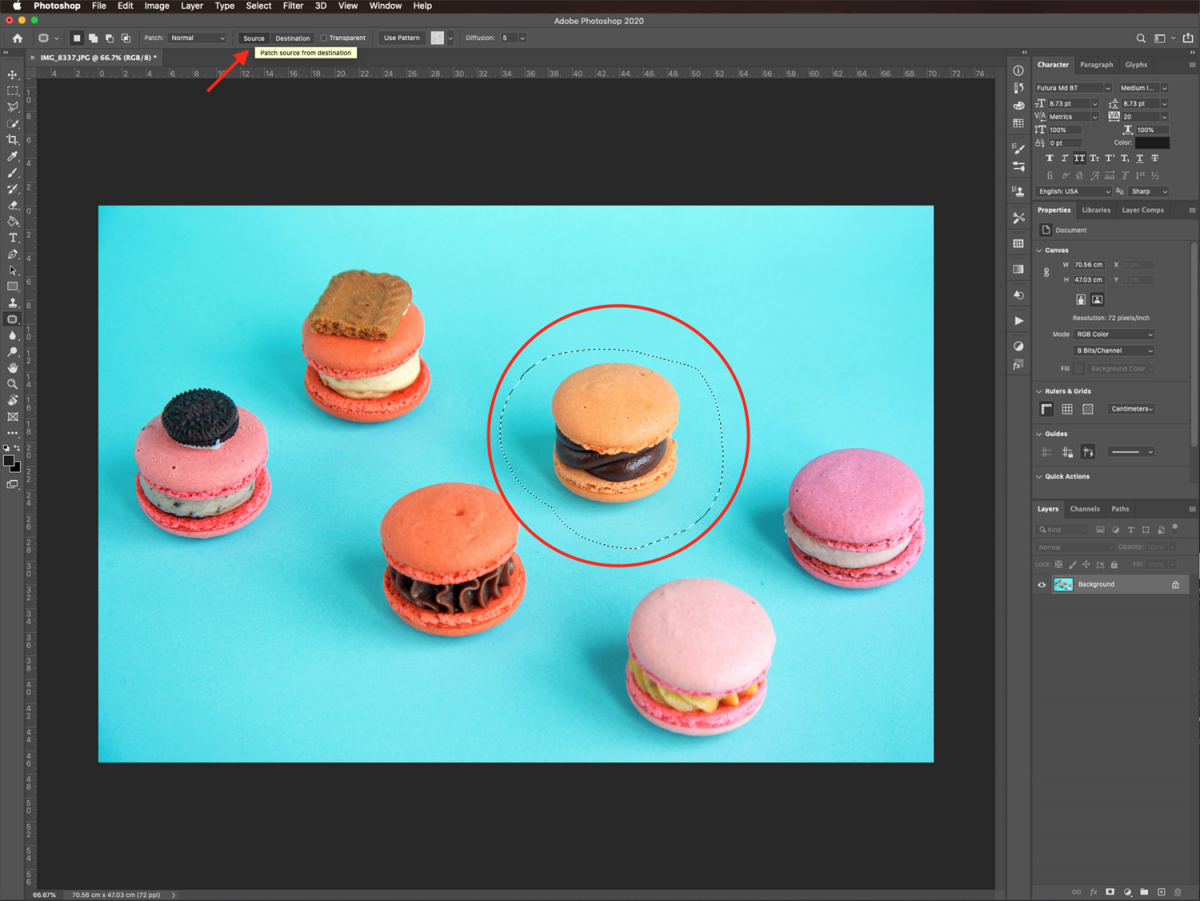
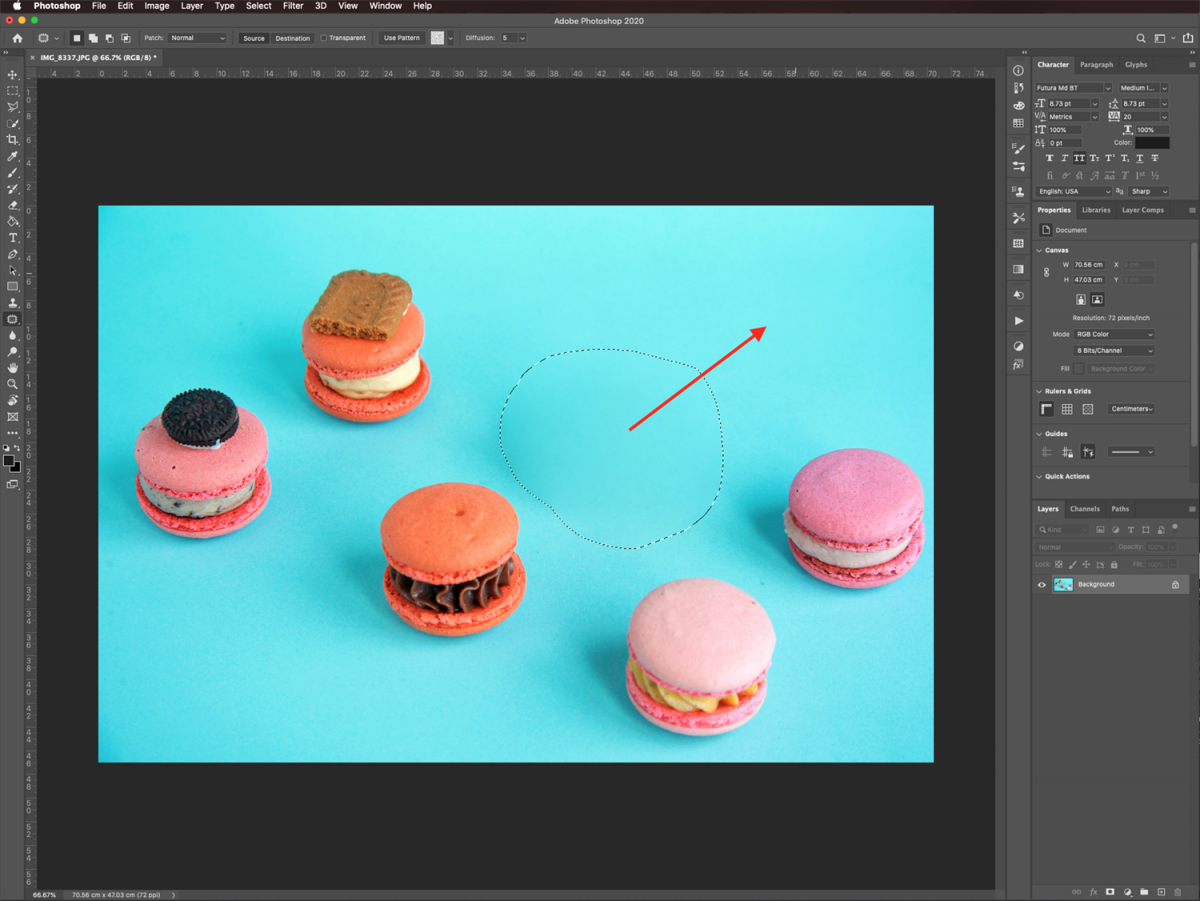
Drag in the cursor to select the area you want to repair and select Source in the options bar, then drag the selected portion to the area you want to patch with.
Or, drag in the cursor to select the area from which you want to sample and select Destination in the options bar and then, drag the selected portion on top of the area you want to patch.
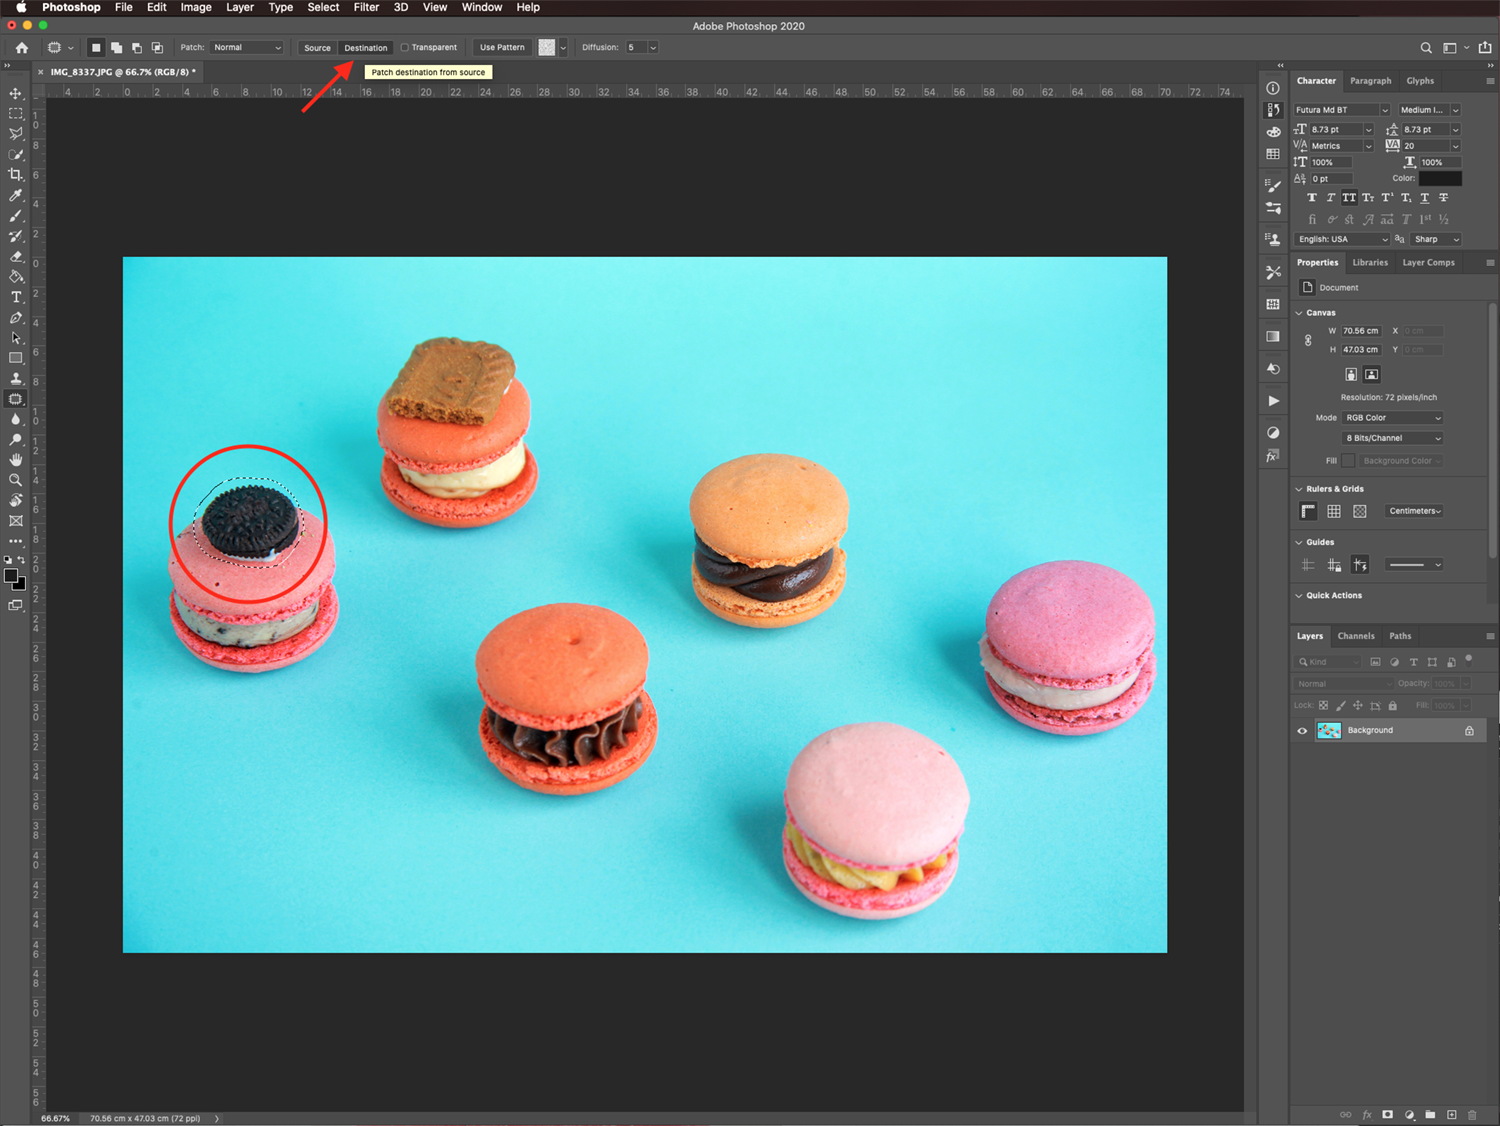
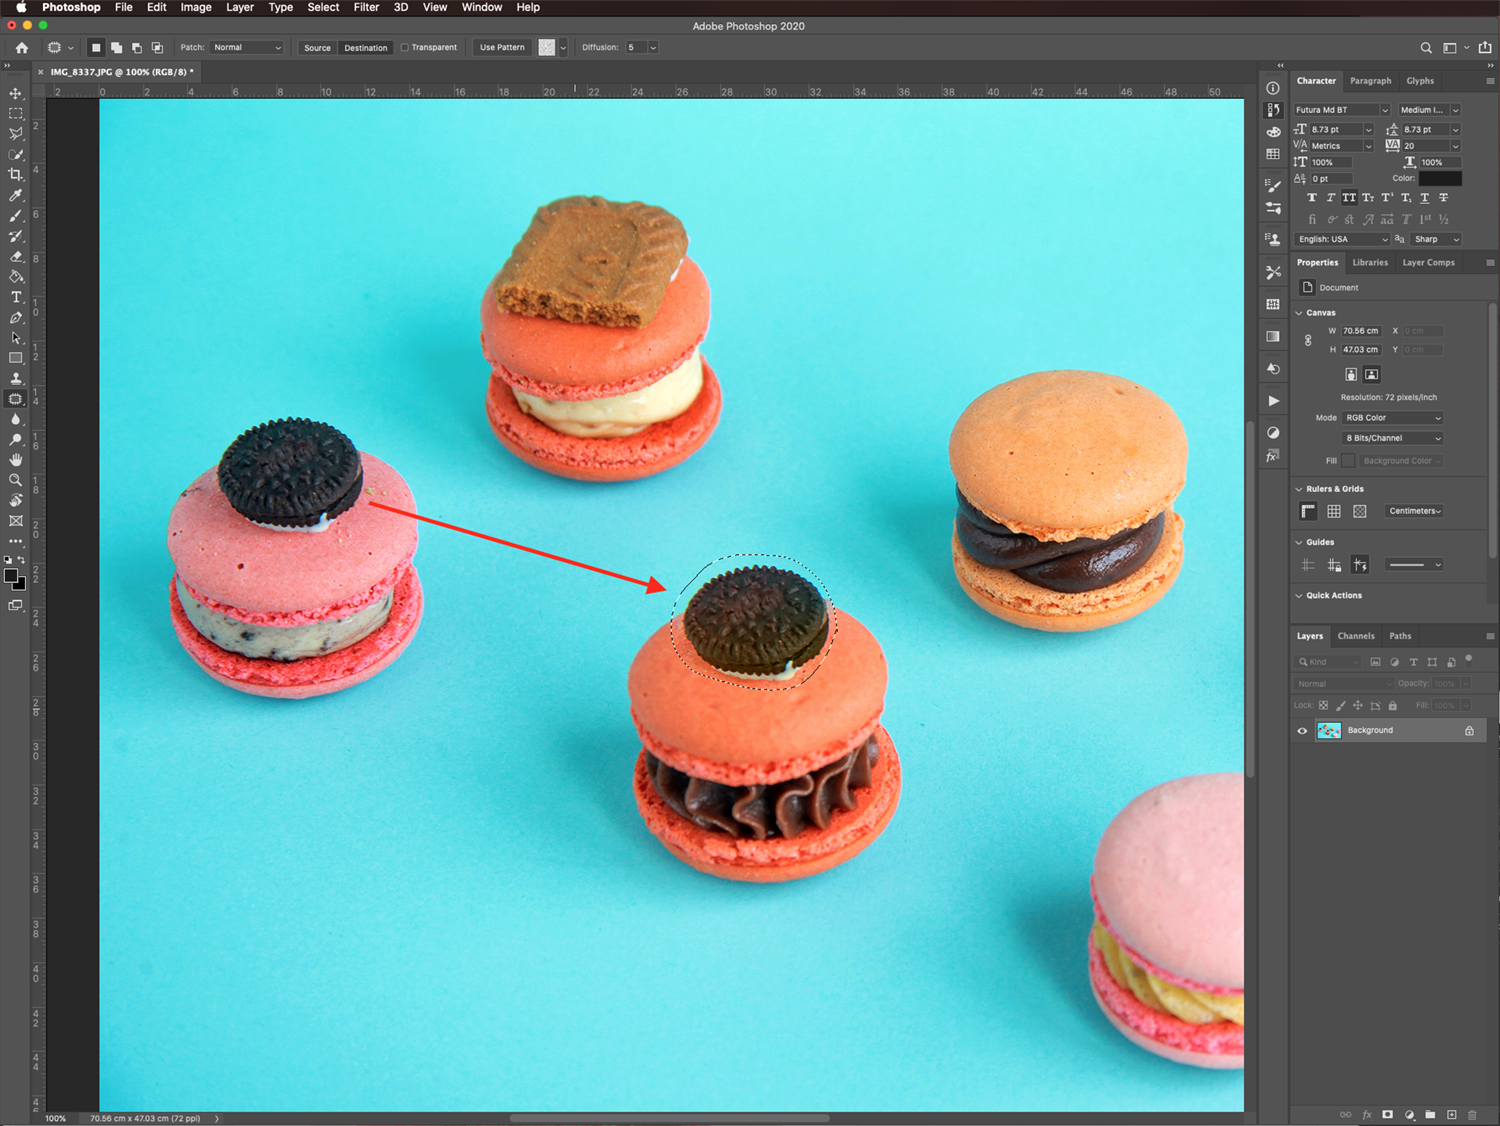
Also, you can make the selection before choosing the Patch Tool.
Depending on your image, you can use the source option backward or to clone or reproduce certain portions of it.
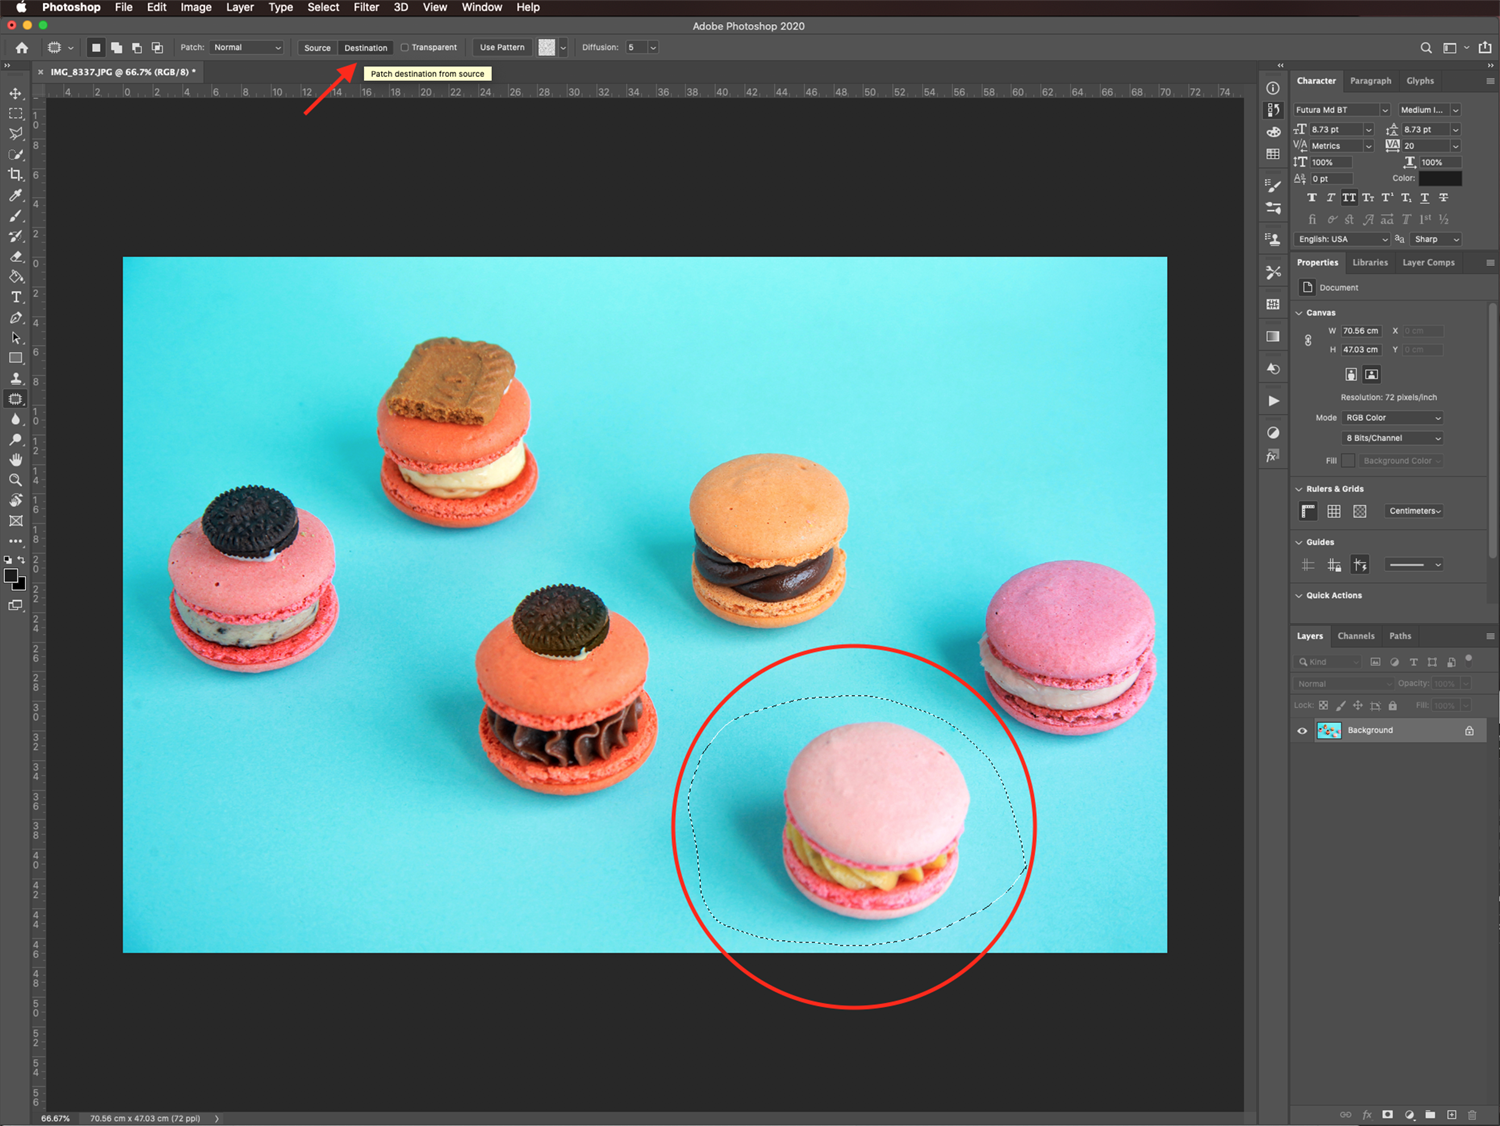
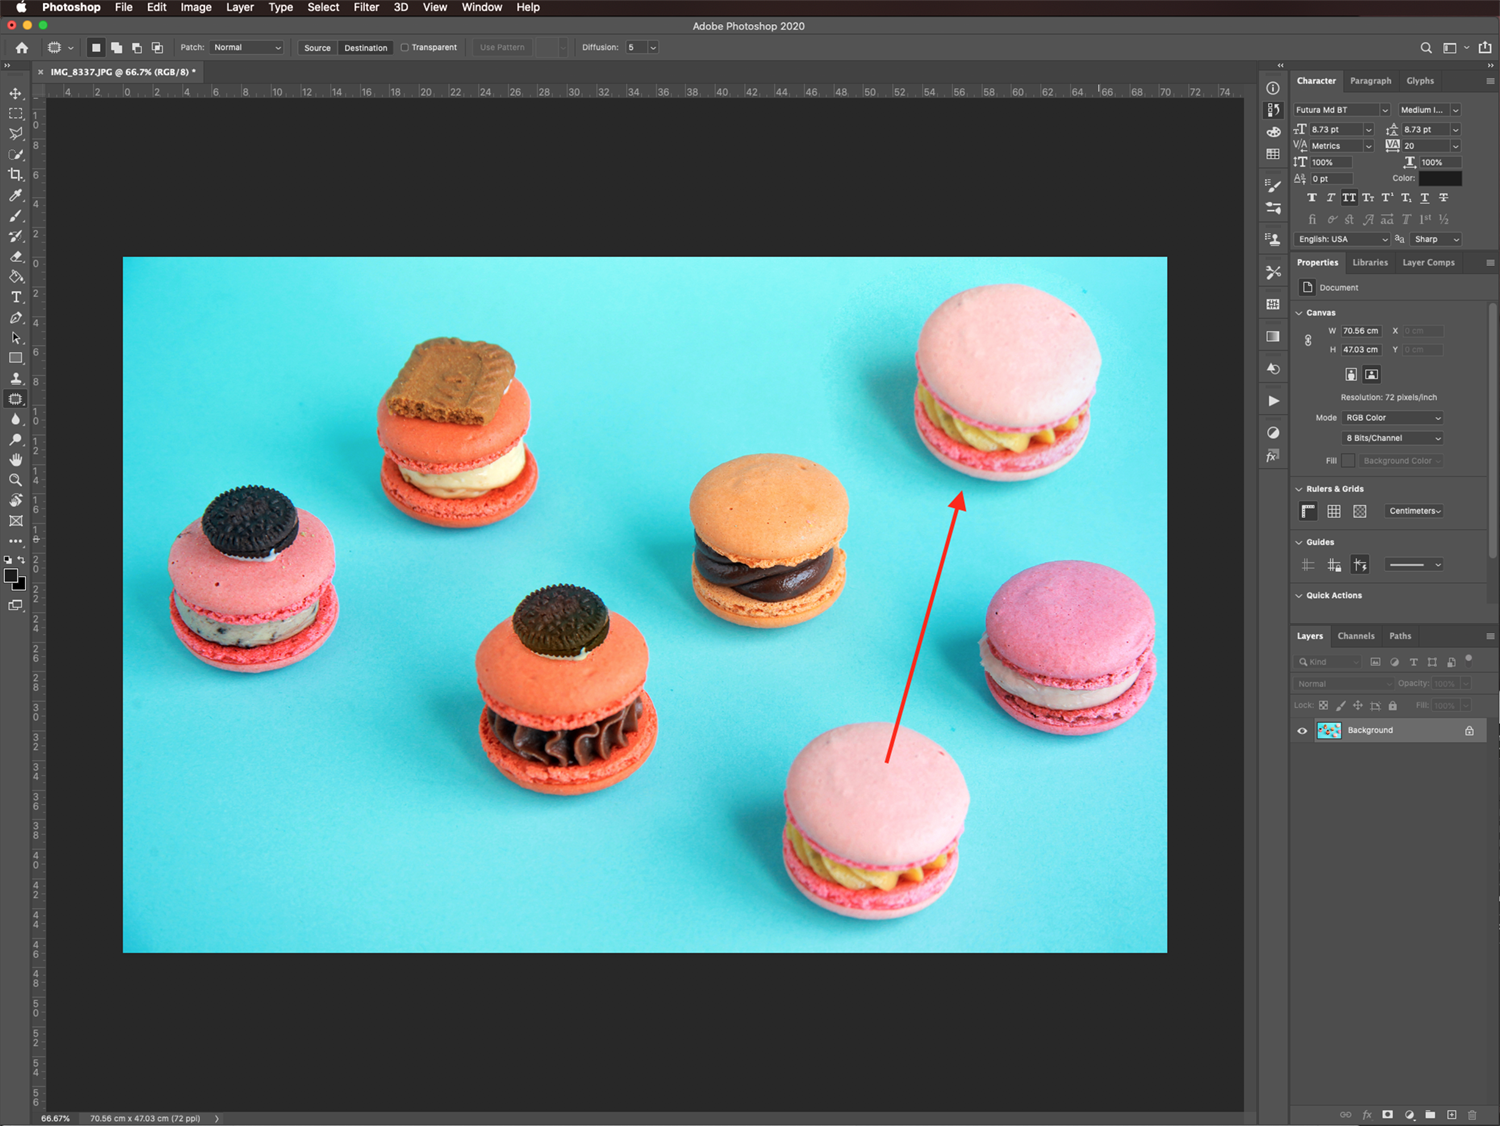
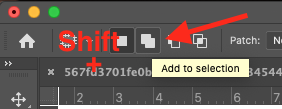
To add to the existing selection, Shift-drag in the image or click the Add to Selection in the options bar.
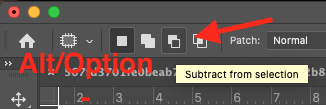
To subtract from the existing selection, Alt-drag / Option-drag (Mac OS) in the image or click the Subtract from Selection in the options bar.
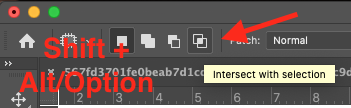
You can also Alt+Shift-drag (Windows) or Option+Shift-drag (Mac OS) in the image to select an area intersected by the existing selection. Or click the Intersect with Selection in the options bar.
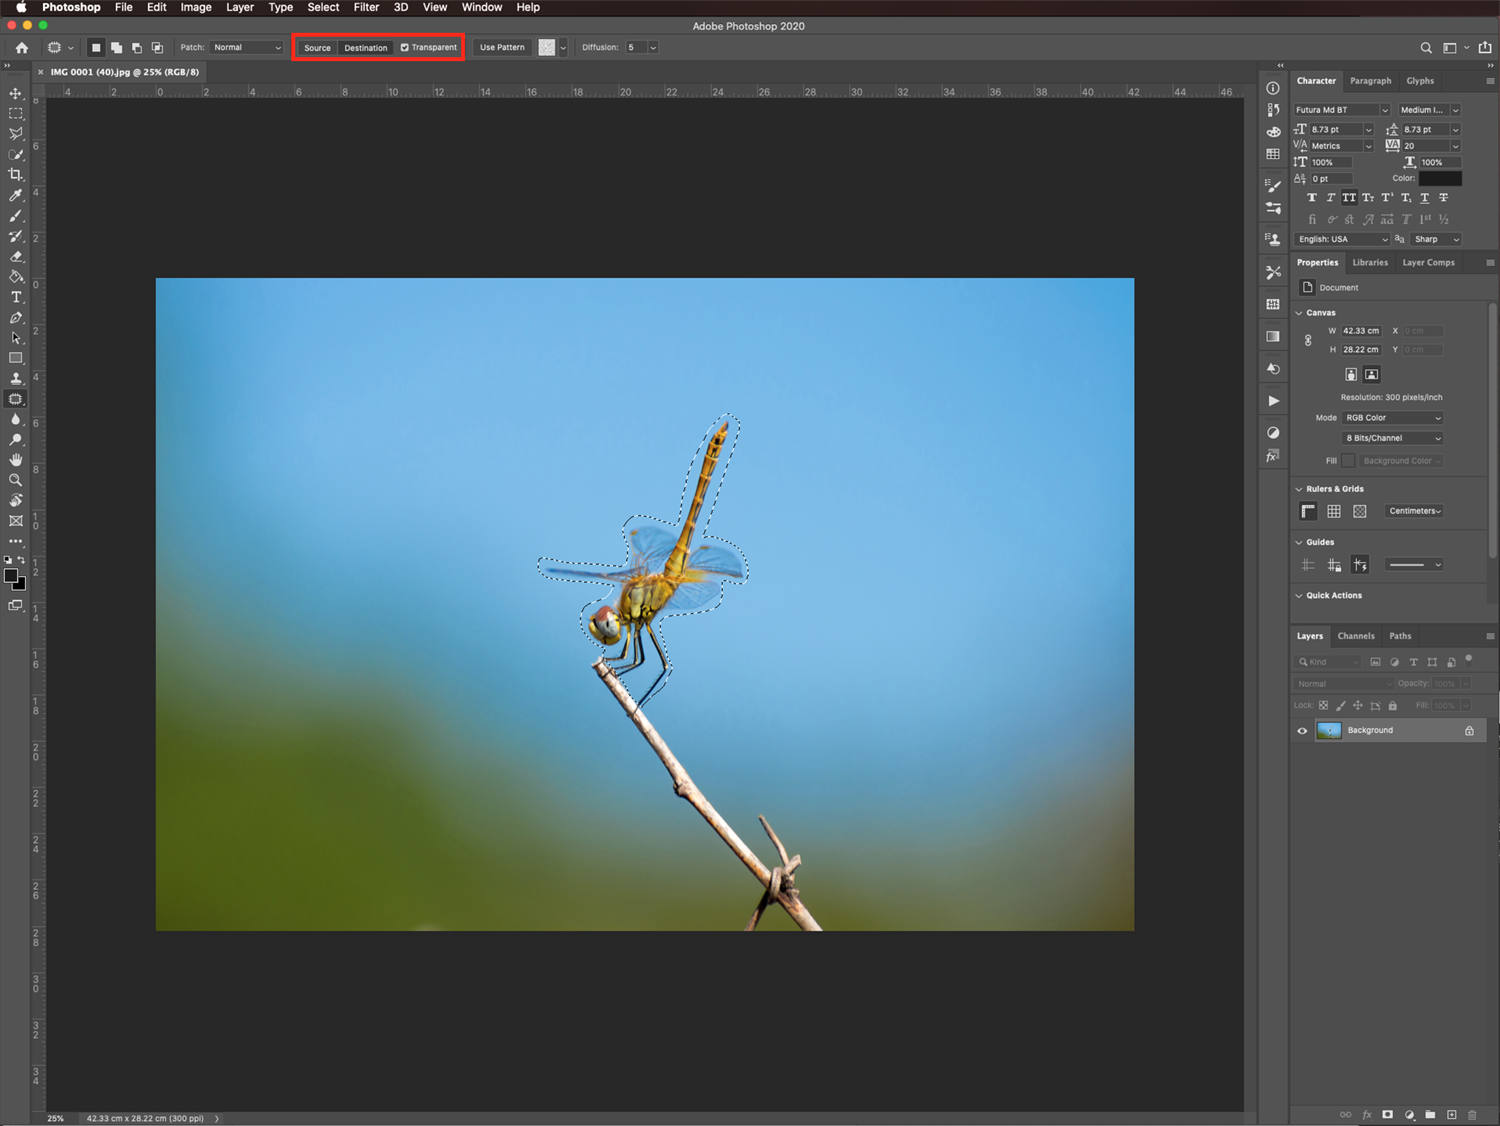
To extract texture with a transparent background from the sampled area, select Transparent on the options bar. Deselect it if you want to replace the target area with the sampled one. This option works best for solid or gradient backgrounds with clearly distinct textures. (We used a different Stock Photo for this example).
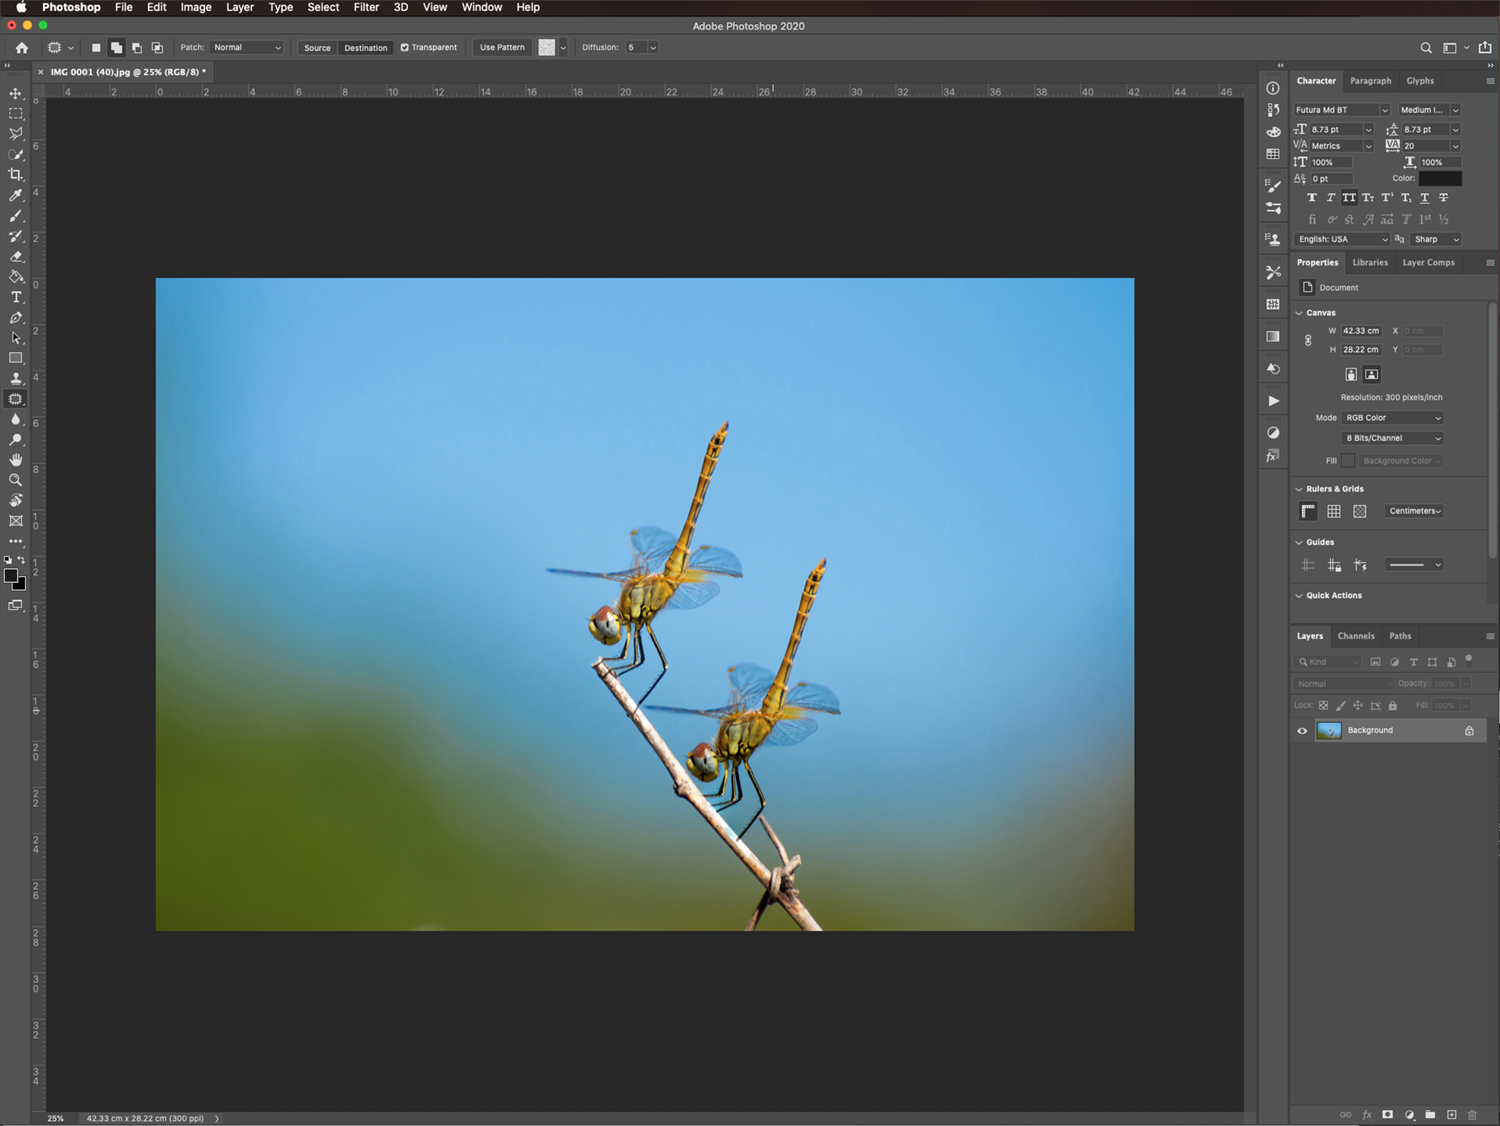
To control how quickly the pasted region adapts to the surrounding image, adjust the Diffusion in the options bar. A lower value should be used for images with grain or fine details, and a higher value for smooth images.

Other similar tools that you can use are the Spot Healing Brush and the Healing Brush among others.
If you enjoyed this tutorial, feel free to leave a comment. You can also let us know if there is any topic you would want us to cover in future tutorials.
Other interesting Photoshop stuff for you to explore...
If you want more information regarding similar Photoshop tools you can take a look at all of the Photoshop Tutorials for Beginners.
For this tutorial, we will be using a Stock Photo from Design Bundles.
1. Select the Patch Tool
Open your image and select the Patch Tool from the Toolbox.
You may need to click either the Healing Brush tool, Spot Healing Brush tool, Red Eye tool, Content-Aware Move tool, or the three small dots
at the bottom of the Toolbox to show the hidden tools and make your selection.2. Patch Tool Usage
You can use the Patch Tool in two ways:
Drag in the cursor to select the area you want to repair and select Source in the options bar, then drag the selected portion to the area you want to patch with.
Or, drag in the cursor to select the area from which you want to sample and select Destination in the options bar and then, drag the selected portion on top of the area you want to patch.
Also, you can make the selection before choosing the Patch Tool.
3. Other Ways of Using the Patch Tool
Depending on your image, you can use the source option backward or to clone or reproduce certain portions of it.
4. Adding and Subtracting from Selection
To add to the existing selection, Shift-drag in the image or click the Add to Selection in the options bar.
To subtract from the existing selection, Alt-drag / Option-drag (Mac OS) in the image or click the Subtract from Selection in the options bar.
You can also Alt+Shift-drag (Windows) or Option+Shift-drag (Mac OS) in the image to select an area intersected by the existing selection. Or click the Intersect with Selection in the options bar.
5. Using the Transparent Option
To extract texture with a transparent background from the sampled area, select Transparent on the options bar. Deselect it if you want to replace the target area with the sampled one. This option works best for solid or gradient backgrounds with clearly distinct textures. (We used a different Stock Photo for this example).
To control how quickly the pasted region adapts to the surrounding image, adjust the Diffusion in the options bar. A lower value should be used for images with grain or fine details, and a higher value for smooth images.
Other similar tools that you can use are the Spot Healing Brush and the Healing Brush among others.
If you enjoyed this tutorial, feel free to leave a comment. You can also let us know if there is any topic you would want us to cover in future tutorials.
Other interesting Photoshop stuff for you to explore...
If you want more information regarding similar Photoshop tools you can take a look at all of the Photoshop Tutorials for Beginners.
Related Tutorials
Affinity Tutorials
How to Use the Patch Tool in Affinity Photo
If you want to know how to use the Patch Tool in Affinity Photo, check out this 3 step tutorial.
Photoshop Tutorials
How To Use Photoshop Burn Tool
Inkscape Tutorials
How to Use the Bezier Curve Tool in Inkscape
In this tutorial, learn how to create lines and curves in Inkscape with the Bezier Curve Tool!
Cricut Tutorials
How To Use The Slice Tool In Cricut Design Space To Split Images
Learn how easily to Split Images in Cricut Design Space using the Slice Tool.
Photoshop Tutorials
How to Use Text Effects in Photoshop
With Photoshop Text Effects, you can create text with impact in just a few steps.
Photoshop Tutorials
How to Use EPS Files in Photoshop
In this tutorial, learn how to use EPS files in Photoshop as Smart Objects to maintain image quality