By Design Bundles
How to Use EPS Files in Photoshop
Did you know you could use EPS files in Photoshop? Besides photo editing, you can use Photoshop for graphic design. You can import vector images and EPS files into Photoshop and use them without losing image quality. We’ll show you how in this tutorial.
After downloading your files, unzip the files before using them. We’ll be using watercolor winter landscape images from Design Bundles for this tutorial if you’d like to follow along.
Step 1 - Open or Place the EPS File as a Smart Object
With your background image open in Photoshop, click File and select Open as Smart Object, Place Embedded, or Place Linked. We chose Open as Smart Object.
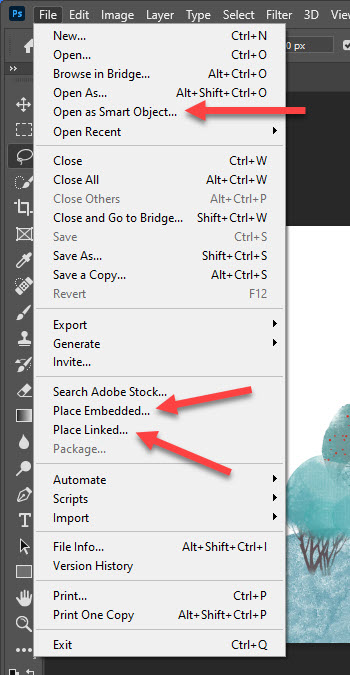
In the Open dialog, select the EPS file and click Open.

Step 2 - Rasterize the EPS File
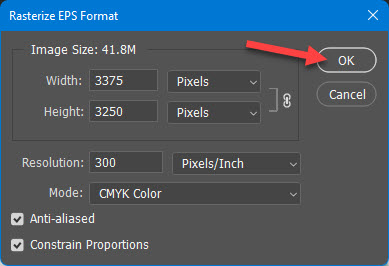
The Rasterize EPS Format dialog will pop open. You can simply click OK.
Note: if you used the Place Embedded or Place Linked command, you will not be asked to rasterize the EPS file.
Step 3 - Edit Contents of the Smart Object
The EPS file will open in a separate document tab. We want to use only one building from the image, so we must edit the contents of the Smart Object. Double-click on the Smart Object layer thumbnail in the Layers panel.
Note: If you used the Place Embedded or Place Linked command, you still edit the Smart Object contents in the same way by double-clicking the Smart Object layer thumbnail.

After double-clicking the Smart Object layer thumbnail, you may be asked to select an application to open the EPS file. Select Adobe Illustrator and click OK.
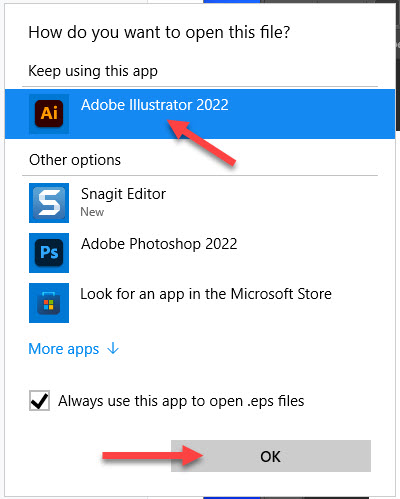
The EPS file will open in Illustrator, where you can edit the contents. Select the white background with the Selection Tool (V) and press Delete.

Now delete all but one building, like in the image below.

Step 4 - Save the EPS File
You must save the EPS file in Illustrator for the changes to be reflected in Photoshop. Go to File > Save (Ctrl/Cmd + S). Make sure you are using the Save command and not the Save As command.
Note: Saving this EPS file will not affect the contents of the actual EPS file.

Once your EPS file has been saved, go back to Photoshop. You’ll see that the document with the EPS file has been updated to reflect the recently saved EPS file.

If you close Illustrator after saving and realize that you’ve made a mistake while editing the contents, you can undo the change in Photoshop and edit the contents of the Smart Object layer again.
Step 5 - Copy Smart Object Layer to Background Image Document
Because we opened the EPS file instead of placing it, we now have to copy it over to the document with our background image.
Click + drag the Smart Object layer from the Layers panel up to the background image document tab. Then continue dragging it on the canvas, dropping it close to where you may want the final image. See the following clip for a better understanding.

You could also Copy (Ctrl/Cmd + C) the Smart Object layer and Paste (Ctrl/Cmd + V) it into the background image document instead.
Step 6 - Edit Smart Object Layer
You can transform the Smart Object layer and add filters to it if you’d like, without affecting the Smart Object contents.
Select the Move Tool (V), enable Show Transform Controls in the Control panel at the top, and select the Smart Object layer. Then use the handles on the bounding box to transform the Smart Object layer, or click + drag the image to move it.

We scaled the image down and moved it over to the right.

One disadvantage to using the Open command instead of the Open as Smart Object, Place Embedded, or Place Linked commands is that the EPS file opens as a regular image layer. Regular image layers can lose image quality, making it blurry or pixelated.
The image below shows a comparison between a regular non-Smart Object layer and a Smart Object layer after multiple transformations. You can see that the regular layer is quite blurry in contrast to the Smart Object layer. The Smart Object layer remains crisp and clean because the original image is not affected in any way by the transformations.

And that’s all there really is to using EPS files in Photoshop. Remember that Photoshop is a powerful tool that you can use for more than just photo editing.