By Design Bundles
Silhouette Tutorials24 min
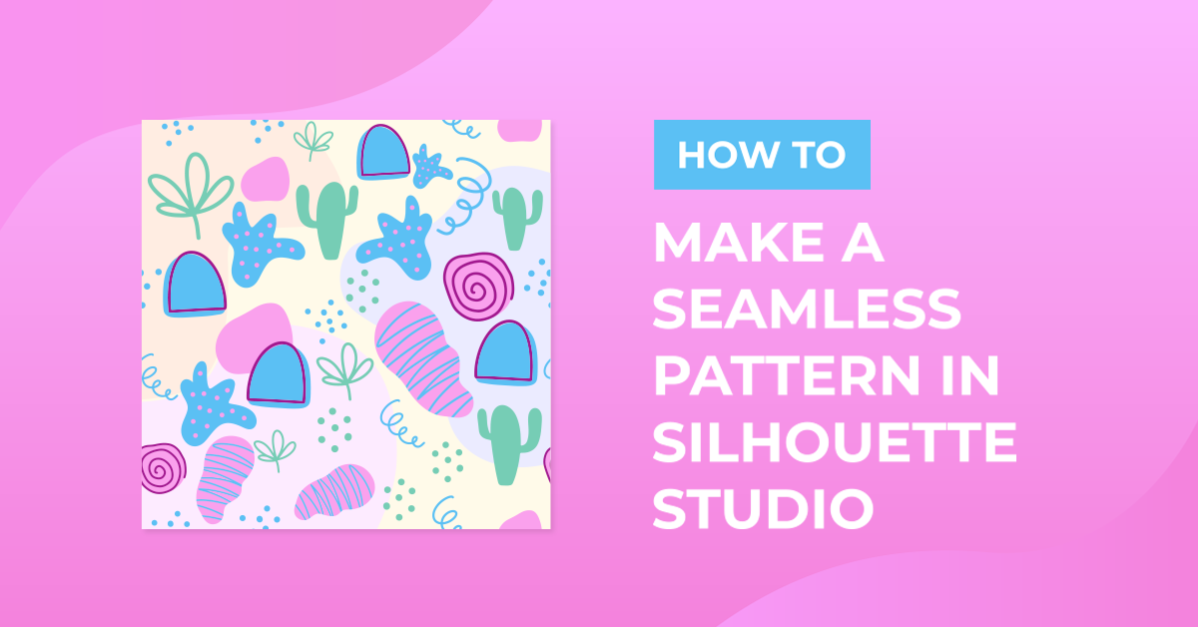
How to Make a Seamless Pattern in Silhouette Studio
For this tutorial we are making a seamless repeat pattern that you could use to print at home to make scrapbook paper, use with printable vinyl, or sublimation. If you are using an outside source like a print company or manufacturer, you would need to make sure you follow the transformative guidelines as mentioned in the Flat Sheet Goods section in the Design Bundles license.
Seamless patterns are created with the purpose of placing them side by side and the edges meet up seamlessly. This is an intermediate to advanced tutorial, so you will need to know how to import images into silhouette.
If you are a more visual learner, check out the video below.
To save your finished product as a PNG or JPEG, you will need the Business Edition of Silhouette Studio to do so.
Let's get started by opening up Silhouette Studio. We will be using a Boho Wolves Bundle from Design Bundles.
We will be using a size 12 x 12 artboard for this seamless pattern. Choose No Machine > No Cutting Mat > 12 inches x 12 inches. If you prefer, you can choose to turn off your grid.
We will start by selecting open > Merge > Select your folder > Select your images > Ok. Repeat this process to merge as many images as you would like. Resize your images to fit on the artboard as needed.
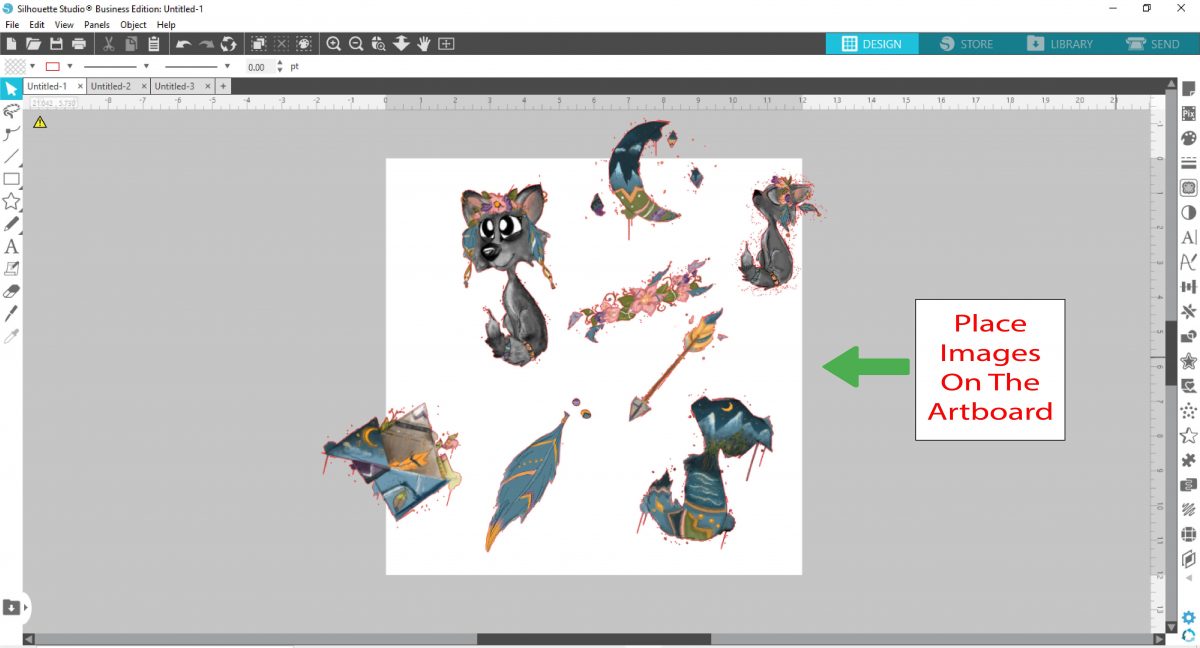
Here you will position your images throughout the artboard. When adding an image that covers an edge, remember the image will be on the opposite side of the artboard once finished. That is not an empty space. These images are not set in stone and can be moved later on.
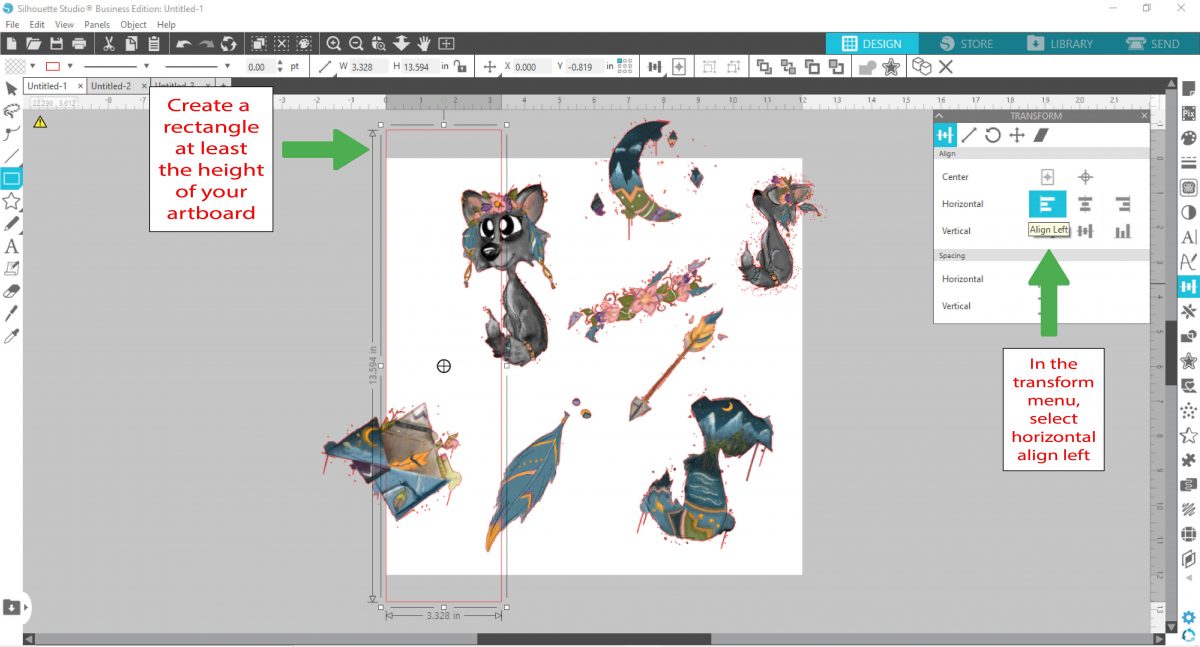
Create a rectangle that is at least the same height as your artboard. Then under the Transform panel select Align and click on Left Horizontal. This will place your rectangle on the farthest left corner of your artboard.
Using a shortcut, select Ctrl + Left. This will duplicate your rectangle to the left.
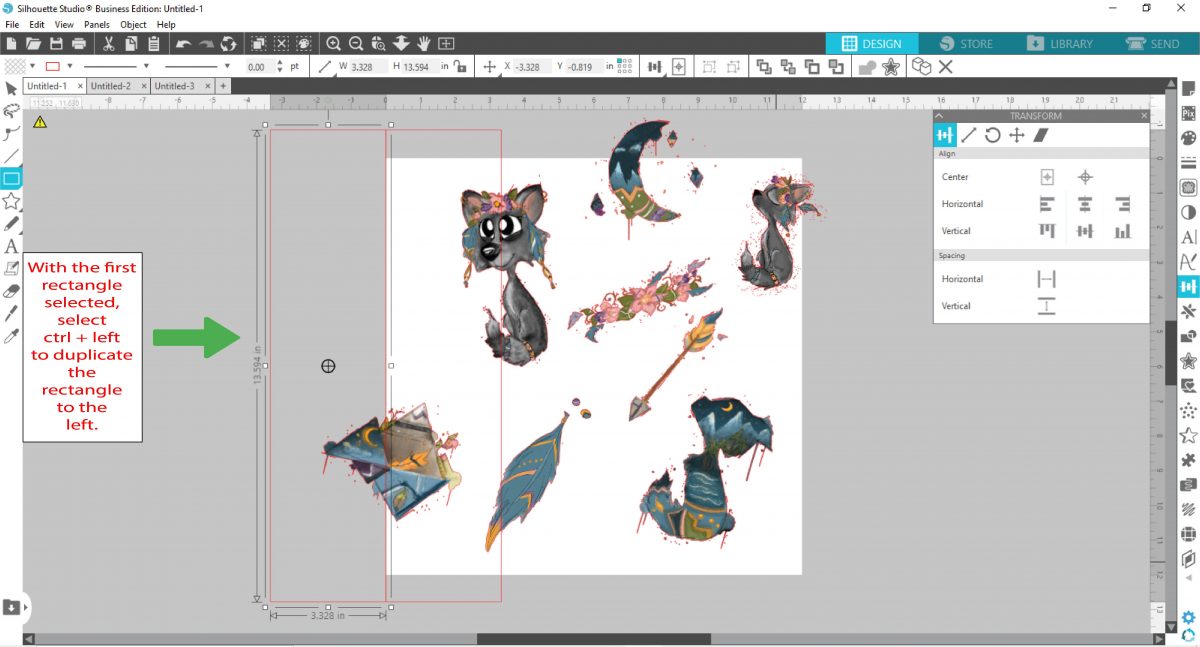
Duplicate the image that is overlapping the edge on the left side. Do to this select the image and press Ctrl + Left arrow on your keyboard.
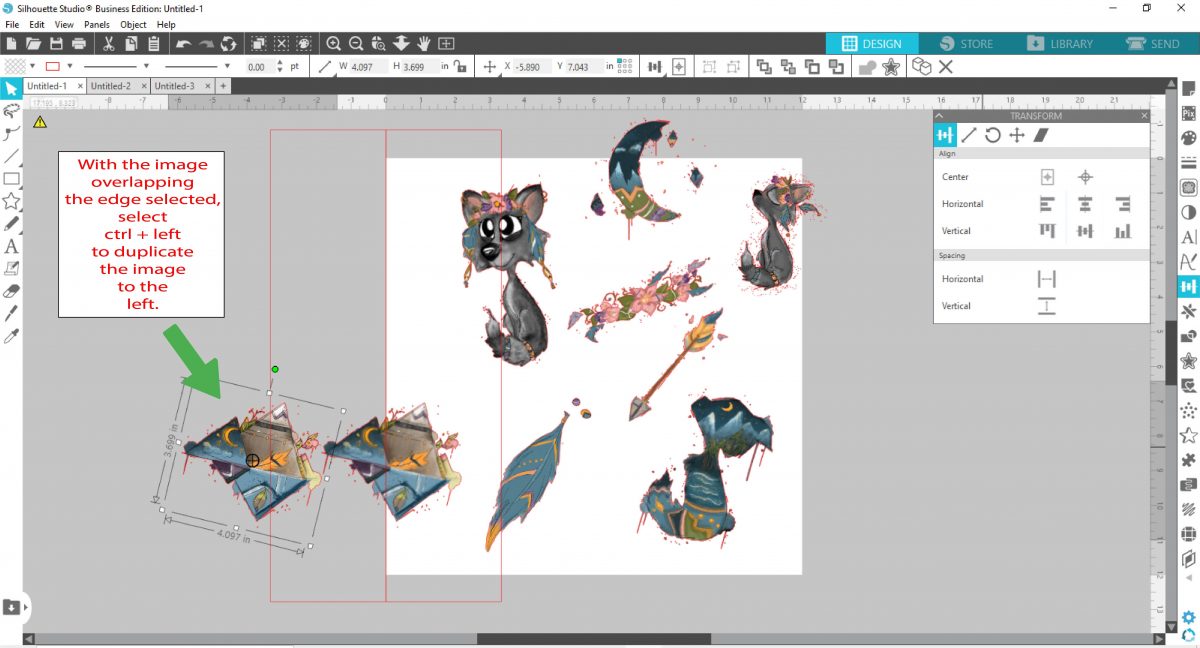
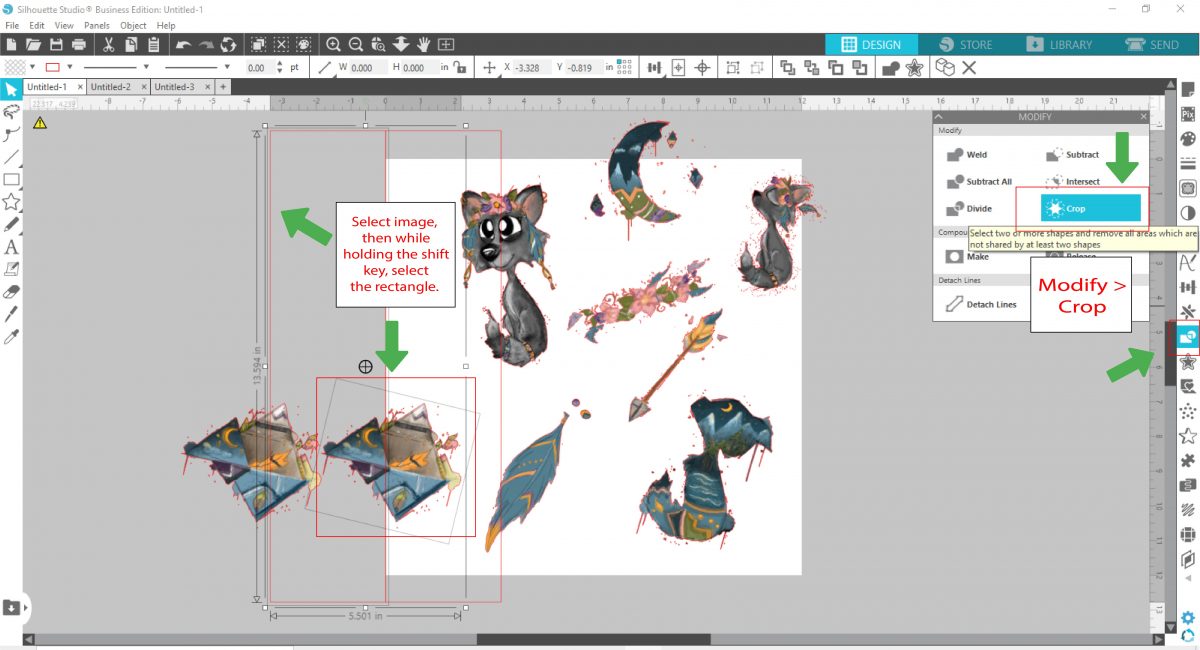
Select the original image and while holding the Shift key, select the duplicate rectangle. Next click on the Modify panel to open and click Crop.
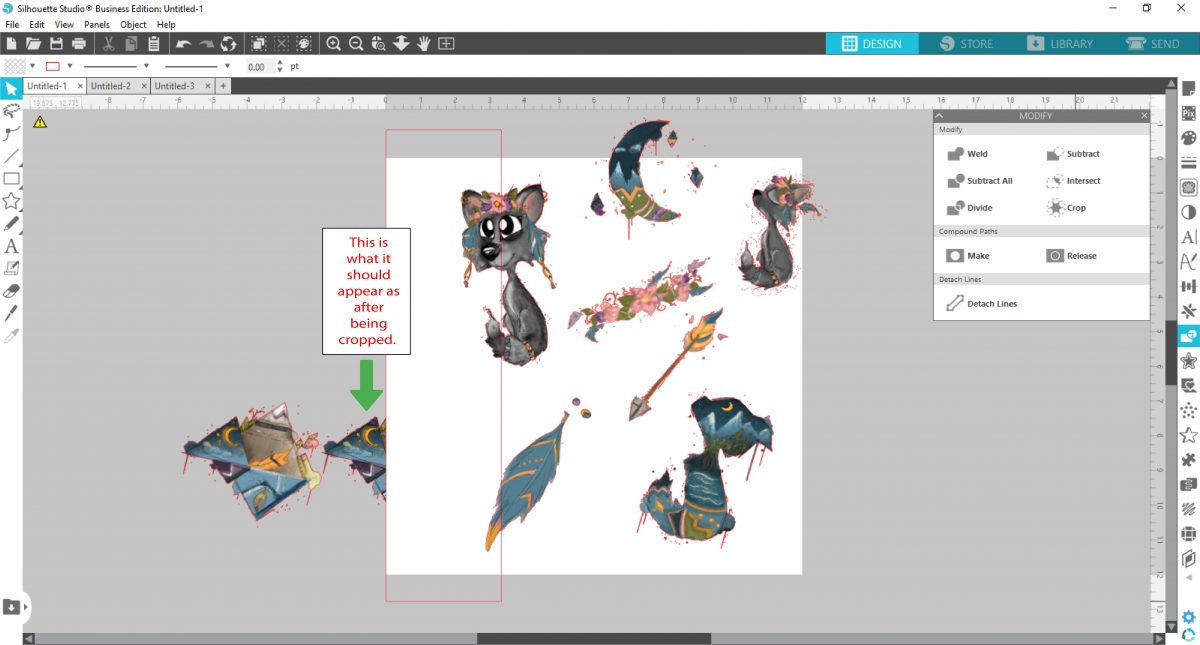
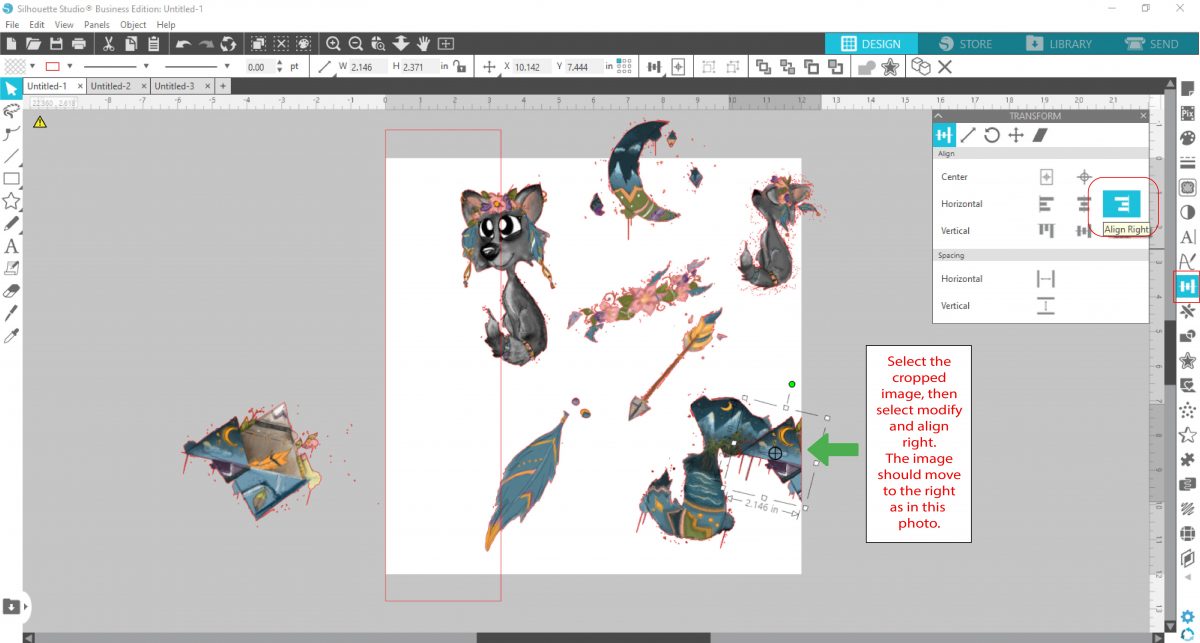
Select the cropped image. Then select the Align tool and select Horizontal right. This will move your image to the right hand side of the artboard. Don't worry if it overlaps another image. Those images can still be moved around and positioned to work with the edges. This will be done at a later step.
IMPORTANT-DO NOT MOVE ANY OF THE IMAGES ONCE THEY HAVE BEEN CROPPED AND ALIGNED ALONG THE EDGES.
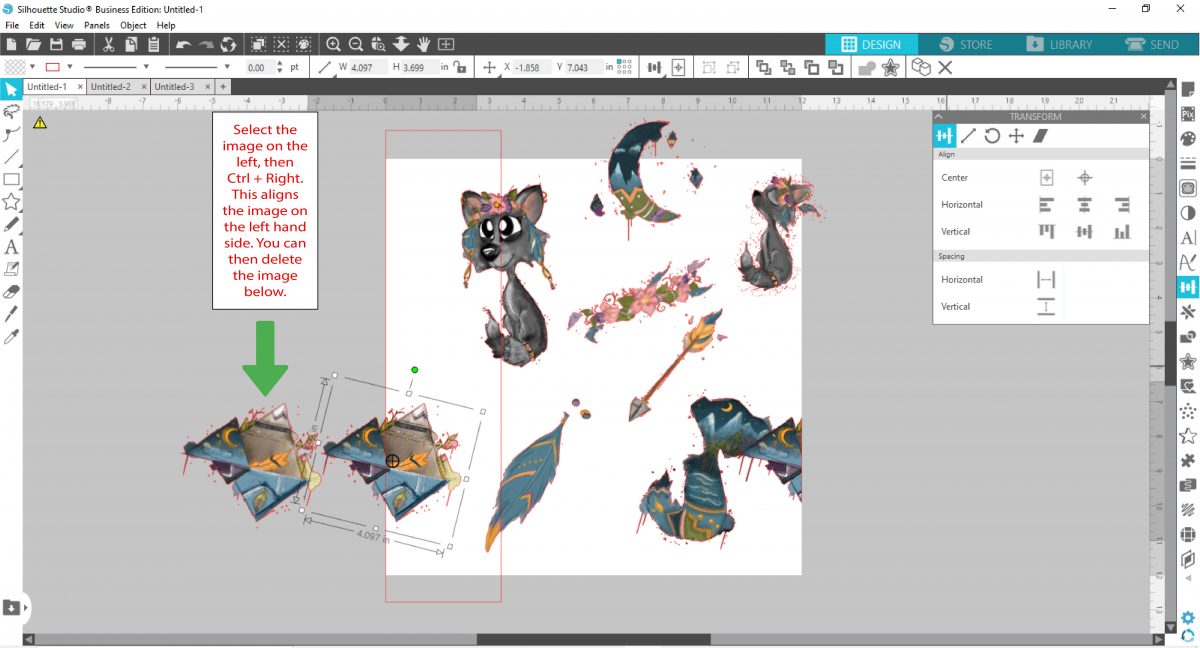
Select the duplicate image on the left side. Then, use the shortcut to align it on the left side of the artboard. You do this by selecting Ctrl + Right. Remember to not move this image again, once it has been aligned.
Follow these steps for any other images you may have overlapping on the left side.
Replace and resize some of the overlapping images before moving forward. This will help keep things clean and nothing will get in the way.
We are going to be working with the image overlapping on the right side now. This requires you to move the rectangle to the right side. You do this by selecting the rectangle and then selecting the Align tool on the right hand side. Then select Horizontal Right align. Once it is aligned, you should duplicate it. Do this with the shortcut Ctrl + Right.
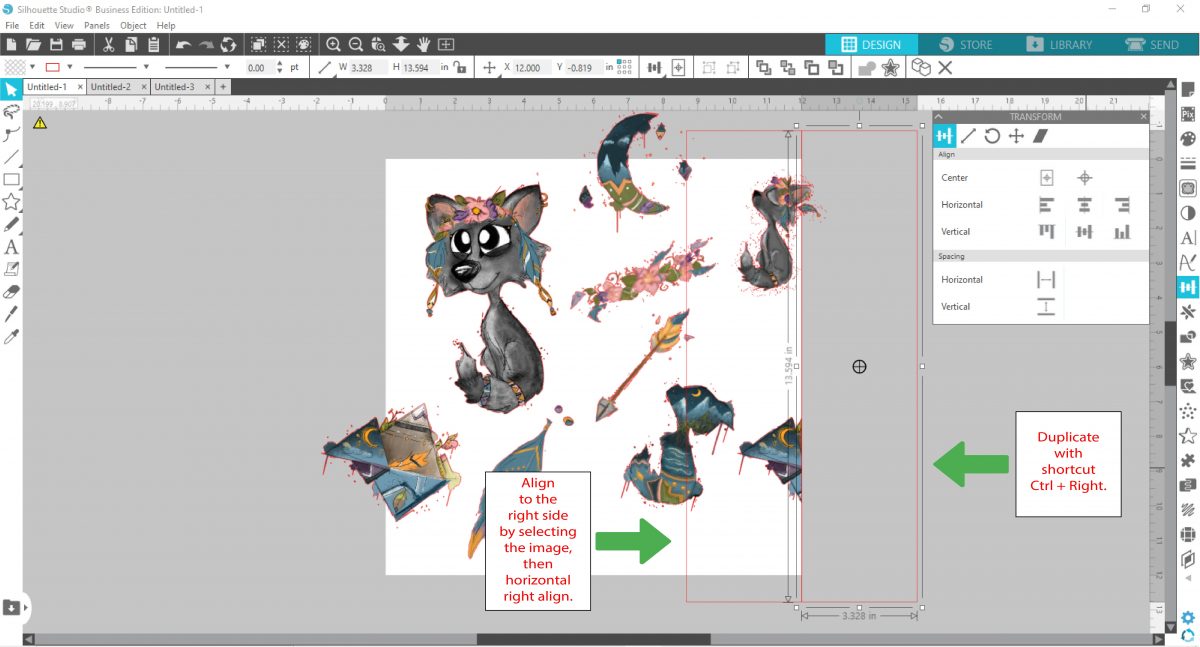
Duplicate the image that is overlapping the edge using the shortcut. Ctrl + Right. This duplicates your image to the right.
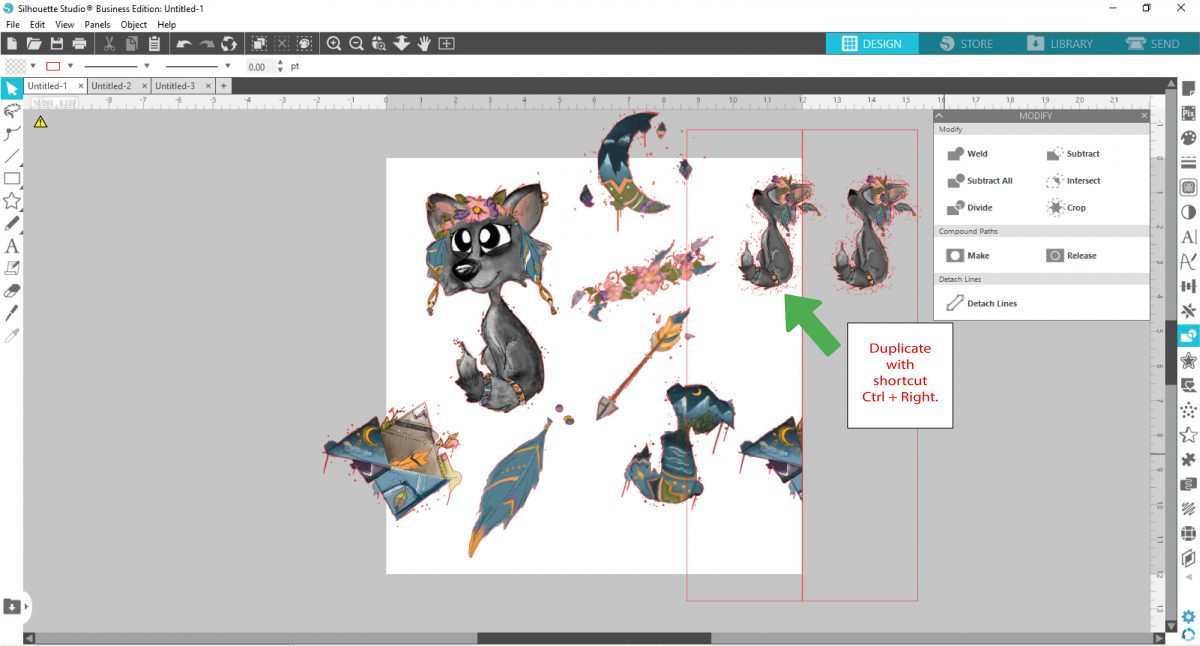
Select the original image. Then while holding the shift key, select the duplicate rectangle. Next, select the modify tool and crop.
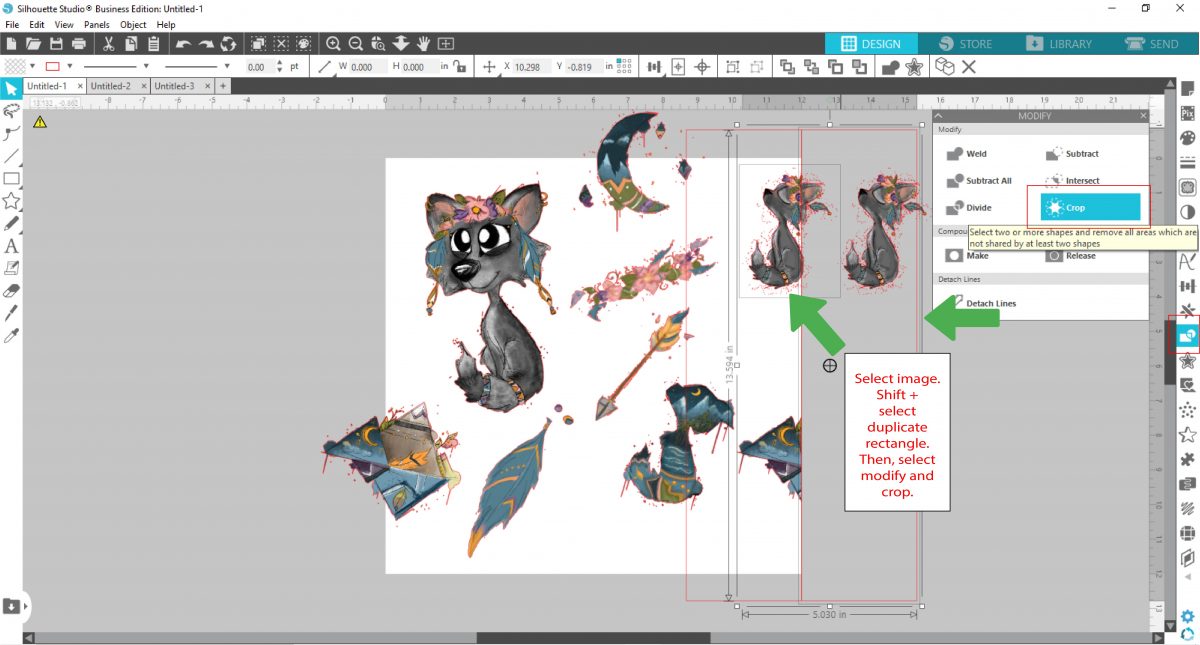
This step is a little different. Depending upon your clip art, you may or not have to take this step. However, with the clipart we are using, this specific image requires it to be group before proceeding. I recommend skipping this step in the future and if the next step does not move correctly, you know this is a step that has to be taken. You can then select undo and repeat this step.
To move forward with this step, simply right click with the image selected and select group.
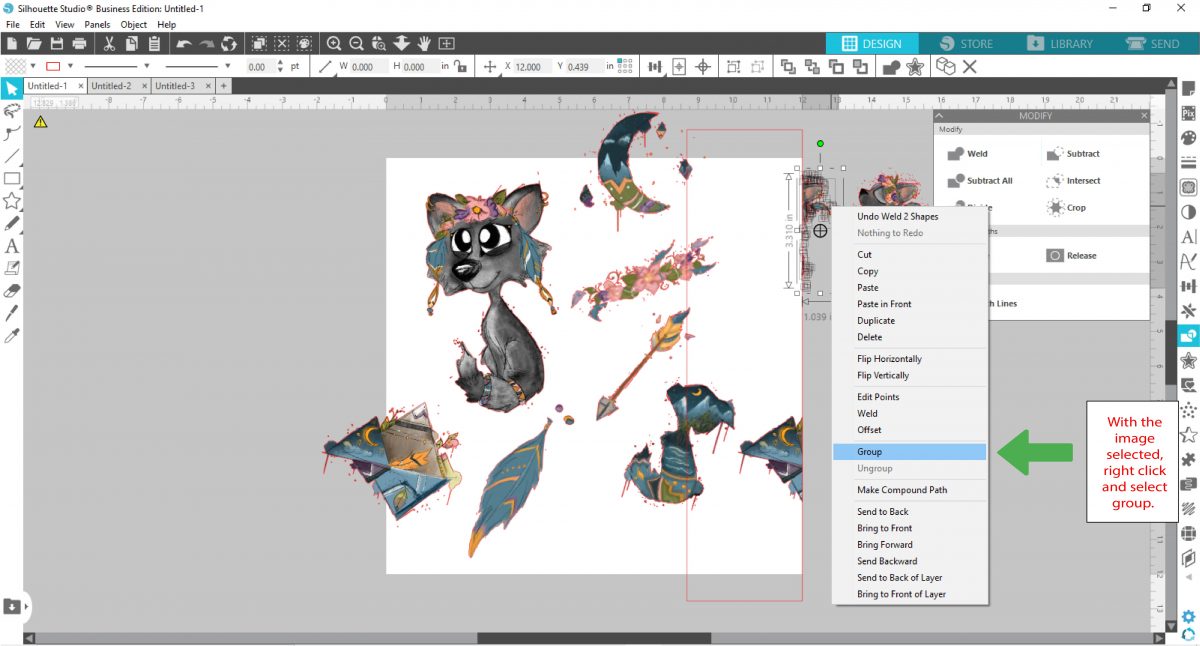
Select the cropped image. Then select the "align tool" and select "horizontal left." This will move your image to the left hand side of the artboard. Remember don't worry if it overlaps another image.
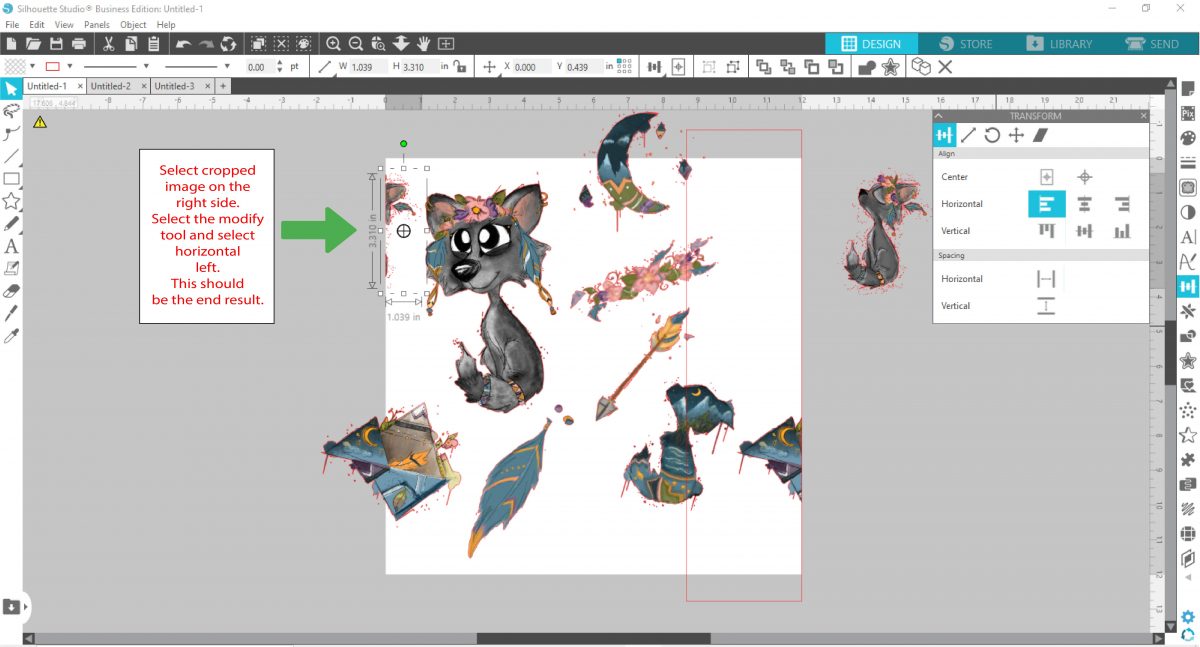
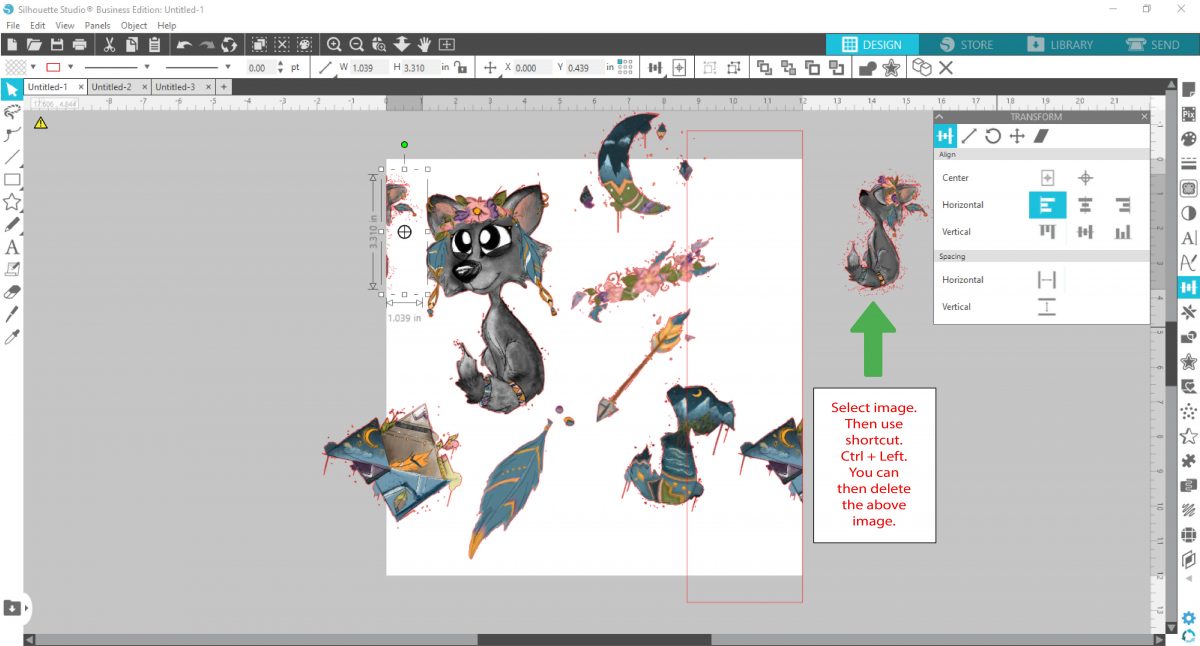
Select the duplicate image on the right side. Then, use the shortcut to align it on the right side of the artboard. You do this by selecting Ctrl + Left. This is an image you want to make sure you don't move again, once it is aligned.
Follow these steps for any other images you may have overlapping on the right side.
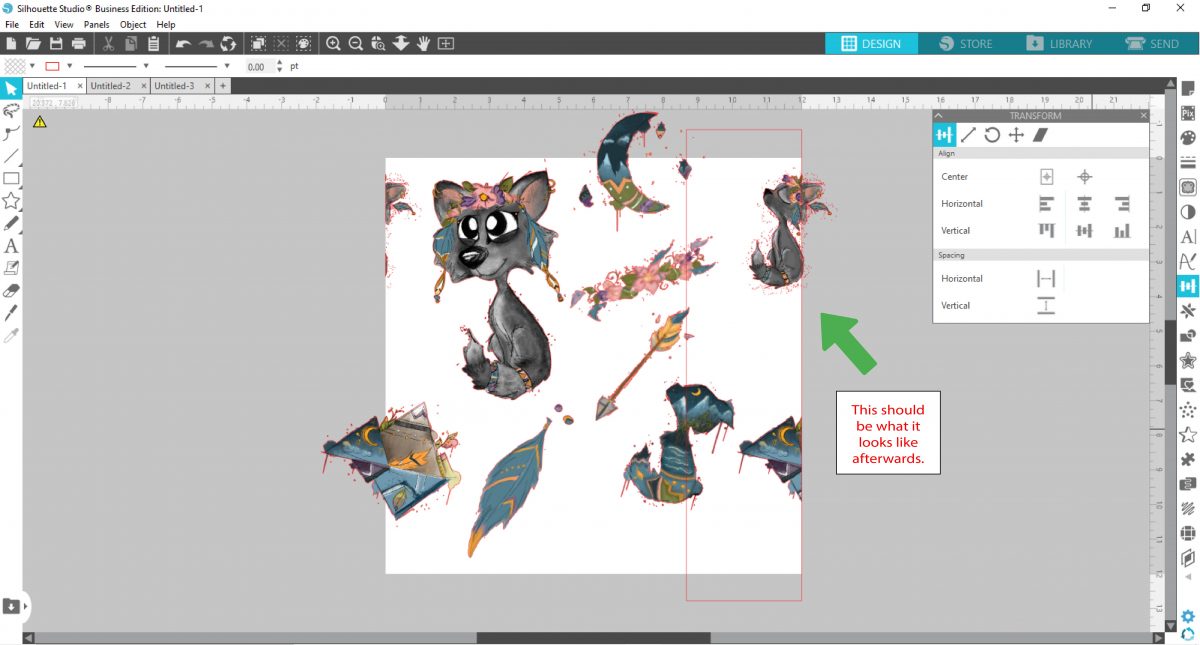
Here we need to reposition the rectangle in order to cover the image overlapping the edge on top. Select the rectangle and open the transform tool. Rotate 90 degrees. Then select align > center > align top.
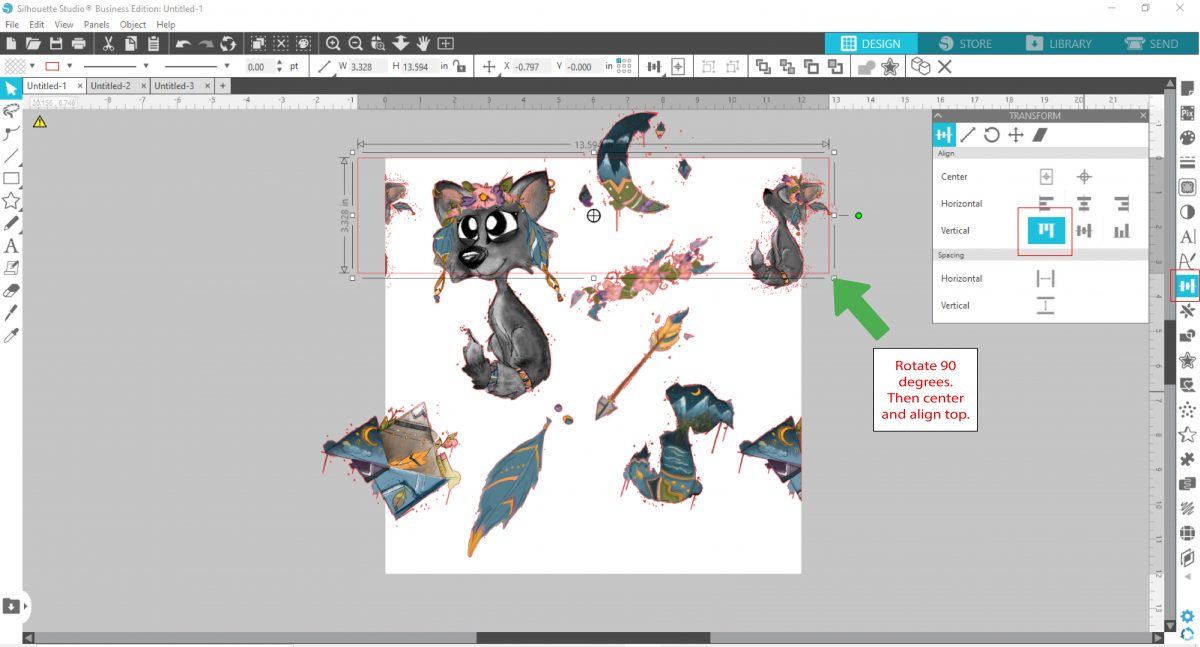
Duplicate the rectangle using the shortcut, Ctrl + Up. Then select the image overlapping the edge and repeat the shortcut.
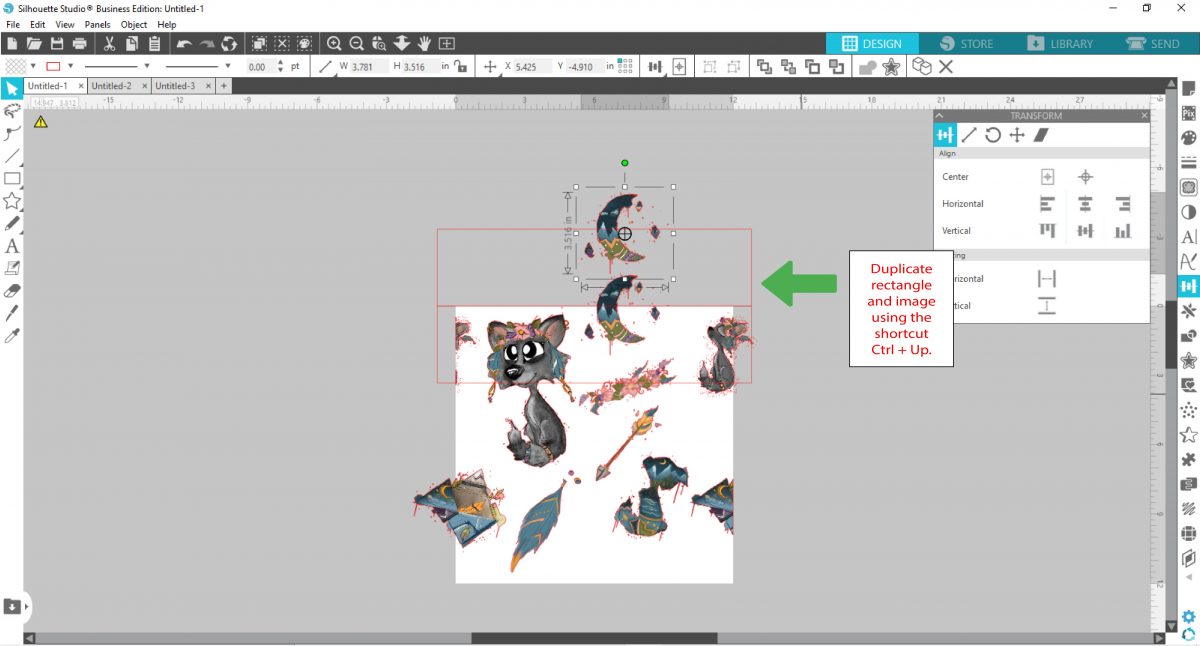
Repeating the steps that you took above, you need to crop the image. Select the original image. Then while holding the shift key, select the duplicate rectangle. Next, select the modify tool and crop.
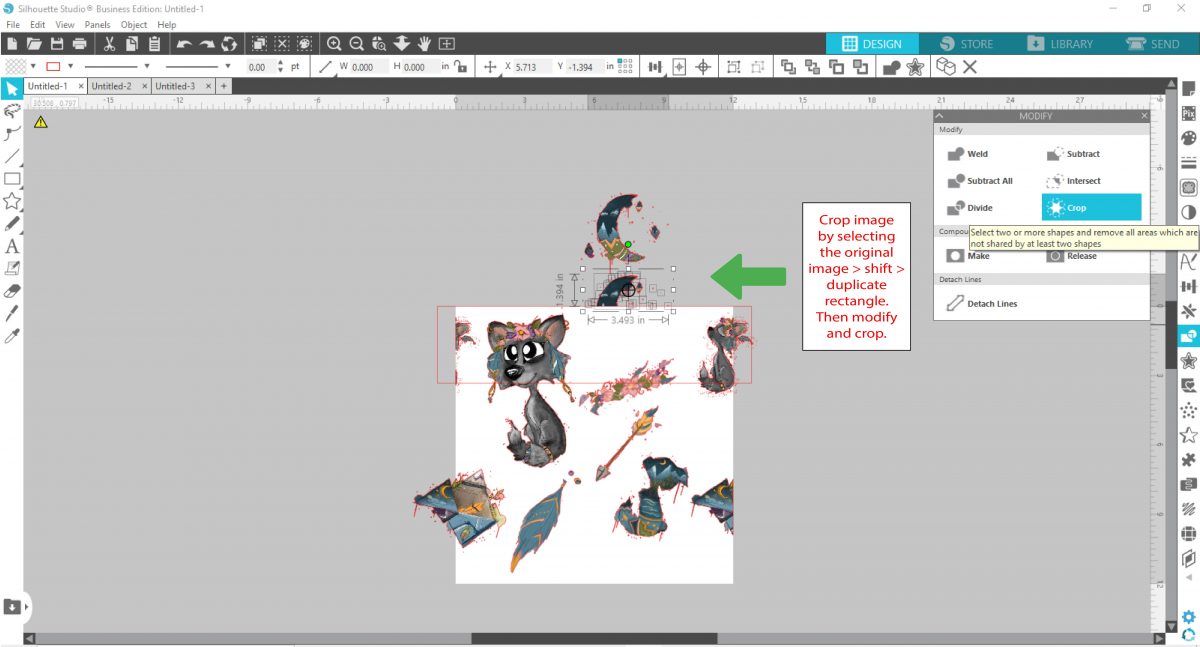
Group by selecting the image and right clicking. Remember this is not always a requirement.
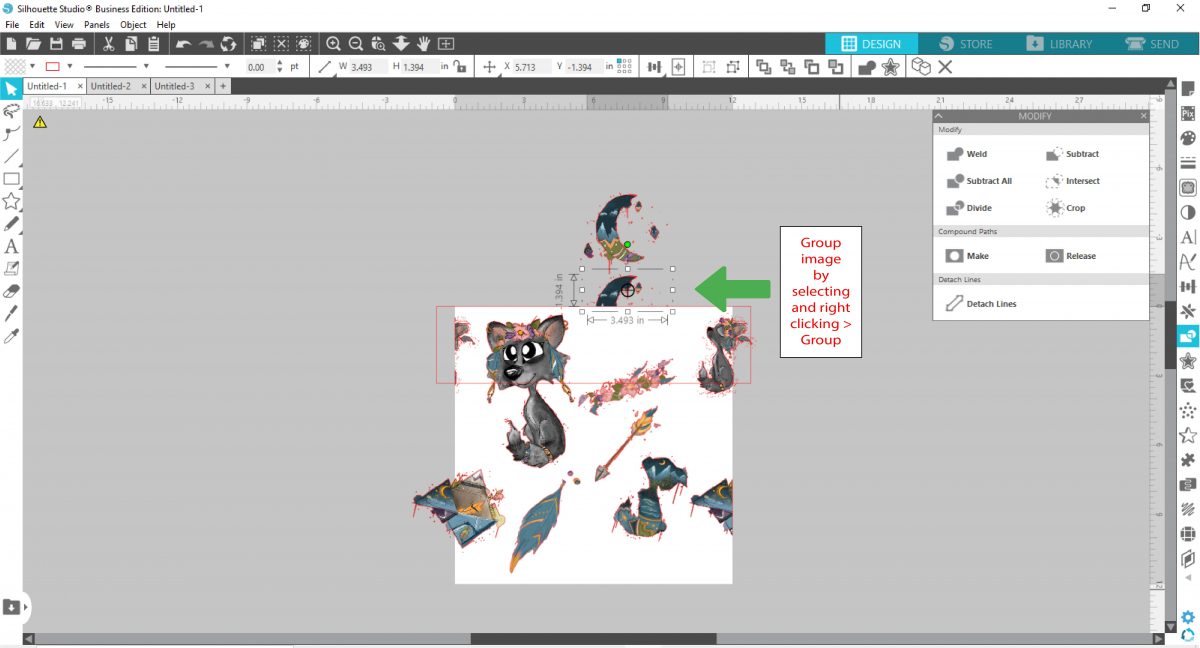
Select the cropped image. Then select the "align tool" and select vertical > align bottom. This will move your image to the bottom side of the artboard.
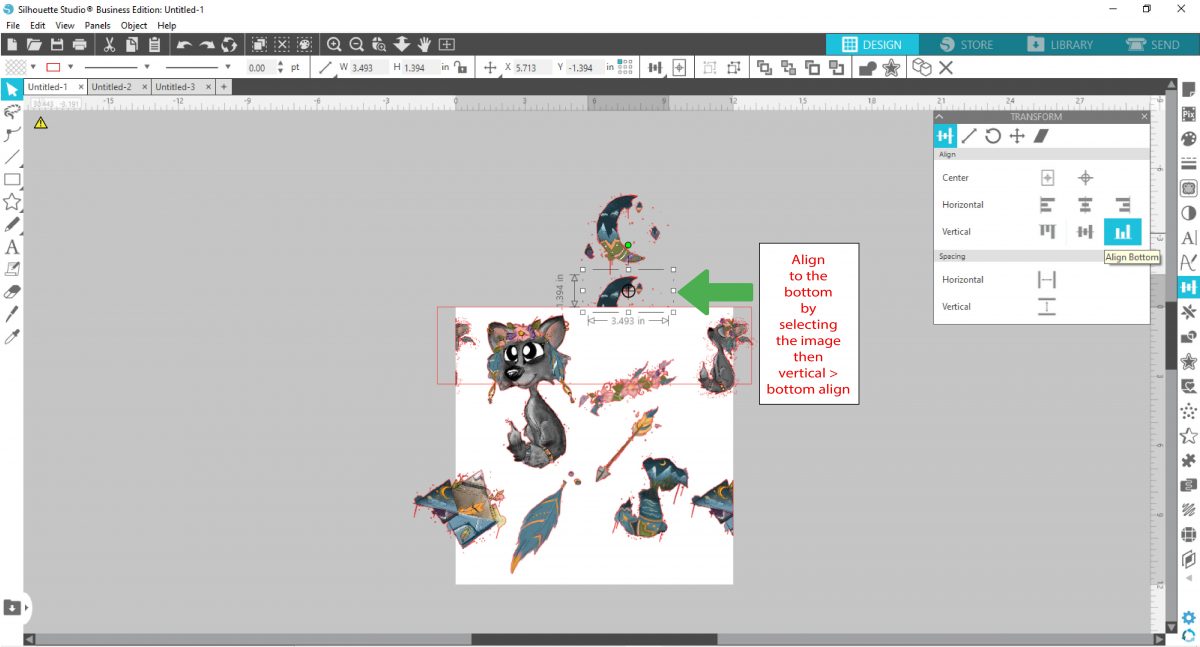
Select the duplicate image on the top. Then, use the shortcut to align it on the top of the artboard. You do this by selecting Ctrl + down. You should then delete the image above the aligned image. Once it's aligned, make sure to not move that image again.
Follow these steps for any other images you may have overlapping on the top.
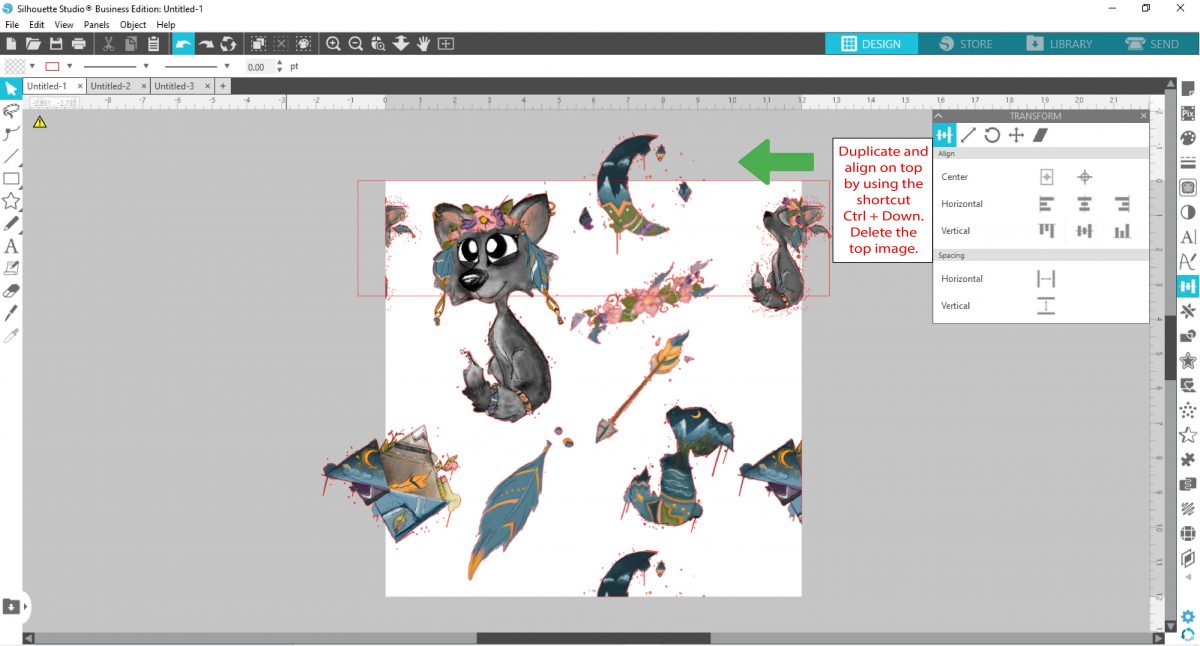
Fill in your gaps by duplicating and resizing the images, until you are happy with the outcome.
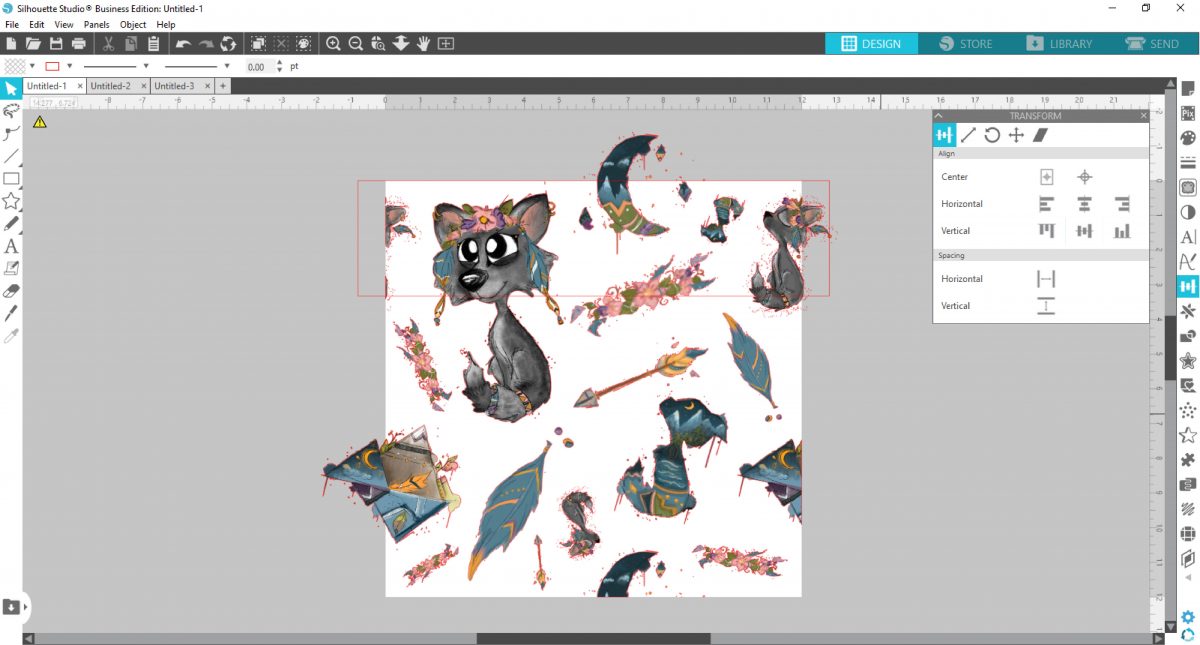
Delete the rectangle that was used for placement
Here you can have fun and choose any background you would like. I decided to use a solid background by creating a square > right select > send to the back > center. I filled it with a light blue. However, this is where you can have more fun if you would like.
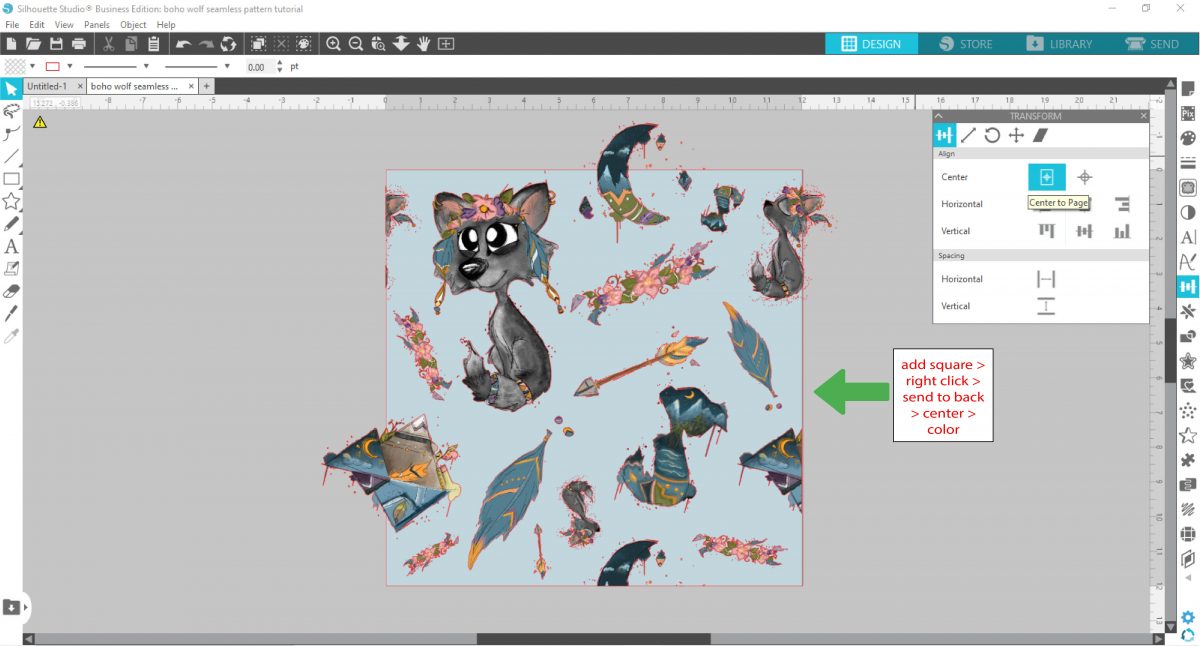
You will notice that it still looks incomplete because the images are still overlapping the edges. However in Silhouette Studio, it will only save what is actually on the artboard itself. Once saved as a PNG or JPEG, you will no longer see the images overlapping and it will then be seamless.
Now that your seamless pattern is done you are ready to save it. Click on File and select Save As then Save to Hard drive. This will save the file to your computer. Give the file a name and next to Save as type, choose either JPEG or PNG.
***If you have Silhouette 4.4, you will notice there are red cut lines on the outside of your images. Those are the automatic cut lines that are produced on a PNG with a transparent background. You can choose to cut these off by selecting the whole image and changing the red outlines to transparent. This way when saved the red cut lines will not be shown.
If you don't have a lot of time and want to skip the design process, check out the seamless patterns on Design Bundles! Make sure to also take a look at some of our other tutorials such as creating sticker sheets in Silhouette and adding outlines around text in Silhouette Studio.
Seamless patterns are created with the purpose of placing them side by side and the edges meet up seamlessly. This is an intermediate to advanced tutorial, so you will need to know how to import images into silhouette.
If you are a more visual learner, check out the video below.
To save your finished product as a PNG or JPEG, you will need the Business Edition of Silhouette Studio to do so.
Let's get started by opening up Silhouette Studio. We will be using a Boho Wolves Bundle from Design Bundles.
Step 1 - Setup page and merge images
We will be using a size 12 x 12 artboard for this seamless pattern. Choose No Machine > No Cutting Mat > 12 inches x 12 inches. If you prefer, you can choose to turn off your grid.
We will start by selecting open > Merge > Select your folder > Select your images > Ok. Repeat this process to merge as many images as you would like. Resize your images to fit on the artboard as needed.
Step 2 - Position images
Here you will position your images throughout the artboard. When adding an image that covers an edge, remember the image will be on the opposite side of the artboard once finished. That is not an empty space. These images are not set in stone and can be moved later on.
Step 3 - Add a rectangle and align
Create a rectangle that is at least the same height as your artboard. Then under the Transform panel select Align and click on Left Horizontal. This will place your rectangle on the farthest left corner of your artboard.
Using a shortcut, select Ctrl + Left. This will duplicate your rectangle to the left.
Step 4 - Duplicate and crop image on the left edge
Duplicate the image that is overlapping the edge on the left side. Do to this select the image and press Ctrl + Left arrow on your keyboard.
Select the original image and while holding the Shift key, select the duplicate rectangle. Next click on the Modify panel to open and click Crop.
Step 5 - Align image to the right
Select the cropped image. Then select the Align tool and select Horizontal right. This will move your image to the right hand side of the artboard. Don't worry if it overlaps another image. Those images can still be moved around and positioned to work with the edges. This will be done at a later step.
IMPORTANT-DO NOT MOVE ANY OF THE IMAGES ONCE THEY HAVE BEEN CROPPED AND ALIGNED ALONG THE EDGES.
Step 6 - Duplicate the image and align on the left side
Select the duplicate image on the left side. Then, use the shortcut to align it on the left side of the artboard. You do this by selecting Ctrl + Right. Remember to not move this image again, once it has been aligned.
Follow these steps for any other images you may have overlapping on the left side.
Replace and resize some of the overlapping images before moving forward. This will help keep things clean and nothing will get in the way.
Step 7 - Realign the rectangle and duplicate
We are going to be working with the image overlapping on the right side now. This requires you to move the rectangle to the right side. You do this by selecting the rectangle and then selecting the Align tool on the right hand side. Then select Horizontal Right align. Once it is aligned, you should duplicate it. Do this with the shortcut Ctrl + Right.
Duplicate the image that is overlapping the edge using the shortcut. Ctrl + Right. This duplicates your image to the right.
Select the original image. Then while holding the shift key, select the duplicate rectangle. Next, select the modify tool and crop.
Step 8 - Group if needed
This step is a little different. Depending upon your clip art, you may or not have to take this step. However, with the clipart we are using, this specific image requires it to be group before proceeding. I recommend skipping this step in the future and if the next step does not move correctly, you know this is a step that has to be taken. You can then select undo and repeat this step.
To move forward with this step, simply right click with the image selected and select group.
Step 9 - Align image to the left and right
Select the cropped image. Then select the "align tool" and select "horizontal left." This will move your image to the left hand side of the artboard. Remember don't worry if it overlaps another image.
Select the duplicate image on the right side. Then, use the shortcut to align it on the right side of the artboard. You do this by selecting Ctrl + Left. This is an image you want to make sure you don't move again, once it is aligned.
Follow these steps for any other images you may have overlapping on the right side.
Step 10 - Adjust rectangle and image
Here we need to reposition the rectangle in order to cover the image overlapping the edge on top. Select the rectangle and open the transform tool. Rotate 90 degrees. Then select align > center > align top.
Duplicate the rectangle using the shortcut, Ctrl + Up. Then select the image overlapping the edge and repeat the shortcut.
Repeating the steps that you took above, you need to crop the image. Select the original image. Then while holding the shift key, select the duplicate rectangle. Next, select the modify tool and crop.
Group by selecting the image and right clicking. Remember this is not always a requirement.
Step 11 - Align image to the bottom and top
Select the cropped image. Then select the "align tool" and select vertical > align bottom. This will move your image to the bottom side of the artboard.
Select the duplicate image on the top. Then, use the shortcut to align it on the top of the artboard. You do this by selecting Ctrl + down. You should then delete the image above the aligned image. Once it's aligned, make sure to not move that image again.
Follow these steps for any other images you may have overlapping on the top.
Fill in your gaps by duplicating and resizing the images, until you are happy with the outcome.
Delete the rectangle that was used for placement
Step 12 - Add a background if needed
Here you can have fun and choose any background you would like. I decided to use a solid background by creating a square > right select > send to the back > center. I filled it with a light blue. However, this is where you can have more fun if you would like.
You will notice that it still looks incomplete because the images are still overlapping the edges. However in Silhouette Studio, it will only save what is actually on the artboard itself. Once saved as a PNG or JPEG, you will no longer see the images overlapping and it will then be seamless.
Step 13 - Save as a JPEG or PNG
Now that your seamless pattern is done you are ready to save it. Click on File and select Save As then Save to Hard drive. This will save the file to your computer. Give the file a name and next to Save as type, choose either JPEG or PNG.
***If you have Silhouette 4.4, you will notice there are red cut lines on the outside of your images. Those are the automatic cut lines that are produced on a PNG with a transparent background. You can choose to cut these off by selecting the whole image and changing the red outlines to transparent. This way when saved the red cut lines will not be shown.
If you don't have a lot of time and want to skip the design process, check out the seamless patterns on Design Bundles! Make sure to also take a look at some of our other tutorials such as creating sticker sheets in Silhouette and adding outlines around text in Silhouette Studio.
Related Tutorials
Affinity Tutorials
How to Make a Seamless Pattern in Affinity Designer
In this tutorial you will learn how create a Seamless Pattern in Affinity Designer.
Inkscape Tutorials
How to Make a Seamless Pattern in Inkscape
Discover how to make a seamless pattern Inkscape using a template.
Silhouette Tutorials
How to Make and Edit Shapes in Silhouette Studio
Discover how to make and edit shapes in Silhouette Studio using the Drawing Tool.
Procreate Tutorials
How to Make a Seamless Pattern in Procreate
Discover how to create a Seamless Repeating Pattern using Procreate.
Illustrator Tutorials
How to Make a Seamless Pattern in Illustrator
Silhouette Tutorials