By Design Bundles
Making Your First Cut With Silhouette Curio
Your Silhouette Curio machine is capable of so many amazing crafts. This can be engraving or sketching, card designs, HTV projects and so much more. But, if you are a beginner, you might want some guidance on getting started. In this tutorial we will help you in making your first cut with Silhouette Curio.
For this tutorial we will be using a sun and moon svg by DreamONprints. You are welcome to browse through our selection of SVG cut files for more inspiration.
Step 1 - Change the page layout for the Curio
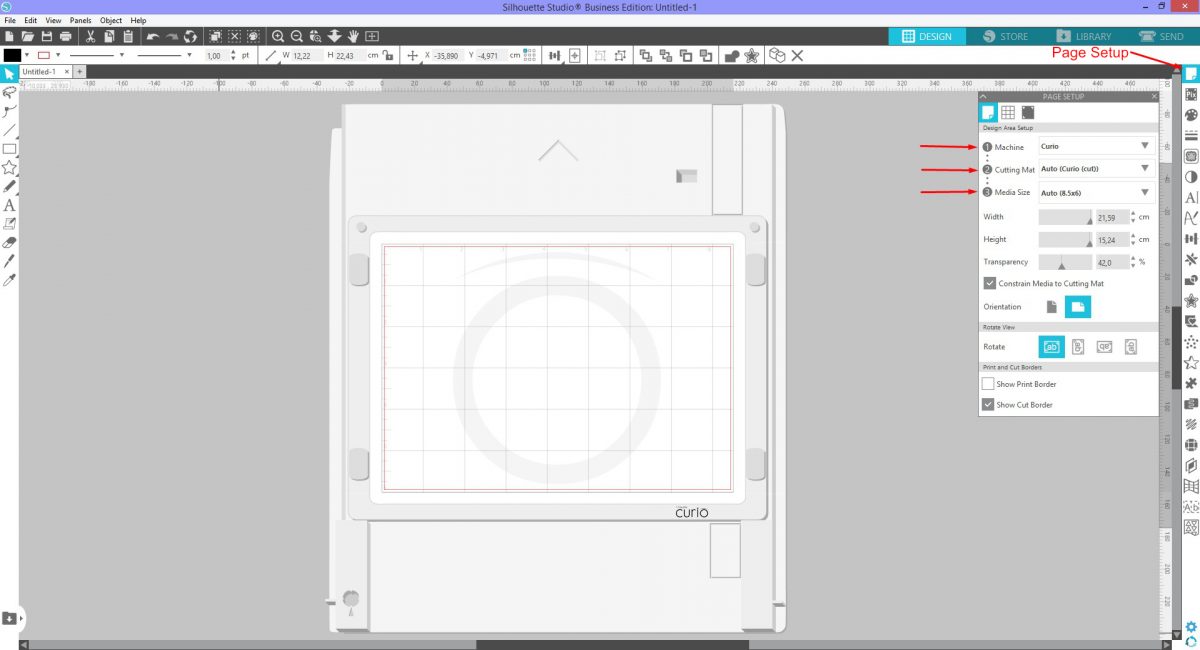
By default, when opening Silhouette Studio the standard Cameo page set up is selected. We need to change this to reflect the Curio. On the right side panel, at the very top, click on Page Setup.

In the Page Setup panel, you will have the option to change the Machine, Cutting mat and Media size. Click on the downward arrow for Machine and change to Curio. The screen will change to reflect the Curio mat.
The settings for Cutting mat and Media size should automatically change. If you are using a larger Curio mat this can be adjusted under the Cutting mat size.
Step 2 - Add your design and Send to cut
Go to the File menu at the top left of the screen and click Open. Locate where your design is stored then open it in Silhouette Studio. When you click on the design, a box with little corner and side nodes will appear. These nodes allow you to adjust the size of the design. To make the design bigger or smaller, select a corner node and drag in or out.

Next, click on the Send panel at the top right of the screen. This will take you to the cut settings where you can adjust them. At the bottom of the screen you will see a machine icon and a number. The number indicates how many machines have been registered in the software.
If you only have a Curio machine, it should automatically be selected. If you have more than one machine, we will have to select the Curio. Click on the machine icon and choose the Curio.

You will see a red and blue circle on the right hand side. Each one represents a carriage that will hold a tool for your machine. If you were going to sketch and cut, then a blade would be placed in carriage and a sketch pen in the other. The red and blue circle will correspond with the circles on your machine.
For this tutorial we will only be cutting the design so the red carriage is selected. Either carriage can be used as long as the tool is placed in the carriage shown on your screen.

Click the drop down arrow and select your Material. The Action and Tool will automatically adjust for a cut. If you need to sketch or emboss then you would change these two settings.
We chose Heat Transfer, Glitter for our material. Be sure that your design is selected and click on Cut. This will cut all areas outlined in red on the screen. The Blade depth, Force, Speed and Passes will adjust according to the settings. You will also see just above these settings a description Cut Heat Transfer, Glitter (Curio Platform 6).
Curio Platform 6 indicates how many platforms are required. This is usually Platform 2 + Platform 2 + Platform 1 + Cutting mat. Your cutting mat is the same thickness as Platform 1. As the HTV is a thin material, all 6 Platforms are used. The total thickness of the platforms and material must not be more than 6mm.

A green tick next to Curio bottom of the screen indicates the machine is ready. Place your material on the mat corresponding with your screen. Now, click the Send button located at the bottom of the screen.
The software will give an indication of the time it will take to cut your material. Once done, remove the material from the mat. It's suggested that you lay the mat with material face down and pull the mat up and away. This is while holding down the material with your other hand. It will help to prevent bending in your material.
Well done on making your first cut with the Silhouette Curio. If you found this tutorial helpful, we have even more excellent tutorials available such as using the sketch tool with the Silhouette Curio.