By Design Bundles
Using Fonts in Silhouette Studio
Fonts can be a focal point for any project or design. The selection of fonts available today is staggering, from big bold fonts to delicate script fonts. Whatever your choice, there is sure to be a font for you. In Silhouette Studio, text is added with the Text Tool. The font is then changed with the Text Style Panel. Colors, gradients and patterns can also be added to fonts. In this tutorial we will give a brief overview of how to access and use your fonts in Silhouette Studio.
You can follow our video tutorial if you need more of a visual guide.
In this tutorial we will be using a chicano lettering font by Muntab Art. If you would like to use a different kind of font be sure to browse our great selection of tattoo fonts from Font Bundles.
Step 1 - Access the Text Tool
Ensure your font has been unzipped and installed in your PC. If you are unsure how to do this, we have a tutorial on installing fonts on Windows for you to follow. The Text tool is located on the left side toolbar and is shown as a capital A. Click this icon then click anywhere on the canvas to begin typing your text.

The text can be edited at any time while this remains as a text object. Even if you click away or work on another design, you can still come back and edit the text. Do this by double clicking on the text to enter edit mode.
Now click away from the text and then click it once. You will be able to move it around, resize, rotate and even change the text alignment. We used the resizing handles to make the text bigger. Then clicked on the Center alignment at the top of the screen.

Step 2 - Use the Text Style Panel
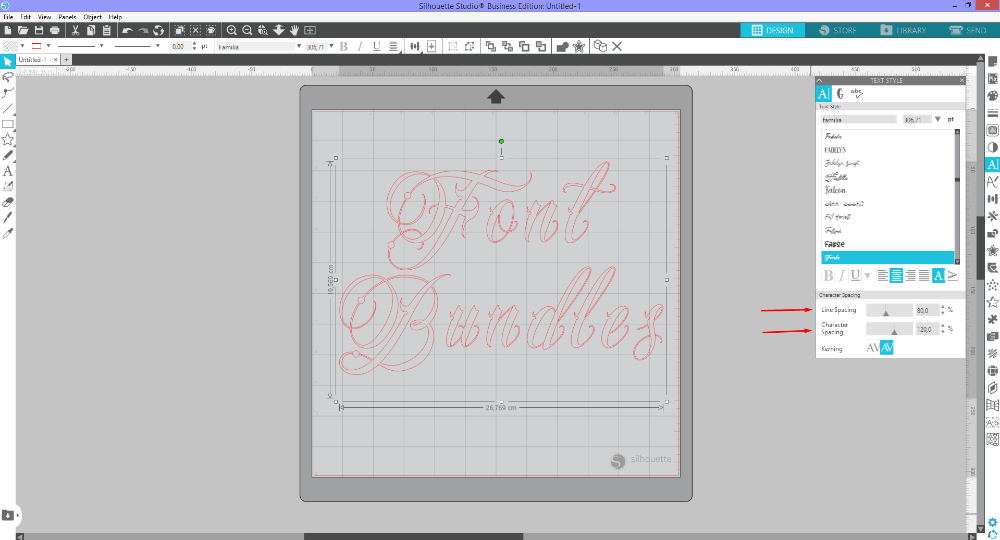
All of the fonts located on your system can be found under the Text Style panel on the right hand side. Click on the Text Style icon to open the panel. Under the font menu scroll down and select your font. Now, depending on the type of font you chose, you may need to resize your text.

You can adjust the Line Spacing, this is the space between the lines of text. You can also adjust the Character spacing, which is the spacing between letters.
Step 3 - Use the Fill panel to add color
Now we want to add some color to our font. On the right hand side you will find the Fill panel. It looks like a painter’s palette. Click on this to open the fill options. Make sure that your text is selected then choose a color.

That’s all there is to get started with using fonts in Silhouette Studio. If you would like to learn more, we have a great in depth tutorial on how to edit text in Silhouette Studio.
We hope that you enjoyed this tutorial and if you want, be sure to check how to create a distressed design and use warp templates in Silhouette Studio.