By Kia Lor
How to Create an Offset Stroke in DesignScape
Today, we will go over how to make an offset stroke in DesignScape. You can use this technique to quickly outline your text.
DesignScape is available for Gold Plus Members only and is an excellent substitute for Photoshop and Illustrator. The program is internet-based, so it won't take up space on your hard drive. You can still use all of your fonts by easily importing them into DesignScape. We have a free 30-day trial available for the Gold Plus Membership if you're interested!
First, you’ll need to create a new document and import your font. We'll be using the Butterfly font in this tutorial, but you can check out our collection of free script fonts on Font Bundles for other fantastic font options.
Step 1 - Add Text Using the Type Tool
Click on the Type Tool (T) in the left toolbar, and select your font from the top toolbar or the Character panel. Click on the canvas and type out your desired text.

Step 2 - Duplicate Text Layer
You can apply a stroke directly to the first text layer if you want, but we will be duplicating the text layer to keep the stroke layer and the text layer separate. In the Layers panel, right-click on the text layer and click Duplicate Layer.

Step 3 - Open the Stroke Properties in the Layer Style Dialog
With the duplicate text layer selected, click on the eff button at the bottom right and select Stroke.

Step 4 - Edit the Stroke Properties
The Layer Style dialog will open with the Stroke tab selected. Here you can change the stroke size, position, blend mode, opacity, and fill type.

Change the Stroke Size
The stroke size affects the stroke thickness.

Change the Stroke Position
The stroke position affects where the stroke is placed based on the outline path of the text itself.
- Inside - places the stroke inside the outline path.
- Center - places the stroke with its center running along the outline path.
- Outside - places the stroke outside the outline path.

Change the Stroke Blend Mode
Blend mode affects how the colors of the stroke interact with the colors under it. There are several different blend mode options. See the following image for a comparison of how the stroke color interacts with the white and purple colors below using the Darken, Normal, and Difference blend modes.

Change the Stroke Opacity
The stroke opacity affects how transparent the stroke is. The following image shows how much the purple brush shape and the white background show through the stroke depending on the opacity.

Change the Stroke Fill Type
The fill type options are Color, Gradient, and Pattern.
Color
When using the Color option, the stroke is simply a solid color. Tap the color box below Fill Type to change the color.

Gradient
This option fills the stroke with a gradient, and there are several properties you can play around with to achieve the look you want.
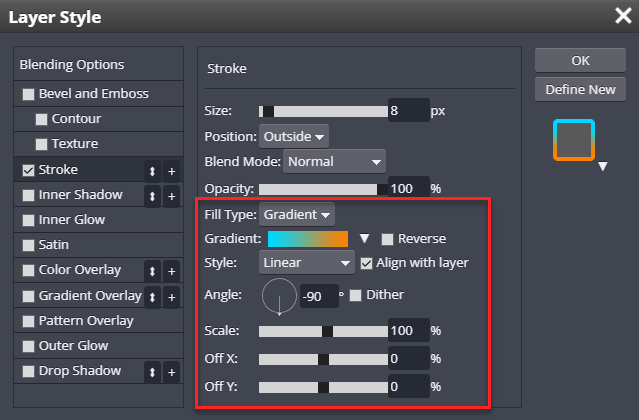
The following is an example of a stroke filled with a gradient.
Pattern
Not only can you fill strokes with colors, but you can even fill them with patterns. This option is very cool and fun! The Pattern option also has several properties you can play around with.
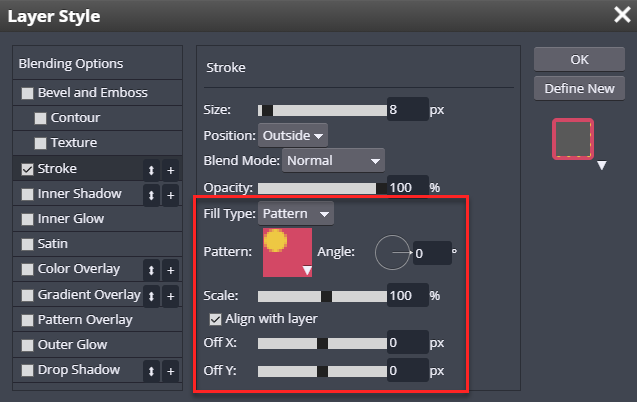
The following is an example of a stroke filled with a pink and yellow polka-dot pattern.

Step 5 - Finish Editing the Stroke Layer
Change Text Color to Be the Same as the Stroke Color
With the Text Tool (T) enabled, select the stroke layer. Then click on the text color picker (next to the size) in the top toolbar, and click on the stroke portion of the text to change the text color (of the stroke layer) to be the same as the stroke color.

Move Stroke Layer Below Text Layer
Because the stroke layer is on top, we can't see the text layer. We will need to move the stroke layer down. Click and drag the stroke layer below the original text layer.

Notice the new order of the layers in the following image.

Step 6 - Save/Export Project
Now you can save or export your project. You'll have to turn off the background layer to save it as a transparent PNG file, or if needed, you could turn off one layer and save it as separate PNG files.
You have finished creating an offset stroke in DesignScape! Use this technique to create unique looks for your text to enhance your designs.