By Kia Lor
How to Use Layer Masks in Photoshop
Maybe you know what a clipping mask is, but you’re a little unsure about layer masks. Layer masks are used to edit and conceal parts of a layer non-destructively. In this tutorial, you’ll learn about the basics of using a layer mask, and then we’ll show you a couple of ways to use them.

In this tutorial, we’ll be using beautiful pictures of Greece.
Basics of Using a Layer Mask
Layer masks work on a grayscale, so when using them, you want to remember the saying, “White reveals. Black conceals.” If you use gray, it will partially reveal/conceal.
Step 1 - Add a Layer Mask
With an image open in Photoshop, select the image layer and click the Add vector mask icon at the bottom of the Layers panel.

You’ll see the layer mask thumbnail to the right of the image layer thumbnail. As of right now, the entire image layer is revealed. You know this is the case because the entire layer mask thumbnail is white.

Step 2 - Set the Foreground and Background Colors
Select the layer mask thumbnail. Then click the Default Colors icon (D) in the left toolbar to reset the foreground color to white and the background color to black. You can quickly swap the foreground and background colors by clicking the Switch Colors icon or pressing the X key.

Step 3 - Select Brush and Edit Brush Options
When using the brush to conceal or reveal areas, you can use any brush tip you want. Select the Brush Tool (B) and open the Brushes panel (Window > Brushes). Then search for and select the brush you want to use.

You can modify the brush preset options in the Options bar at the top. Set the Size and Hardness to what you’d prefer.

Step 4 - Conceal Parts of the Layer Using Black on the Layer Mask
Make sure the layer mask thumbnail is selected, and with black as the foreground color, you can now paint over the areas you want to hide. You’ll see that when hiding parts of the image, what’s below that layer shows through. In our case, there is nothing below, so you’ll see the checkerboard background.

You can use layer masks in this way to create unique edges like we did in our tutorial on creating distressed edges in Photoshop.
Step 5 - Reveal Parts of the Layer Using White on the Layer Mask
To reveal areas you’ve concealed, click the Switch Colors icon or press the X key to swap the foreground and background colors again. Then paint over the concealed areas with white to reveal them.

Step 6 - Disable and Enable Layer Mask if Needed
If you need to hide the layer mask at any point but still have it available for later, you can disable the layer mask. Right-click on the layer mask thumbnail and select Disable Layer Mask. A red ‘x’ will appear on the layer mask thumbnail when it’s disabled. Then to re-enable the layer mask, simply click on the layer mask thumbnail.

Use a Layer Mask With an Adjustment Layer
We have a full in-depth guide on how to combine two images in Photoshop using a layer mask, but for this tutorial, we’ll show you how to use a layer mask with an adjustment layer and then with a selection.
Using a layer mask with an adjustment layer, you're able to conceal parts of the adjustment layer, so it only affects specific areas of your image.
Step 1 - Add an Adjustment Layer
With your image open, select an adjustment to add from the Adjustments panel (Window > Adjustments). We selected the Black & White adjustment.

You’ll notice that the adjustment layer already has a layer mask that is entirely white, meaning the entire adjustment layer is revealed and affects the whole image.

Step 2 - Create a Clipping Mask if Needed
Normally, an adjustment layer affects all the layers below it, but you can clip the adjustment layer to the layer directly below itwith a clipping mask in Photoshop. Right-click on the adjustment layer and select Create Clipping Mask, so it only affects the one layer.

Step 3 - Edit Adjustment Layer’s Layer Mask
Keep in mind that the layer mask is on the adjustment layer this time, so when concealing or revealing, you are doing it to the adjustment layer.
Now conceal parts of the adjustment layer by painting the layer mask with black. Remember that when concealing, what’s below the layer will show through. As shown below, the colored image shows where the adjustment layer has been concealed.

Create unique and meaningful images by highlighting only certain areas of your image.

Use a Layer Mask With a Selection
You can use this technique to cut out parts of an image by concealing areas. Manually create your selection by using a selection tool or importing a transparent PNG that’s in the shape you want your selection to be. We’ll be using a transparent PNG from this bundle of transparent brush stroke png masks.
Step 1 - Place Transparent PNG
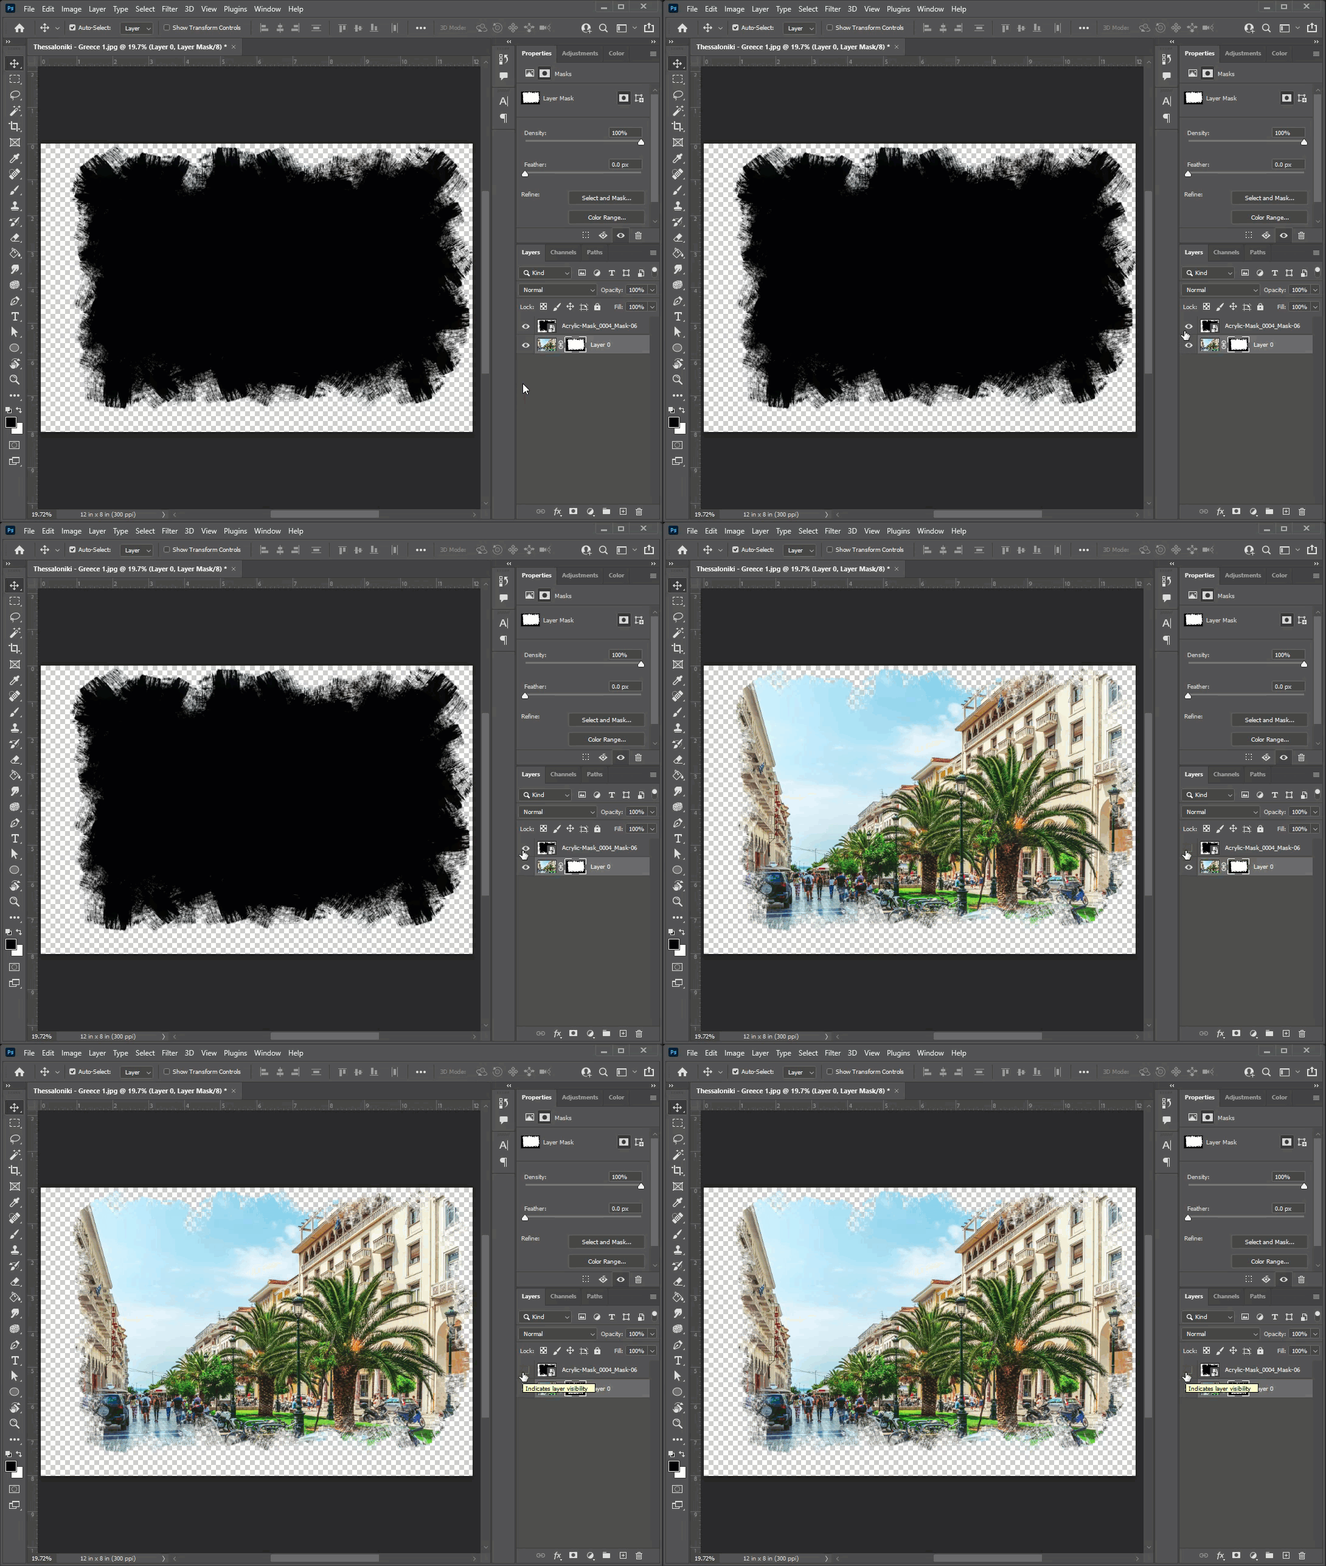
With your image open in Photoshop, go to File > Place Embedded. Then locate your transparent PNG, select it, and click Place.

Once the transparent PNG has loaded, lower its opacity in the Layers panel so we can see through it. We’ll be using the shape of the transparent PNG to cut the image, so place the transparent PNG where you want the image to be cut and in the correct size.

Once it’s where you want it and in the right size, increase the opacity back to 100% and press Enter.
Step 2 - Select Pixels of Transparent PNG Layer
Hold down the Ctrl key and click on the transparent PNG layer thumbnail to select the pixels.

Step 3 - Add a Layer Mask
Select the image layer and click on the Add vector mask icon. It may look like you deleted the image, but that is not the case.

Step 4 - Hide Transparent PNG Layer
To see the result, click on the eye icon of the transparent PNG layer to hide it. As you can see, the image is now in the shape of the transparent PNG.
Step 5 - Edit Layer Mask
You can edit the layer mask the same way as we did earlier in this tutorial using the brush tool if needed. Below is a simple edit we did to reveal a small part of the image.

That’s pretty much everything you need to know about using layer masks in Photoshop! As you can see, layer masks are not too intimidating once you get the hang of using them, so get comfortable with them as they’re an important part of Photoshop. Now go and create some awesome photos using layer masks!