By Design Bundles
How to Make a Gradient in Procreate
Gradients can really help to add depth and texture to your drawings. A color gradient is the transition or blending from one color to another. In this tutorial, we will go over a few different ways on how to make a gradient in Procreate, how to fill shapes with gradients, and how to recolor a gradient.
If you would like to follow along, we will be using the default Soft Brush included in Procreate, a PNG image file from The Huge SVG Bundle, and stamp brushes from the 32 Mystic Procreate Stamps set. We have a tutorial on how to install Procreate brushes if needed.
Make a Gradient Using Gaussian Blur
Gaussian blur will smooth and blur drawings. It’s a very easy tool to use for creating gradients. You can apply Gaussian blur to entire layers or to areas you touch with the pen. In this tutorial, we will be applying Gaussian blur to entire layers.
Step 1 - Fill Layer With Color
Open the Procreate color palette and pick a color. Fill the whole layer with that color. See the image in step 2 for a better understanding.
Step 2 - Fill New Layer With Another Color
Next, add a new layer on top. Pick another color and color fill half that layer.

Step 3 - Activate Gaussian Blur
Tap the Adjustments button in the top menu. Then tap Gaussian Blur and select Layer.

Step 4 - Adjust Gaussian Blur
Adjust the amount of Gaussian blur by sliding your finger or pen left and right across the screen.

Step 5 - Make a Single Gradient Layer
Merge the layers into a single gradient layer by pinching the layers together with your fingers.

You can create gradients with as many colors. Make sure all the colors are on a single layer before applying the Gaussian blur. See the following image for a multicolor gradient example.

This method of using Gaussian blur to create a gradient can also be applied to other shapes of solid colors and not only lines. See the following image for a circular gradient example.

Make a Gradient Using Soft Brush
This method may not be as precise if you want straight lines of gradients. Instead, it allows you to make gradients that follow drawn curves.
Step 1 - Set Up Base Color Layer
Open the Procreate color palette and pick a color. Fill the layer with that color. Next, pick another color. Then, open the Brush Library and select Soft Brush in the Airbrushing category. Make the brush a relatively large size.
Step 2 - Draw Gradient With Brush
Zoom out so the canvas is smaller and easier to work with. Starting with your pen off the canvas, slowly draw across the canvas to create the gradient. Continue to add as many colors as you would like.

Step 3 - Use Gaussian Blur to Fix Gradient
If you are not satisfied with the gradient blending, you can apply a small amount of Gaussian blur to the layer or use the Smudge tool. Merge layers into a single gradient layer.

Make a Gradient Using the Selection Tool’s Feather Option
The Feather option is used to make soft/blurry edges. It can also be used to create gradients.
Step 1 - Fill Layer With Color
Open the Procreate color palette and pick a color. Fill the layer with that color, and pick another color.
Step 2 - Activate Selection
Tap the Selection button in the top menu.
Step 3 - Enable Color Fill
Tap Color Fill in the Selection toolbar at the bottom to enable it.
Step 4 - Draw Selection
Pick a Selection mode, and draw your selection shape. If you are using the Freehand mode, tap the grey circle node after drawing your selection.
The following image shows steps 1 through 4.

Step 5 - Enable Feathering
Next, tap Feather and adjust how soft you want the edge to be. Tap the Selection button to commit changes.

Recolor a Gradient Using the Gradient Map Feature
If you're not happy with your gradient colors, you can even change them using the Gradient Map feature.The Gradient Map feature can not only recolor gradients but also entire drawings. The Gradient Map feature looks at the lights/highlights, darks/shadows, and midtones.
Step 1 - Enable Gradient Map
Tap the Adjustments button, and then tap Gradient Map. Select Layer.

Step 2 - Gradient Library Overview
In the Gradient Library, choose one of the default gradient palettes or create your own. Tap and hold a gradient palette to duplicate or delete it. Tap a gradient palette or the + icon to open the Gradient Map interface. Continue reading to learn about the Gradient Map interface.

Step 3 - Gradient Map Overview
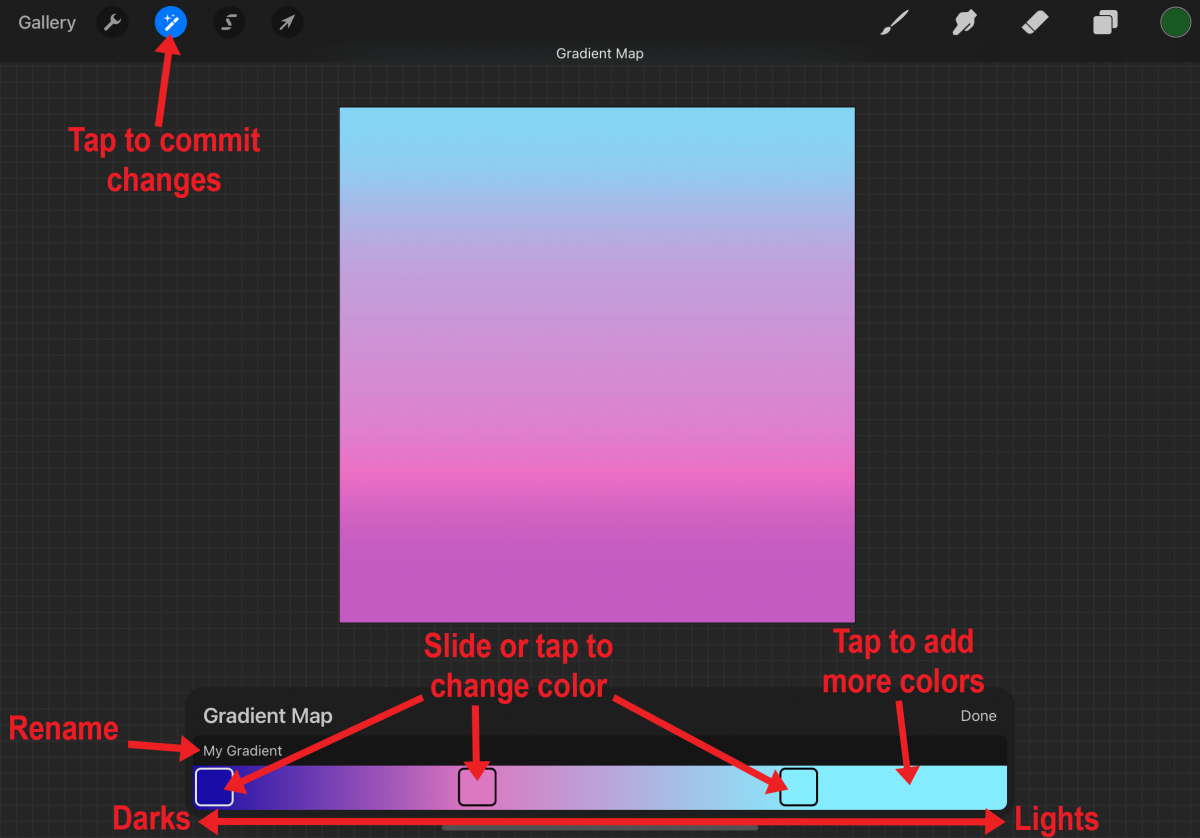
In the Gradient Map interface, you can rename the gradient palette, change the colors in the boxes, slide the color boxes, or add more colors to the gradient bar. The left side of the gradient bar will affect the darker areas of the layer, while the right side will affect the lighter areas of the layer. Tap and hold down on the color boxes to delete them. Change and slide the color boxes to your liking. Tap the Adjustments button to commit changes.
Next up, check out our tutorials on how to use the smudge tool and everything to know about color palettes in Procreate.