By Design Bundles
Warp Tool in Silhouette V4.1
The Mesh Warp Tool is available in the Silhouette Studio Designer Edition and higher. It is a very versatile tool that allows you to warp the shape of your design. Depending on your version, there are three warp options. For this tutorial we will be discussing the Mesh Warp tool in Silhouette V4.
We will be using these colorful balloons clip art and a groovy retro font in this tutorial. Let’s get started by opening Silhouette Studio.
Step 1 - Open design and type out text
You can import your design either by going to File > Open or clicking on the Folder icon top left of the screen. You can also drag and drop your design onto the canvas. Resize as needed.

Once you have imported your design, type out your text using the Text Tool on the left hand side. To change the font click on the Text Style panel on the right side of the screen. We have an in depth tutorial to guide you on how to edit text in Silhouette Studio if needed.
You can change the color fill of the font by clicking the Fill and Stroke option top left.

Step 2 - Apply the Mesh Warp Tool
On the right hand side, click on the Warp Tool that looks like a net. If you are unable to see the Mesh tool, click on the small arrow at the bottom of the right toolbar. A pop up bar will appear with additional tools.
Click on the Balloon clipart to select then click on the Warp Tool. The Warp panel will appear with three warping options. We will select the first one.
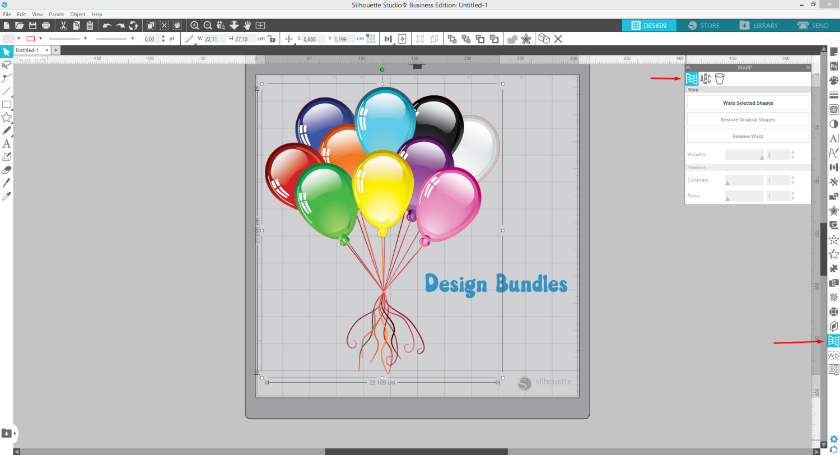
Click on Warp Selected Shapes to place a gridded mesh over the Balloon design.
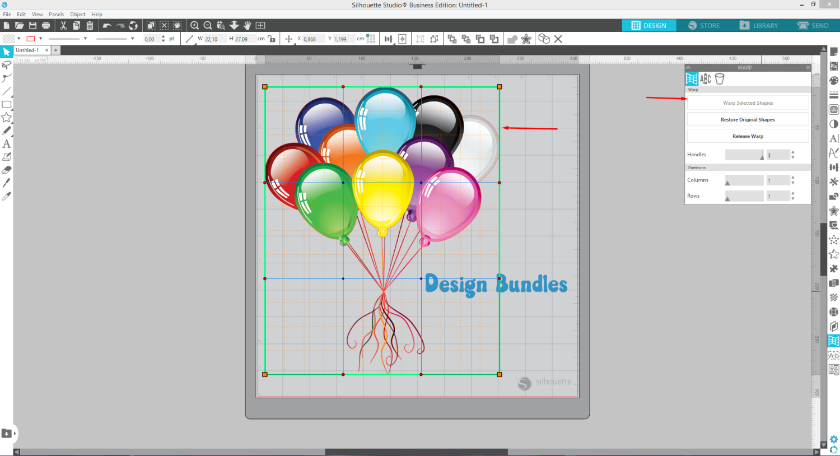
You can increase the mesh points by adding more columns and rows for fine tuning. This works best for smaller adjustments as distortions can be clearly visible.

For this tutorial we will be keeping the default settings for our mesh. If you want to start the mesh over again, simply click Restore Original Shapes.
Step 3 - Adjust the Mesh Warp
Each individual point on the mesh has a handle. You can click and drag on any of these points and also adjust the handles. Here we manipulated the design so the Balloons have a curve in the them.

We then applied a warp mesh to the text. This is an instance of where you can increase the columns and rows. It will allow you to move a smaller part of the mesh at a time.
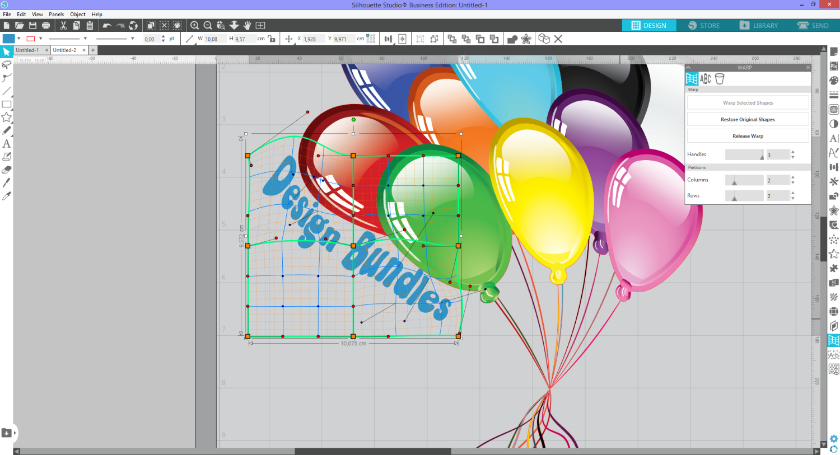
If, by accident, you click away from the mesh, don’t worry. Just click back on the design and the mesh will be accessible again. However, once you click on Release Warp, the design will become individual objects. The mesh can no longer be edited but you can add a new mesh warp to the same objects.
The individual objects can also be repositioned and resized as you want.


If you enjoyed this tutorial we have more excellent tutorials to learn from such as using warp templates and weeding small text in Silhouette Studio.