By Design Bundles
Photoshop Tutorials9 min
How to Create a Fog Overlay in Photoshop
Overlays are images or textures placed on an additional layer. We use overlays to insert new elements into photos or projects that were not there before. By using blending modes and adjustment layers, you can transform a daylight scene into a foggy afternoon. In this tutorial, you will learn how to create a fog overlay in Photoshop.
Many overlays have a transparent or black background. They are then placed on top of the original photograph and blended in. In this example, we will add fog to a city sidewalk photo using a fog overlay for Photoshop to add the desired effect.
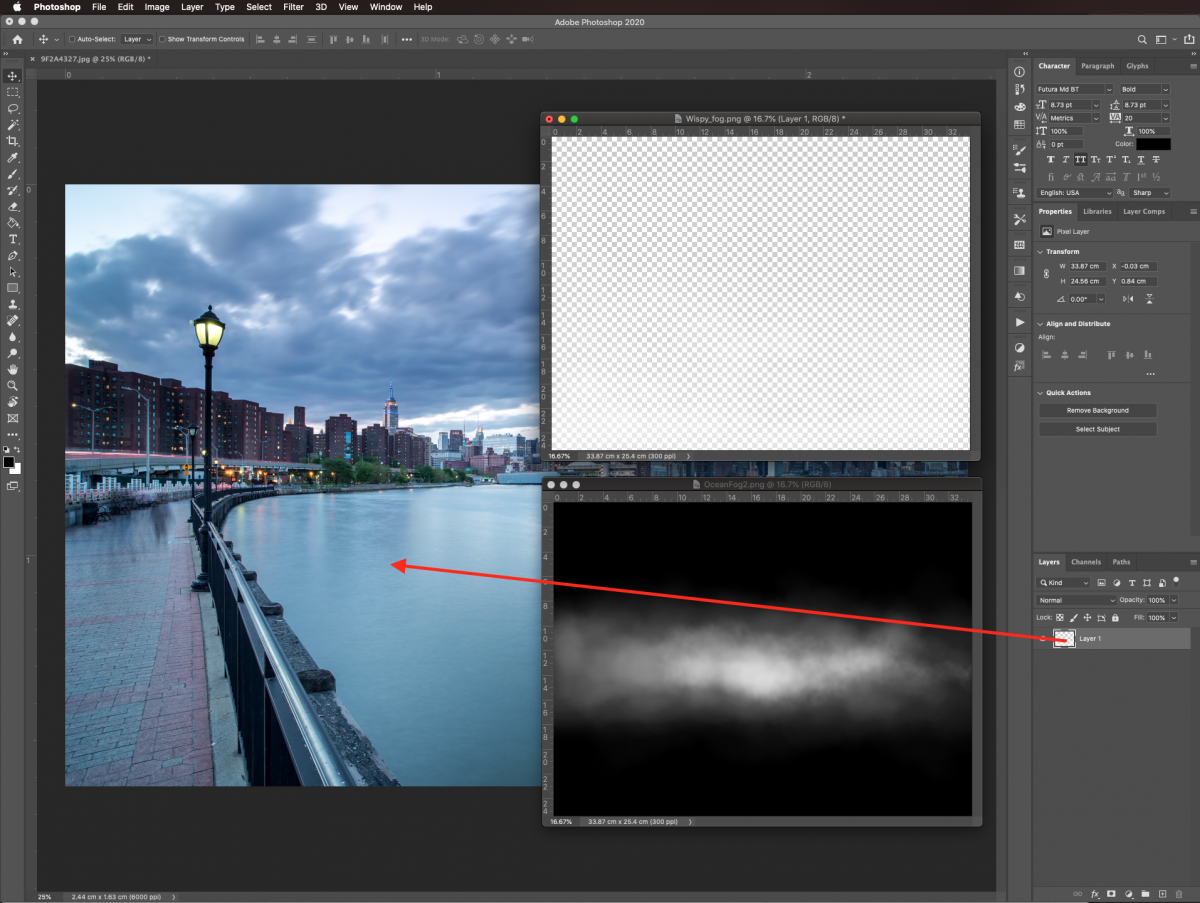
Once in Photoshop, open the images you chose to work with. Bring in the Fog overlay images by dragging from their thumbnail onto the one you are using as a background.
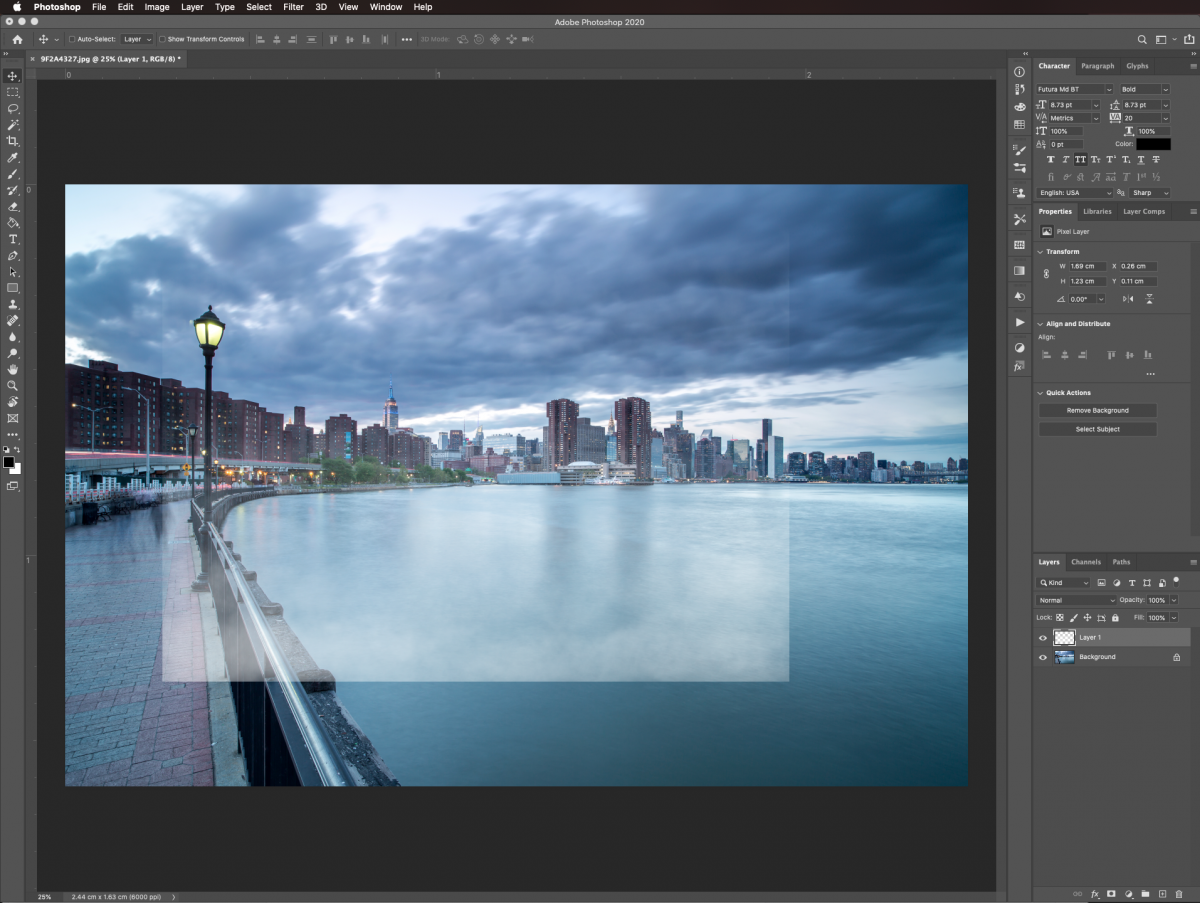
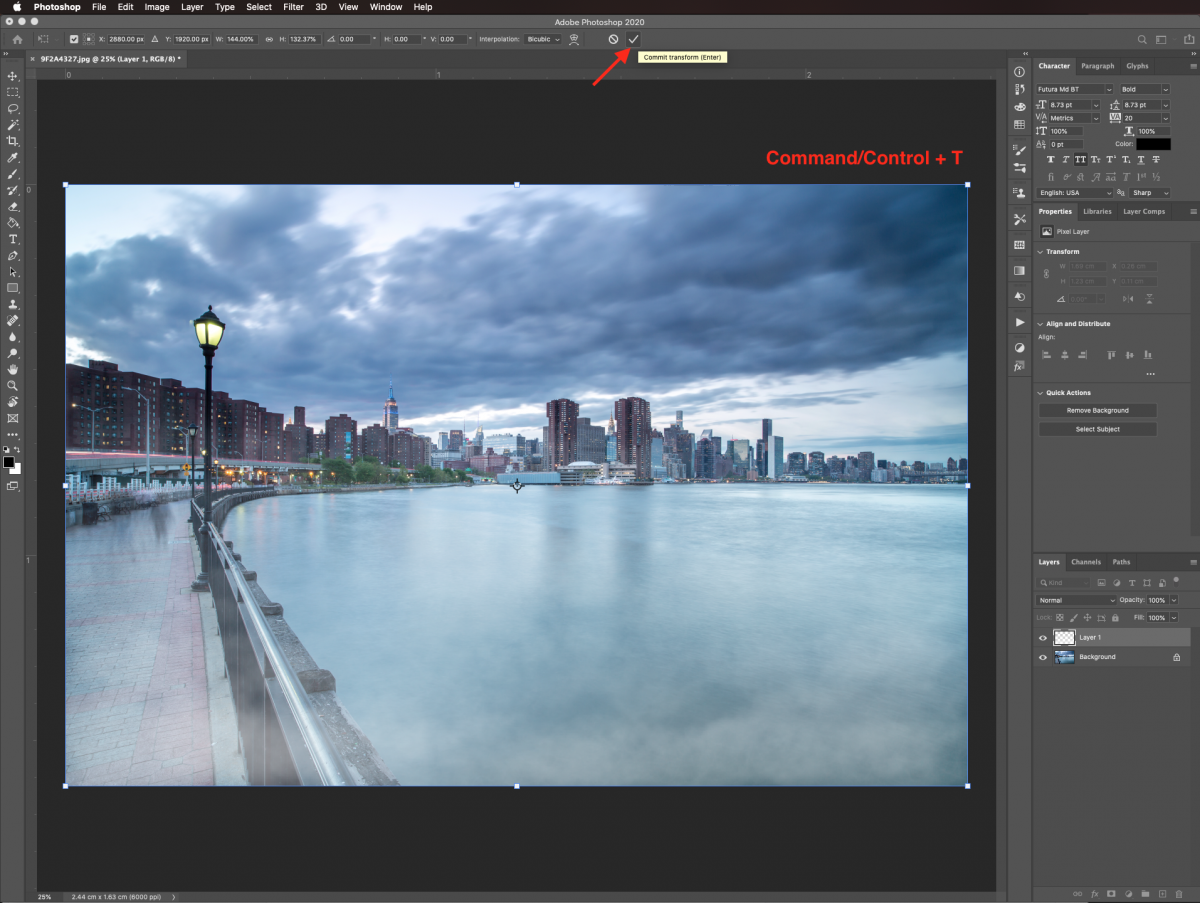
If the photo is too small or too big you can adjust the size. Resize and/or rotate by using Free Transform (Command/Control + T). When you are done, hit Enter or click the checkmark icon on the top menu to commit the changes.
Occasionally overlay images have a black background (not transparent). If that’s the case, you will need to blend it into the background image to get rid of the unwanted dark portions.
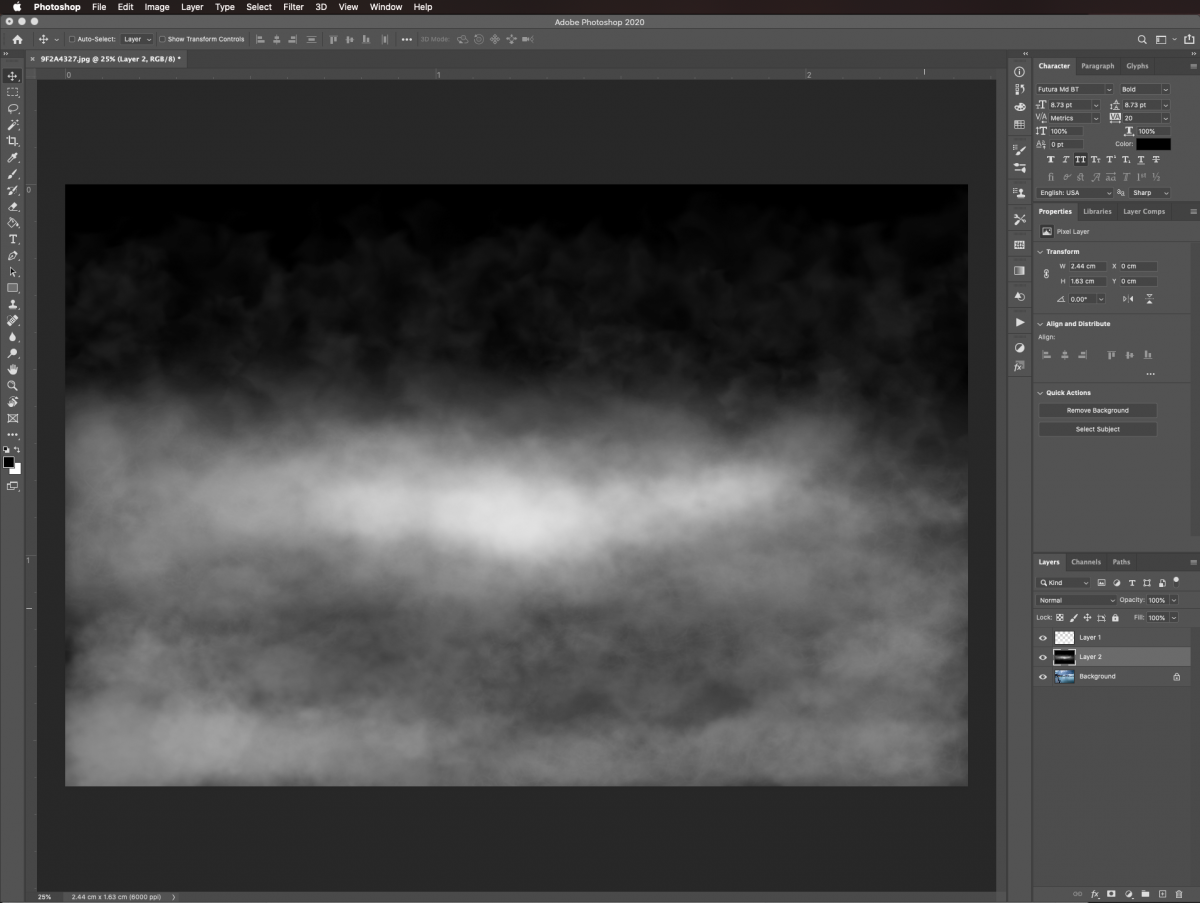
Select the overlay layer, change its Blending Mode to Screen and lower the Opacity if needed. In our case, we left the opacity at 100%.
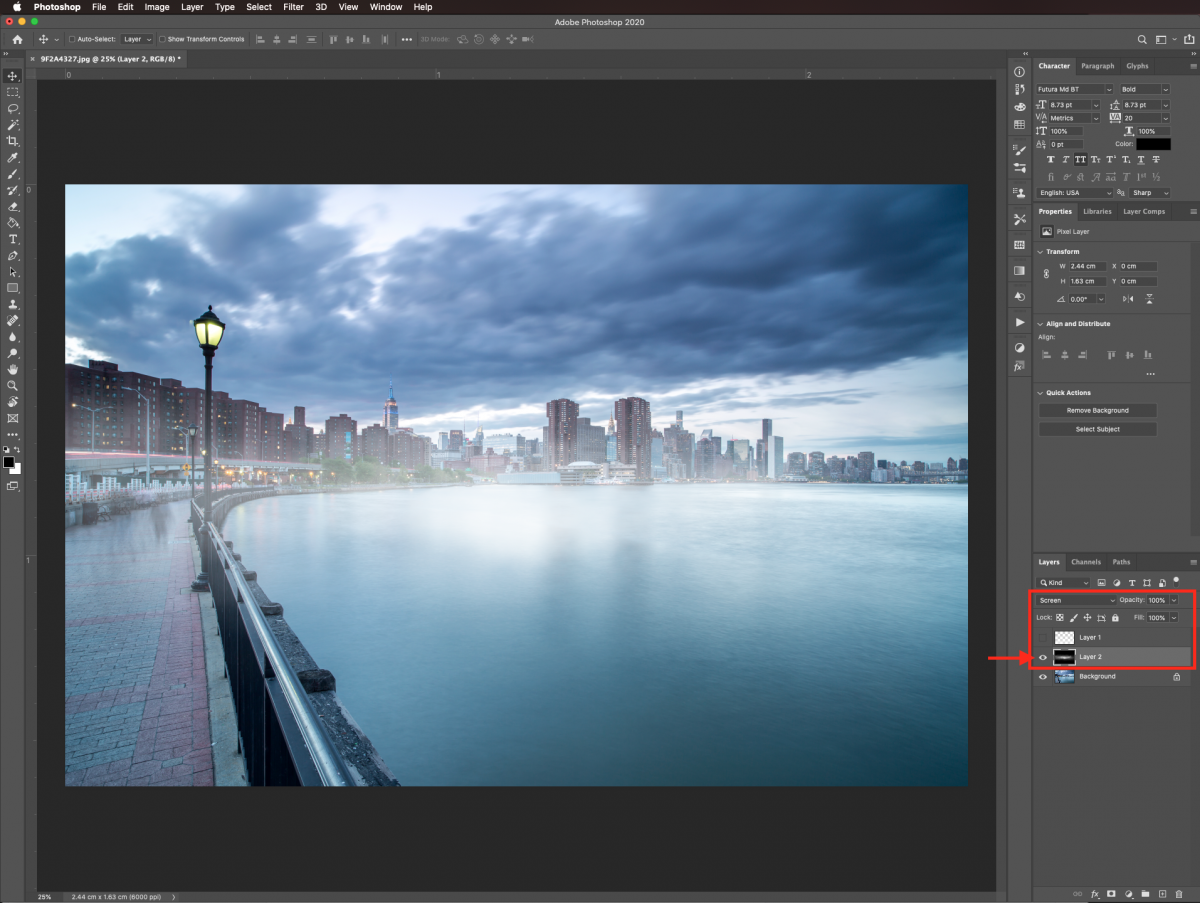
If your overlay image contained a black background an adjustment layer can add more depth to the fog. First, go to the Adjustments panel and create a new Levels Adjustment Layer on top of the overlay layer.
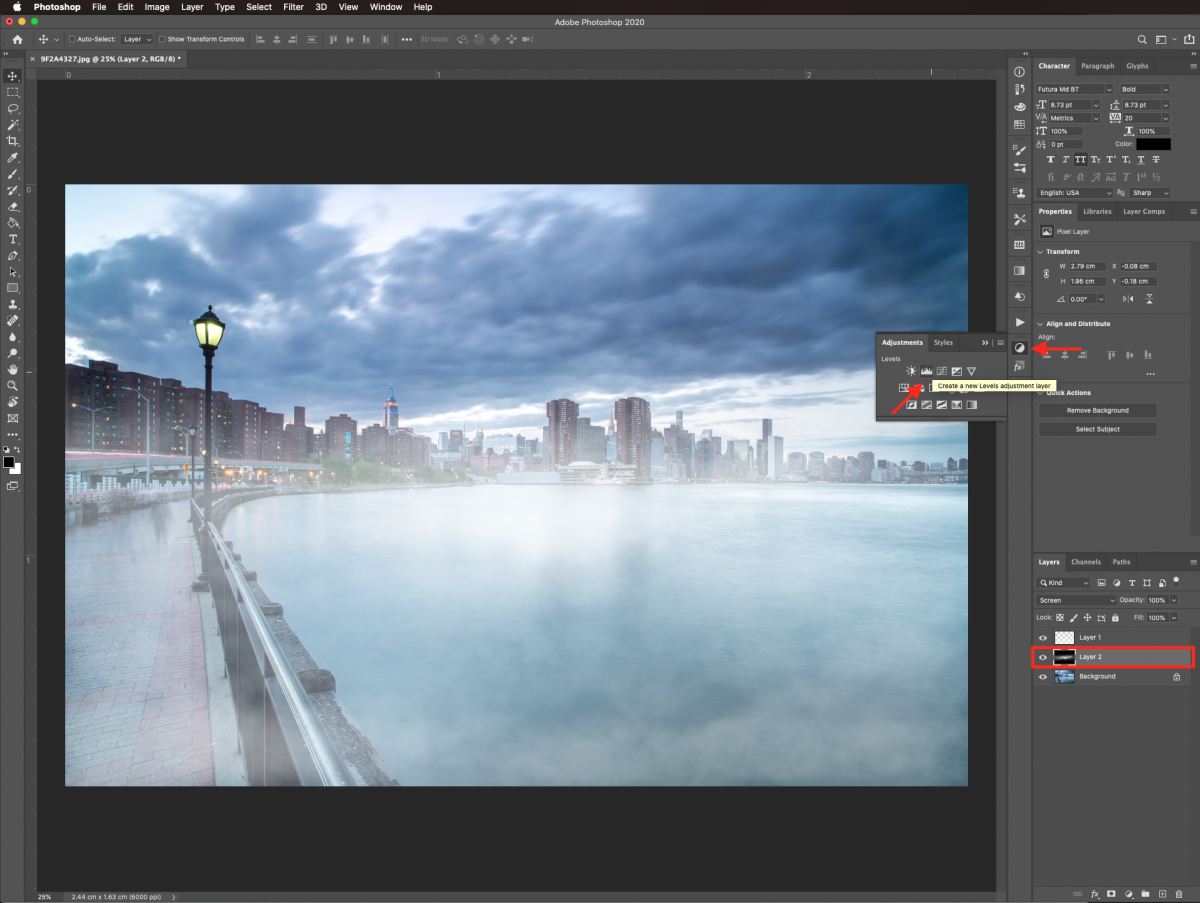
Clip the layer so it will only affect the layer exactly underneath. Do this by clicking on the small button at the bottom of the Adjustments panel.
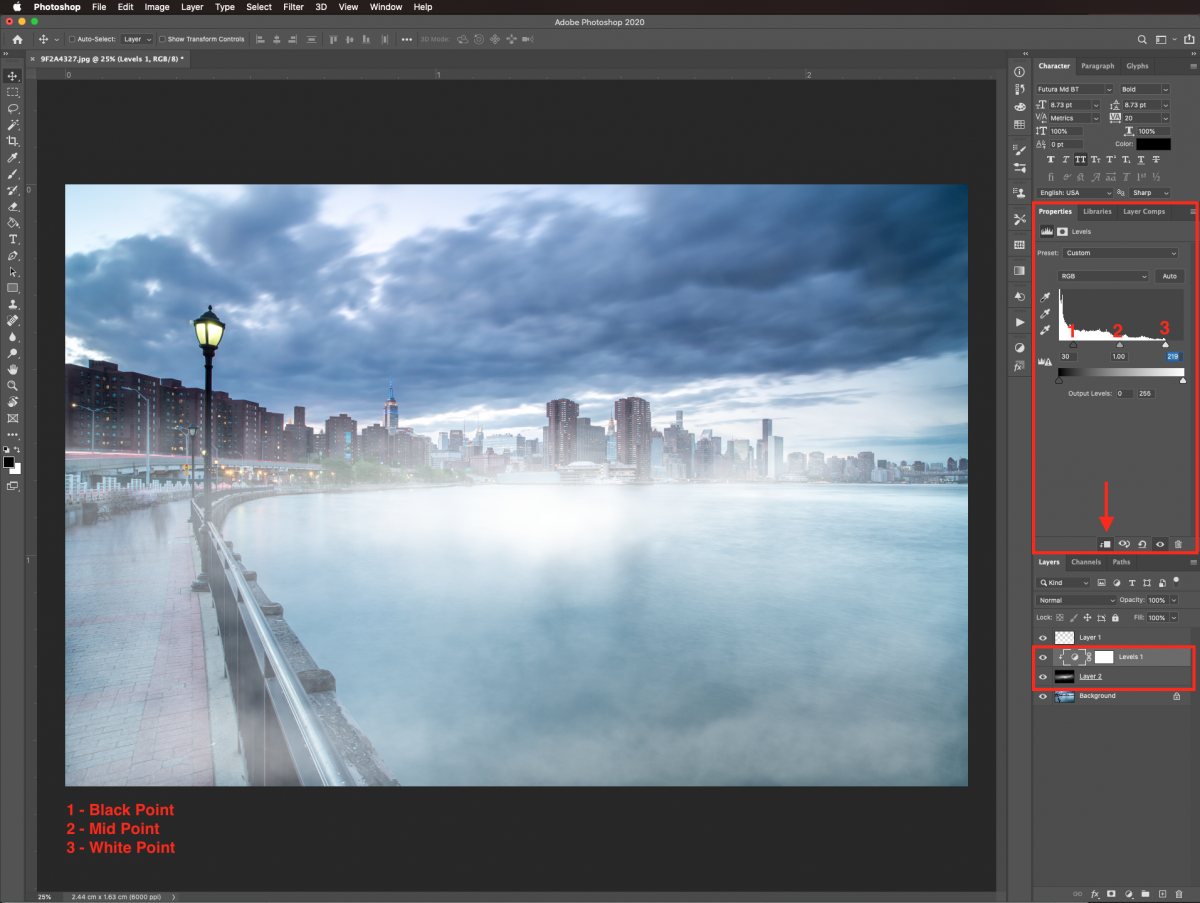
In the Properties panel, select the Black Point lever on the left and move it to the right to about 30. Leave the Mid Point (greys) at 1.0 and move the White Point lever on the right to 219.
We will use some adjustment layers on the background image to make the fog look more realistic. Make sure the background layer is selected. Go back into the Adjustments panel and create a new Color Lookup Adjustment Layer on top of it.
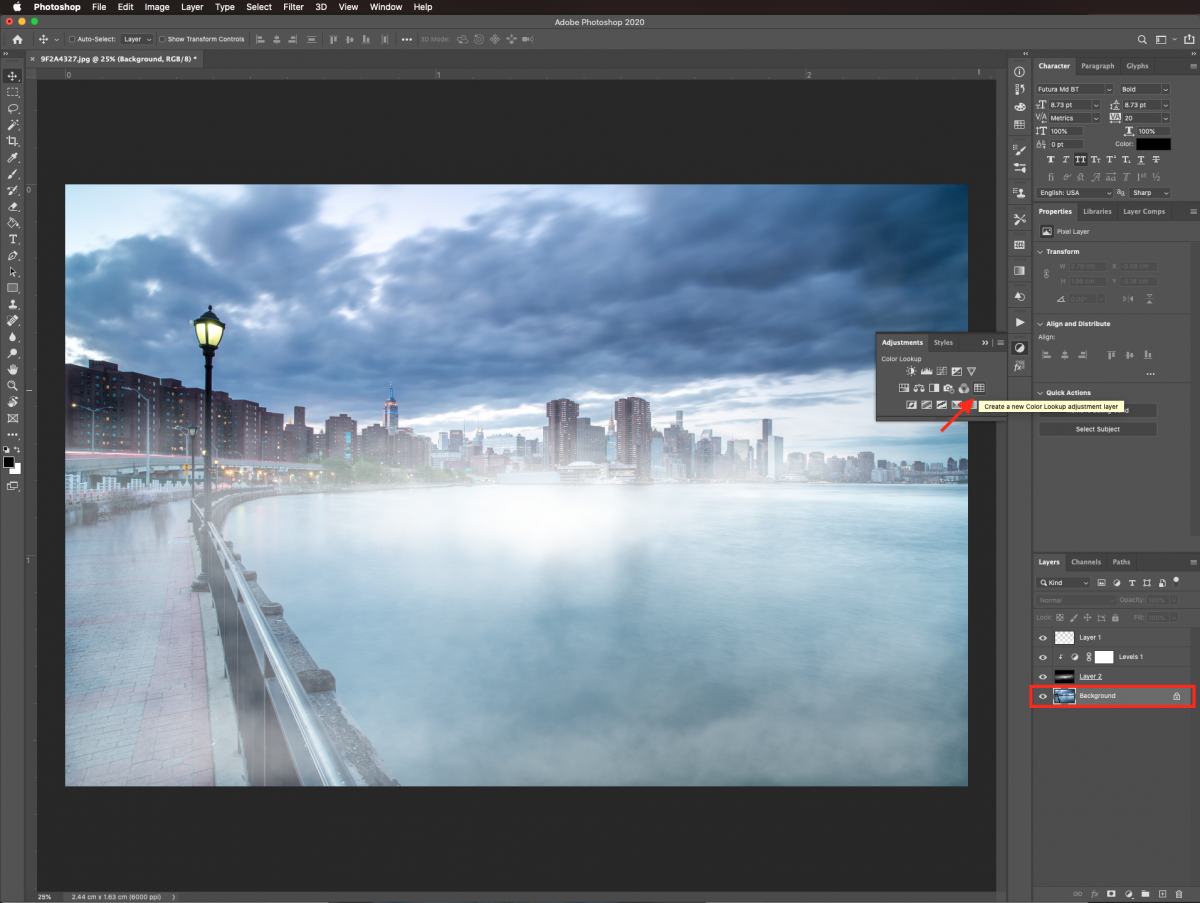
Choose FoggyNight.3DL as the 3DLUTFile and lower the Opacity to about 50%. This will darken the background image a bit.
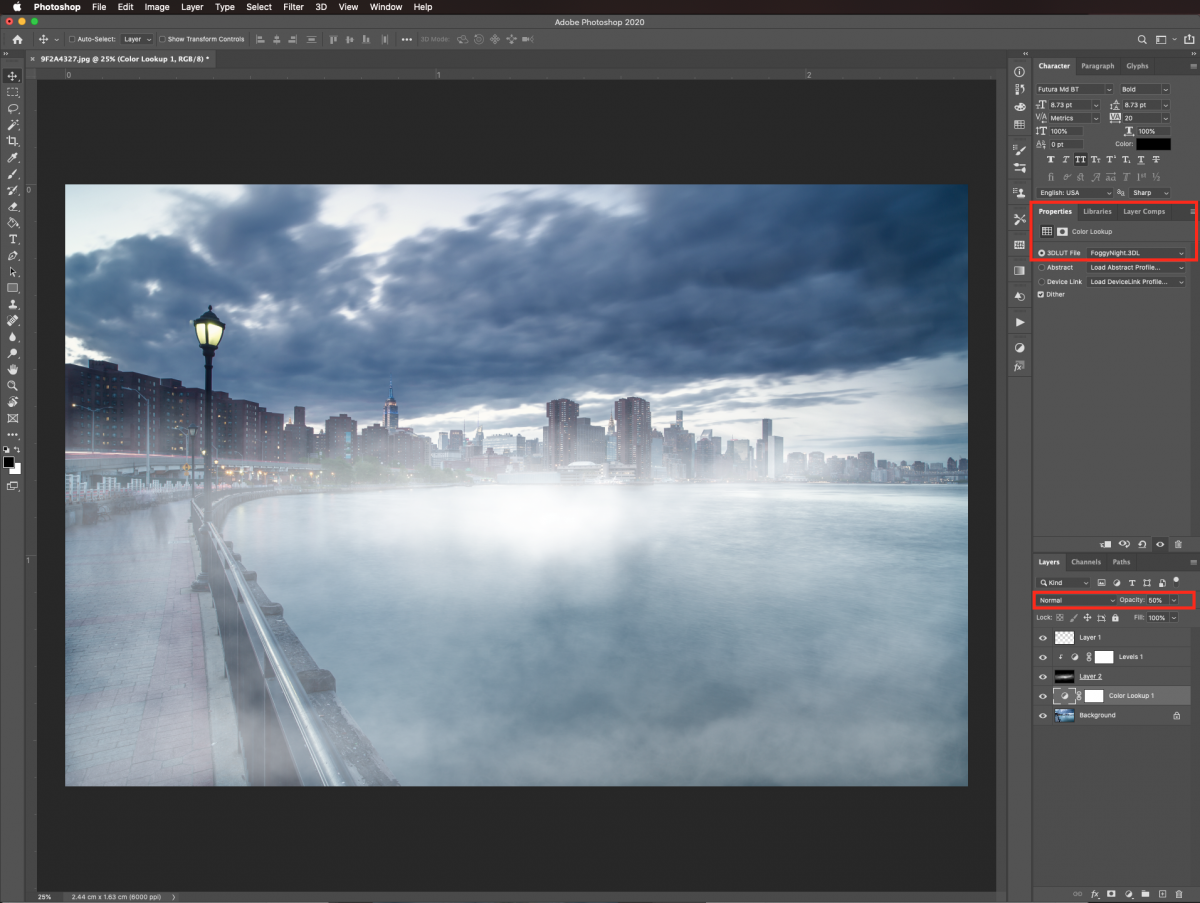
Finally, to enhance the overall look of your image, create a new Brightness/Contrast Adjustment Layer on top of everything.
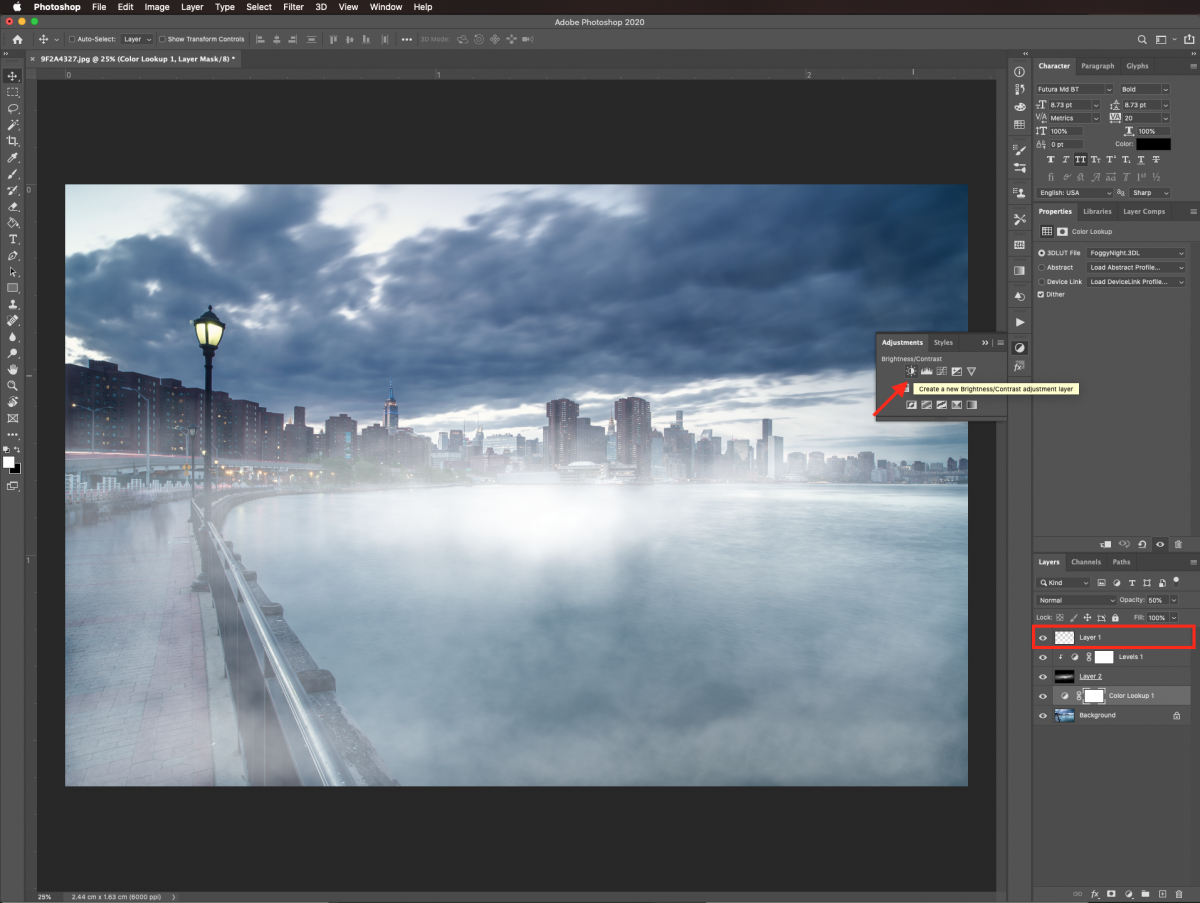
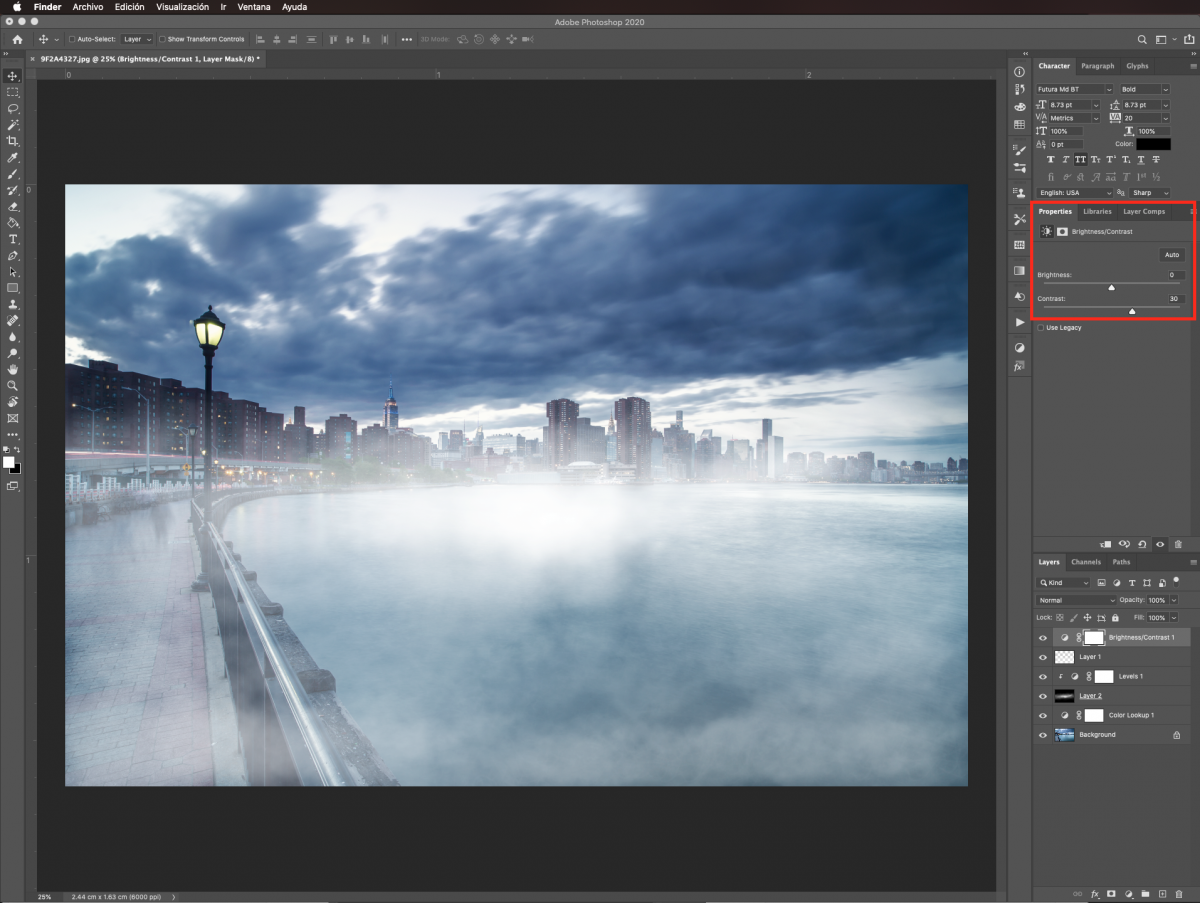
Adjust the Contrast value to 30.
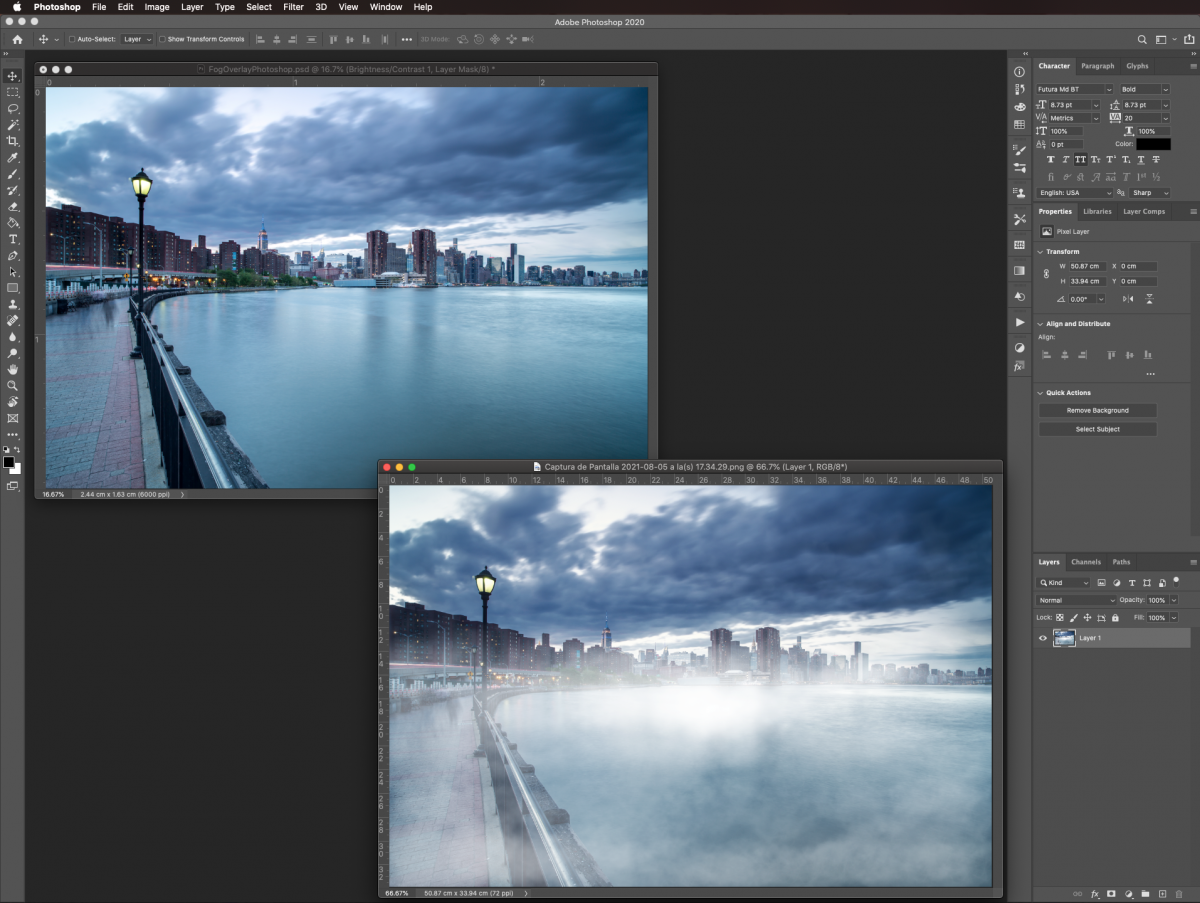
Your final artwork should look similar to the image below.
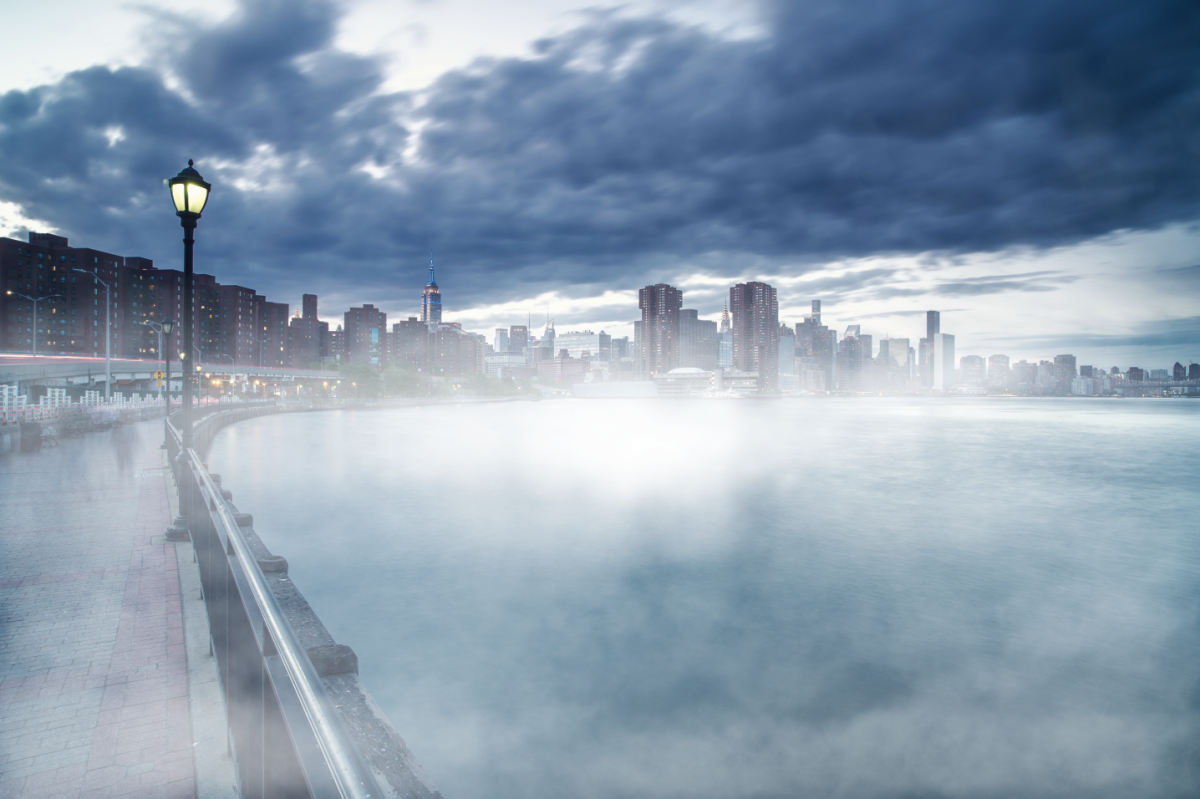
Here is a before and after look of our image to better appreciate the effect.
If you liked this tutorial make sure to check out our guides on how to create an easy duotone, how to create a smoke effect, and how to colorize black and white images in Adobe Photoshop.
Many overlays have a transparent or black background. They are then placed on top of the original photograph and blended in. In this example, we will add fog to a city sidewalk photo using a fog overlay for Photoshop to add the desired effect.
Step 1 - Import the fog overlays
Once in Photoshop, open the images you chose to work with. Bring in the Fog overlay images by dragging from their thumbnail onto the one you are using as a background.
If the photo is too small or too big you can adjust the size. Resize and/or rotate by using Free Transform (Command/Control + T). When you are done, hit Enter or click the checkmark icon on the top menu to commit the changes.
Step 2 - Change the fog overlay Blending Mode
Occasionally overlay images have a black background (not transparent). If that’s the case, you will need to blend it into the background image to get rid of the unwanted dark portions.
Select the overlay layer, change its Blending Mode to Screen and lower the Opacity if needed. In our case, we left the opacity at 100%.
Step 3 - Add a Levels Adjustment Layer
If your overlay image contained a black background an adjustment layer can add more depth to the fog. First, go to the Adjustments panel and create a new Levels Adjustment Layer on top of the overlay layer.
Clip the layer so it will only affect the layer exactly underneath. Do this by clicking on the small button at the bottom of the Adjustments panel.
In the Properties panel, select the Black Point lever on the left and move it to the right to about 30. Leave the Mid Point (greys) at 1.0 and move the White Point lever on the right to 219.
Step 4 - Enhance the background image
We will use some adjustment layers on the background image to make the fog look more realistic. Make sure the background layer is selected. Go back into the Adjustments panel and create a new Color Lookup Adjustment Layer on top of it.
Choose FoggyNight.3DL as the 3DLUTFile and lower the Opacity to about 50%. This will darken the background image a bit.
Finally, to enhance the overall look of your image, create a new Brightness/Contrast Adjustment Layer on top of everything.
Adjust the Contrast value to 30.
Your final artwork should look similar to the image below.
Here is a before and after look of our image to better appreciate the effect.
If you liked this tutorial make sure to check out our guides on how to create an easy duotone, how to create a smoke effect, and how to colorize black and white images in Adobe Photoshop.
Related Tutorials
Photoshop Tutorials
How to Create Speech Bubbles in Photoshop
Learn how to create and edit fun speech bubbles in Photoshop using custom shapes.
Photoshop Tutorials
How to Create a Dusty Texture in Photoshop
Learn how to create a dust texture in Photoshop with this step by step tutorial.
Photoshop Tutorials
How to Create Distressed Edges in Photoshop
Learn how to create distressed edges from scratch in Photoshop using an eraser brush.
Photoshop Tutorials
How to Create a Holographic Text Effect in Photoshop
Discover how to create a holographic text effect in Photoshop with this step by step tutorial.
Photoshop Tutorials
How to Create a Faded Blur Effect in Photoshop
Create a faded blur effect in Photoshop using these technique and add mystery to your images.
Photoshop Tutorials
How to Create a Plaid Pattern in Photoshop
Learn how to easily make plaid patterns in Photoshop.