
I know that not everyone has the time or the inclination to create their own fonts. But what if I told you that there was a way to make your own customized sans-serif font in mere moments, absolutely free? Yeah, I thought you’d like that.
Today I’m going to introduce you to a website called Metaflop, which starts you out with one of three different styles of font, then gives you the ability to adjust almost every aspect of the letters. It’s based on the concept of metafonts, which describe vector fonts with geometric equations.
If that sentence I just wrote makes no sense, no worries! You (just like I) don’t need to know jack about how the underlying systems work in order to have fun with this thing. On the other hand, if you’d like to learn more, Metaflop has a bunch of informative links for you.
If you’re ready to get started, open this link up in a new browser tab or window, and we’ll walk through it: METAFLOP.
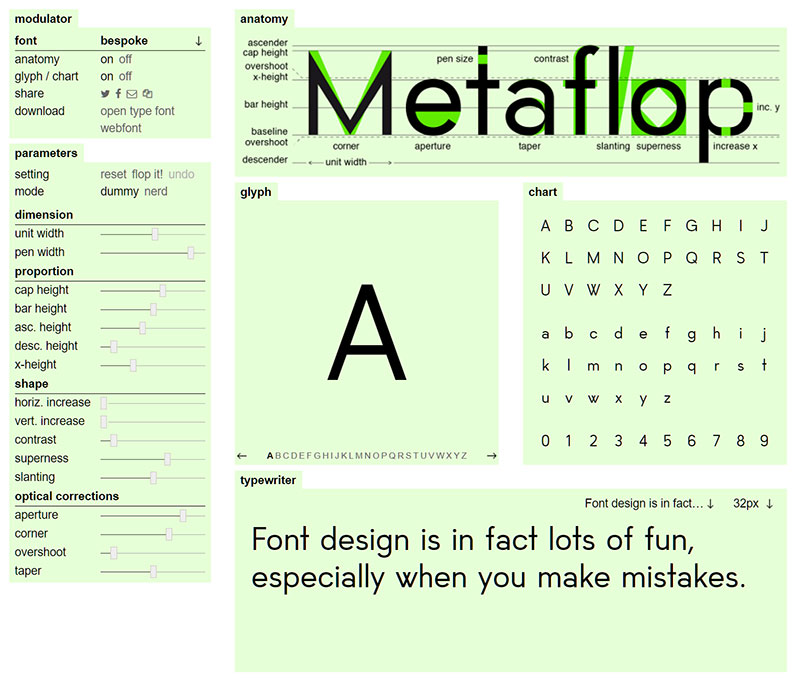
I know it looks complicated, but don’t worry. We’re going to poke at everything and see what it does. Odds are, you’re seeing everything that’s in the photo above, except for the giant “Metaflop” with the neon green bits. I’ll show you how to turn that on in just a second.
First up, let’s take a look at the topmost green box of options, there in the upper left: the “modulator” tab.

At the top, it says: font bespoke. There’s a little downward-pointing arrow to the right of “bespoke” – if you click on it, you’ll also see the options “fetamont” and “adjuster”.
These are the three base fonts you can start from. I’ll show you what all of them look like at the end of this post. For now, just leave it on bespoke -- all of the adjustment examples in this post will use it as a starting point.
Next up: anatomy. This is how you turn on that top box, with the giant METAFONT and the funky neon green stuff. The default setting is to have this box “off”. Just click on the “on” to get it to show up!

The anatomy box gives you a handy reference to what each of the sliders will change on your font. We’re going to go over all of those sliders one by one, but this will be a useful guide when you branch out on your own.
Below that is: glyph / chart . The default here is to have these two windows turned on. Go ahead and turn them off to see what happens! Though I highly recommend then turning them back on.

The chart side will show you what’s happening to the entire alphabet when you move a slider, while the glyph box shows you just one character, much larger.
If you want to switch that character to something else, they’re all available to click on along the bottom of the glyph box. Click on the arrows next to the letters to switch between uppercase, lowercase, and numbers.
Below glyph/chart is the share line. These will put a link to your very own customized font in a Twitter tweet, a Facebook post, an email, or . . . something else.
Honestly, I don’t know what that last icon is, and when I click on it, nothing happens.
Last but not least, you have a couple of download options: open type font or web font. One lets you download an OTF file, the other gives you a ZIP file full of webfont formats: EOT, SVG, TTF, and WOFF.
Not sure which you need? You can always grab ’em all!

There’s one more small section before we get to monkeying with the sliders. Up at the top of the parameters section are a few more options.
Next to setting, there are three things: reset, flop it!, and undo. Undo is the most obvious – it takes you back one step. Reset puts all of the sliders back where they started, so you’re back to the base font without any of your modifications.
And Flop it! is their way of saying “random” – it randomly puts all of the sliders wherever it wants, and the result is often something very weird and funny looking.
Just below that is mode, with two options: dummy and nerd. In dummy mode, there are sliders. In nerd mode, you get boxes where you input exact numbers.
I advise keeping it in dummy mode to start, especially since the range on these sliders isn’t consistent – one might have a range of 0.75 to 2, and the next might be 0.5 to 1.
All right, let’s dig into these sliders, and start customizing! I’m going to show you three results for each slider: farthest-left, dead center, and farthest-right.
I’m resetting the bespoke font back to its original state between all of these adjustments, so you can see how only that one slider affects the letters. As you can see before we even get started, some of the sliders are off to the left and some are off to the right – they aren’t all starting in the middle.
 unit width
As you may have guessed, this adjusts the width of each letter. You can’t get obscenely skinny or wide, but it’s a pretty darned good range to work with.
 pen width
This slider controls the width of the strokes in your font. As you can see by the far-left setting, because this system deals strictly with geometry, sometimes things get a little funky at the extremes. Though if you like the idea of your uppercase A wearing a little triangular party hat, you can totally roll with it!
 caps height
This adjusts the height of the uppercase letters only. You can make them short so they’re the same height as the lowercase, or make them super-duper tall. It doesn’t look like a hugely dramatic range here, but once you also start monkeying with the parameters of the lowercase letters too, you can get some really big contrast in heights.
 bar height
Here we’re raising and lowering the crossbar on the uppercase letters. It affects A, B, E, F, G, H, K, P, and R.
 asc. height
Now we get to mess with the lowercase a little bit! This is the ascender height, where you can adjust the height of the tops of the taller lowercase letters: b, d, f, h, k, l, and t. Note, I didn’t do anything to make the top of the right-hand f curl over like a candy cane here; it was all the decision of the geometry.
 desc. height
Just like we did the ascenders, now this dictates how long the descenders are on the letters that have parts that drop below the baseline: g, j, p, q, and y. And once again, the geometry decided on its own to loosen the curl of that g.
 x-height
The x-height is, technically, the height of the lowercase x. But it also dictates sizing on most of the other lowercase letters as well. By using this in combination with caps height, ascender height, and descender height, you can get some really cool super-tall or super-short results.
 horiz. increase
Here in the shape section of the sliders is where we go from simple adjustments (height and width) into some more complex features that can really make your font unique. This horizontal increase slider takes any curve along the top of bottom of your letters and injects a straight line into the middle of the curve.
 vert. increase
Just as the horizontal increase slider put straight lines in the middle of your top and bottom curves, this vertical increase slider puts those same straight lines into your left-side and right-side curves. If you pushed both the horizontal and vertical increase sliders all the way to the right, your letter O would become a rounded-corner rectangle.
 contrast
This is an adjustment that changes the contrast between your “upward strokes” and your “downward strokes”: higher contrast makes the downward strokes much heavier than the upward strokes. Since these are sans-serif fonts, though, it’s harder to see which strokes go upward and which go downward, so it’s pretty much the vertical strokes getting heavier and the horizontal strokes getting thinner.
There are some exceptions, like X and M and y – play around with it and see what kind of line weights it gives you.
 superness
Superness is the weirdest adjustment for me. In this image, I’ve applied it to the uppercase O. It sort of assumes an invisible square around your letters, then pinches the four corners inward when you slide it all the way left, and pushes the corners out into points when you slide it all the way to the right. Its natural position is about two-thirds to the right.
So it would fall between this weird rounded diamond shape and the giant square. Use superness with care, because it can make letters unreadable in a hurry.
 slanting
This gives your letters a jaunty (or an extremely jaunty) tilt to the left or the right. If you want to get technical, it sets the letters at an oblique angle. (This is not italics; italics are a completely new set of letters that go with an upright font.) Looking at this example kind of makes me wish my middle initial was also M – I could make a logo that looks like a crown. Or spikes. Or the top of an explosion.
 aperture
This opens and closes the opening of certain letters with curved ends. This is the only example where I didn’t set the slider all the way to the left – I ended up setting it almost all the way left, so you could still tell this is a C. With the slider all the way to the left, the aperture completely closed and it totally looked like an O. The setting affects the letters C, G, a, c, and e.
 corner
Corner deals with the sharpness of the points on letters where two straight lines meet, like A, M, V, and W. It ranges from sharp enough to cut someone, all the way down to wide and flat enough to rest your drink on.
 overshoot
I discussed this concept a while back when constructing a refined font – if you put a rounded letter (O, for example) next to a flat-bottomed letter (like E), it will look like the O is shorter than the E, just because less of the O is touching the baseline.
To combat that optical illusion, you can make the rounded parts of your letters overshoot the baseline (or x-height, or caps height) just a little bit, to trick the eye into thinking they’re the same height.

taper
This affects the places where curved lines meet straight lines. Dial it over to the left, and it tapers the curved lines so that they’re much thinner where they meet the straight lines.
That covers all of the sliders – now you just have to choose which font you want to start with! The other two options (fetamont and adjuster) have some different sliders due to their different shapes. But with use of the anatomy tab, I’m confident you’ll figure them out. And speaking of which, here are the three starting fonts in their base formats:

They give you some really distinctly different places to start from; slide those sliders and see where you can go!
So there we have it – a ton of adjustment options that can turn an ordinary sans-serif into something cool, weird, elegant, or dorky, just for you!
And the font you create can be used for anything you want – all of the Metaflop fonts are covered under the SIL open font license v1.1, which pretty much means free for any use you want. (You can, if you’re having a bout of insomnia, read the SIL license or read the FAQs about the SIL license.)
Being licensed under the SIL open font license means you can’t sell these fonts, but that’s good for a couple of reasons. First off, these fonts aren’t going to have professional-level spacing and kerning – the geometry doesn’t go quite that far.
Secondly, why would you want to sell your beauties, when you can keep them to yourself and be the only person using them? Imagine having a font that nobody else has, and it only took you a minute to make. Sounds pretty sweet to me!


Crafter's Calendar: A Guide to Inspire You All Year Long!

The Ultimate Dollar Deal Event: What You Need To Know

5 Cool Graffiti Font Styles That Are Trending