
There are a ton of options out there for programs you can use to create font-based designs. So let’s talk about the most popular options, and how easy or hard they each make it to dig into the full capabilities of a font.
Note: there are, of course, many more programs out there than the ones I'm going to talk about. But these are the ones that have people have specifically asked me to cover.
First, though, a brief refresher on some of the font features we might want to use. You can hop over to my post going over the various OpenType features that font creators can throw into a font, but for this overview we’re going to concentrate on three things: kerning, ligatures, and alternates.
 Fonts used in examples: Saboteur, Garlic Butter, Samantha Upright.
Kerning refers to how the letters are horizontally spaced from each other, and most modern fonts have some kerning built in.
In the example above, I’ve turned the kerning off for the first example; the second example has the built-in kerning turned on, and shows how the letters are meant to be spaced in normal use.
Ligatures are characters made up of multiple glyphs, which replace other glyphs as you’re typing. In this example, by typing LLY, software that allows ligatures will replace those three letters with a single modified LLY character.
Ligatures are often used where two letters (like ft or fi, for example) don’t look quite right next to each other in their normal forms. Or, as in this example, they can be used to add more flair to certain combinations of letters.
Alternates covers a wide range of OpenType features, but for the most part they’re going to be alternate versions of the letters and numbers in a font. In this example, the G and H have been replaced with more decorative alternate versions. Some fonts may have one alternate per letter, some may have 20 or more.
Side note: some people refer to alternates as glyphs. However, glyph is another word for a shape, so every letter, number, and piece of punctuation in a font is technically made up of glyphs.
Some letters, like the lowercase i, are made up of multiple glyphs – in the i’s case, there are two glyphs [the straight part and the dot] that make up the character i. So the terms alternates or alternate characters are better to use for clarity.)
PUA is one more thing we should touch on. This is the Private Use Area, a range of Unicode slots that a designer can assign to whatever characters they like.
So while an uppercase A will always be in Unicode slot #0041, once you get into the Private Use Area, a designer could make #E001 an alternate A, or an alternate X, or whatever other character they want.
They’re never the same between fonts, which makes things kind of confusing, but it also allows a font designer to pile however much extra stuff they want in there. Which is good for all of us!
For most of these programs we’re going to discuss, you’ll want to make sure your fonts are PUA-encoded. Many older fonts aren’t, because the PUA is a relatively new feature.
But most current font designers are using the PUA in order to make things easier for everyone, no matter what software they’re using. Most designers also put in their descriptions whether their fonts are PUA-encoded, so you know before buying that it will work for you.
When looking at these graphics programs, we’ll look at the three main fancy-up-your-font elements (kerning, ligatures, and alternates), as well as two other things: how much the programs cost, and what kind of file types you can save your work in.
Especially if you plan on moving your designs into a program like Cricut Design Space or Silhouette Studio (or even sell your designs), you’ll want to be able to save your work in a friendly format.
Speaking of Cricut and Silhouette, their programs are up first:
Kerning: Not supported.
Ligatures: Not internally supported. (Ligature characters can be imported via copy/paste.)
Alternates: Not internally supported. (Alternates can be imported via copy/paste.)
Save Formats: Only in Design Space-exclusive format
Price: Free
Generally speaking, Design Space (and Silhouette’s version, which we’ll get to next) aren’t well-built for creating designs. No OpenType features are supported.
Although you do have the ability to bring in alternate characters and ligatures by opening up a separate program (usually Character Map for PC, Font Book for Mac) copying the characters you want, then pasting them into Design Space:

As a font designer, however, the worst thing is that Cricut Design Space doesn’t honor the kerning that the designer puts in. In fact, letters typed straight into DS are spaced farther apart than in any other program.
The letters can be moved closer together using the Letter Space feature, but you’ve lost the specific spacing that the font designer decided was the best for those letters.
The program does allow multiple file formats to be imported: JPG, GIF, PNG, BMP, SVG, and DXF. So your best bet is to design elsewhere, save to one of those formats, and bring a completed design into Design Space.
Kerning: Not supported.
Ligatures: Not internally supported. (Ligature characters can be imported via copy/paste.)
Alternates: Not internally supported. (Alternates can be imported via copy/paste.)
Save Formats: Only in Studio-exclusive formats
Price: Free for basic edition. Upgrades from $25 up.
Do those stats look familiar? They’re almost exactly the same as Cricut Design Space.

There’s that lack of kerning again. UGH. The top is typed directly into Silhouette Studio. The bottom is an SVG I created in another program and brought in.
Just like Design Space, you can copy and paste ligatures and other alternates from an external source like Character Map or Font Book. But be warned, when you paste them in, they may look like a rectangular box at first.

Because every new time you go to type out some text, you never know what font Silhouette Studio is going to use. (For me, it almost always defaults to a generic “sans-serif,” even if I just used a different font five seconds earlier.) If you get the rectangle, just select it, then re-choose the font you want it to be in.
Silhouette’s basic program allows fewer file import types: JPG, GIF, PNG, BMP, and DXF. If you upgrade to Designer Edition (the cheapest upgrade level), add SVG and PDF to that list.
So just like with Design Space, your best bet is to create a design elsewhere, then bring it in here.
Kerning: Supported, but the user needs to turn it on. (Default setting is off.)
Ligatures: Supported, but the user needs to turn it on. (Default setting is off.)
Alternates: Available in-program through the Symbols menu.
Save Formats: PDF
Price: Varies, $10/month to a flat $150 (or free, if Microsoft Office was bundled with a PC purchase)
I know, I know. Designers right now are throwing thing at their screens, shouting, “You don’t design with Word!” But the thing is, friends, a lot of people do. And compared to some programs, it actually has fairly robust support for OpenType features.
Both kerning and ligatures are fully supported, but they have to be turned on first:
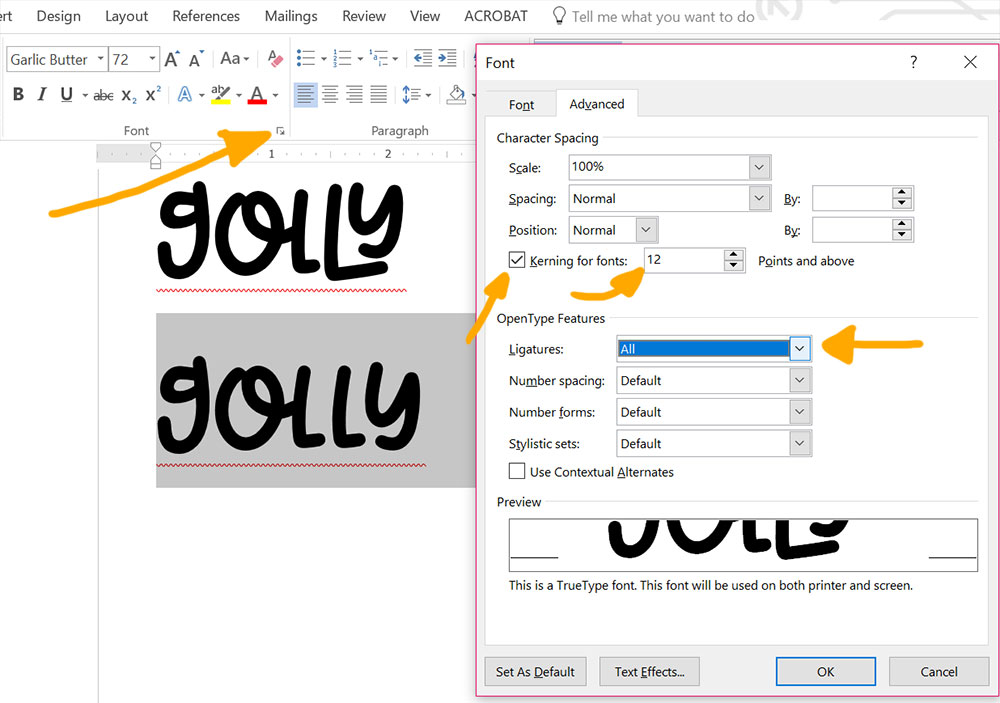
In the Home section of the ribbon, click on the little arrow at the bottom right of the Font section. When the Font window pops up, click on the Advanced tab.
You’ll want to check the box next to Kerning for fonts and input a font size smaller than the size you’re working with. Then go down to the OpenType Features section and choose All in the Ligatures box. Both features will now be turned on for your document.
To get alternate characters in your font, Word has a built-in character map:

Choose the Insert section on the ribbon, then go all the way down to the right-hand end. Select Symbol, then More Symbols... at the bottom. The Symbols window will pop up:

The default setting here is to show you every single character in the entire font. To get to the fancy alternates, go to the Subset drop-down and choose Private Use Area.
This will limit what it shows you to just the alternates the font designer has coded in. If you’re just placing one alternate in your document, single-click on it and then click the Insert button at the bottom of the window.
After clicking Insert, this window will close. If you’re putting in more than one, you can double-click on the character to place it in your document, but until you click either Insert or Cancel, the window will stay open.
Side note: for fonts with extra-tall and extra-low parts, Word can cut the tops and bottoms off of things, because of the way some fonts are constructed conflicting with the way Word looks at font files. Often this can be fixed by adjusting line spacing, but not always.
The biggest problem with Word is the limitations on how you can save your creations. You can’t load a DOC file into most other design programs. You can, however, save your design as a PDF, and open it in Silhouette Studio (Designer Edition and higher).
Otherwise, you’d need to take a screenshot of your creation, then paste it into another program in order to save it as an image file. Which is not only a pain, but gives you a much less sharp image.
Kerning: Supported. (But can’t be turned off.)
Ligatures: Supported. (But can’t be turned off.)
Alternates: Not internally supported. (Alternates can be imported via copy/paste.)
Save Formats: PNG, PDF, SVG
Price: Free
I’d never heard of FontLab Pad until a couple of days ago. It appears to be a variation on NotePad and WordPad, which is to say it’s a very small and light program meant for typing out words, but not necessarily designing.
On the plus side, both kerning and ligatures are automatically applied as you type.

On the minus side, there doesn’t appear to be a way to turn either of those features off. So I hope you like those ligatures, because you’re stuck with them.
As far as letter spacing goes, you also can’t turn off a font’s built-in kerning, although you can adjust the space between all letters uniformly.
There isn’t any internal support for alternates, but just like other programs, you can copy them out of Character Map or Font Book and paste them in place.

Here I just highlighted the ordinary H, went out to Character Map, copied the fancy H, and when I came back into FontLab Pad, I just hit Ctrl-V to paste. Relatively easy!
While it doesn’t allow you to move words around much, this is a fair program if you’re just typing things out in a straight line. On the plus side, it can save files in PNG, PDF, and SVG, which covers almost all of the bases.
Kerning: Supported. (But can’t be turned off.)
Ligatures: Supported. (But can’t be turned off.)
Alternates: Not internally supported. (Alternates can be imported via copy/paste.)
Save Formats: PNG, PDF, SVG, DXF, EPS
Price: Free
Inkscape is the most-recommended free vector program around. And I can understand why, since it’s the best free program. But it’s still a total jerk a lot of the time—open source programs in general tend to be harder to use, more confusing, with fewer features than paid programs.
On the plus side, Inkscape automatically applies a font’s programmed kerning, and automatically makes ligature substitutions. On the minus side, I can’t find a way to turn either of those automatic processes OFF. There seems to be a place where at least ligatures could be turned off:

Here in the Variants tab of the Text and Font menu, I found a Ligatures section. The Common box was checked, so I un-checked it. And nothing happened! The ligatures are still showing up.
If you really don’t want those ligatures, you’d have to type the letters with spaces between them so the ligature doesn’t automatically pop in there, then convert everything to vector objects, then move the widely-spaced letters into place. Ugh.
There isn’t currently any built-in access to alternates, but once again, you can copy and paste them in from Character Map or Font Book. I find it kind of cool that when you do, the little text preview in the Text and Font window shows a box containing the Unicode number in place of the letter.

So I know that this swirly G is Unicode E567. Not that the knowledge of an alternate’s Unicode designation helps me in any way, mind you. It’s just an interesting way for them to handle it.
Inkscape can also sometimes suffer the same problem as Word—cutting off the tops and bottoms of really tall or really long characters, depending on the font. It can be fixed, but Inkscape likes to make things like that a bit challenging.
Complaints aside, Inkscape's default save setting is SVG, so you can always import it into other programs and have a sharp, crisp, and clean design.
Plus, Inkscape is the first program so far in this list that really allows to you apply effects to your text: warping, twisting, arching; you can do so much more than the straight line of type that the previous programs create.
Kerning: Supported, easily switched off and on
Ligatures: Supported, easily switched off and on
Alternates: Supported via a built-in character map
Save Formats: PNG, JPG, GIF, BMP, PDF, EPS
Price: $10/month for just Photoshop CC; $50/month for the entire Adobe Creative Suite CC
Now we’re getting into the good stuff, because now we’re getting into the paid stuff. I wouldn’t normally advise creating design work in Photoshop; it’s meant for photo editing.
But I’m including it because it’s the lowest-cost way to get access to Adobe’s great OpenType functionality.

For kerning and ligatures, there are easy-to-use features on the Character panel. In the upper half, where it says Metrics, is where the kerning is applied. Keep it on Metrics and it will apply whatever kerning the font designer built in.
Change that to Optical, and Photoshop will ignore the designer’s spacing, and apply its own semi-common sense to how it thinks the letters should be spaced. You can also choose a zero in this menu, which drops all kerning and just presents the letters unspaced.
Down lower, there’s a button near the bottom left with fi on it. This is where you can turn ligatures on and off. Its default setting is to be turned on, but if you don’t want the ligatures, just select the text in question and click the button.
I also have an arrow pointing to the aa with an arrow over the top. This is where you can turn alternates on and off, if a font only has one stylistic alternate for each letter.
The other little icons along that row also refer to different kinds of alternates, each of which a font designer can code into their font. The icons are gray when nothing is coded, and white when there’s some coding there.
If there are multiple alternates, you can use Photoshop’s Glyphs panel to get to them:

It’s basically a built-in character map, and you can scroll through every glyph in a font. There’s even a slider along the bottom that lets you change the preview size, which is handy when you’re getting older eyes, like some of us.
Just double-click on any character in there, and it replaces whatever you have highlighted in your project with the alternate.
As far as text effects go, this is a step backward from Inkscape. Since Photoshop is meant for photographic use, you can apply image-based effects, like making your text look like glitter or neon.
But besides some 3D effects, warp, and being able to set text on a curve, your options are fairly limited.
Photoshop can’t save anything in vector format, because it isn’t a vector-based program. But if you make your project large enough, and save at a high enough image quality, you should be able to get your creation into Silhouette or Cricut software and trace it without too much loss of quality.
Kerning: Supported, easily switched off and on
Ligatures: Supported, easily switched off and on
Alternates: Supported via a built-in character map
Save Formats: PNG, JPG, GIF, SVG, PDF, DXF, EPS
Price: $20/month for just Illustrator CC; $50/month for the entire Adobe Creative Suite CC
Illustrator runs its OpenType access much the same way that Photoshop does—not surprising, since they’re from the same company:

Though what Photoshop has in its Character panel is broken up into two panels in Illustrator. Character still has control over the kerning (with the same choices: Metrics, Optical, and zero), but the ligatures and alternates are moved over into a separate OpenType panel.
The tiny icons are almost exactly the same; the fi for turning ligatures on and off, and the aa for the stylistic alternates.

The Illustrator Glyphs panel is also almost the same, showing you every possible character in the font. And once again, you just have to double-click to insert whichever character you want into your project.
As far as creating text effects, if you can think it up, Illustrator can probably do it. Warping, twisting, curving, whatever you want to do. And since it exports in vector formats like SVG, you can make clean, sharp work and bring that work directly into Silhouette or Cricut (or any other program) without a loss of quality.
Kerning: Supported. (Ability to turn it off is unknown.)
Ligatures: Supported, easily switched off and on via interactive drop-down menus
Alternates: Supported via interactive drop-down menus
Save Formats: PNG, JPG, GIF, SVG, PDF, DXF
Price: $16.50/month or $500 flat for the CorelDRAW Graphics Suite 2017
I’ll be honest on this one: I downloaded the 15-day trial version so I could learn enough about CorelDRAW to be able to write this article. And I have to admit, Corel has grown immensely in the 15-or-so years since I last tried their products! (It seems like people either go down the Adobe path, or down the Corel path. I’ve been Adobe.)
I’m amazed at the ease of how CorelDRAW lets you switch between regular text and ligatures:

Just highlight the text, and look for the little downward arrow near the bottom of the blue highlighted zone. It pops out a menu that gives you the option to select either the regular three letters, or switch them out for the LLY ligature. Incredibly easy!
And it’s just as easy to change out your alternate characters:

Once again, you just need to highlight the letter you want to change, and click on the little arrow underneath it. If the designer has coded their font correctly, you’ll be offered all of the alternate options for that letter.
In this case, there are 23 different options for the letter g (This is why we love Laura Worthington so very much). Though it does add a whole other level of difficulty to your work: having to decide which beautiful option you want to use.
From my poking around and Googling certain features, I’ve already discovered that CorelDRAW has a very robust set of options for text effects, so you can warp and twist and arch to your heart’s content.
The only thing I haven’t been able to find is a way to turn off the built-in kerning. But since there are at least three different ways to adjust spacing between letters, including ways to cleanly move one letter without moving any others, I’m not sure turning off kerning is a feature I miss.
After all, it’s how the designer thought it should be spaced. And I think I’ve turned off kerning only a handful of times in my 20+ years of designing.
If you have some budget to spend, but Adobe’s price tag is too high, this is a fantastic cheaper alternative, with an equally great feature set. (And remember, these are deductible expenses on your taxes!)
I’ve mentioned copying characters from Character Map several times, so let’s take a look in there. (Font Book for the Mac is similar in a lot of ways, but since I don’t have ready access to a Mac, this is what you get for today.)

Character Map is a freebie that comes pre-installed on all Windows computers. But it has many flaws, so you may be better served to get a separate font manager (NexusFont is a popular one for PC, and it’s a freebie).
First off is how small it is, and you can’t re-size it any larger. My screenshot of it up there is showing some of my desktop wallpaper on both sides, because Character Map isn’t as wide as my usual 1000-pixel images for this blog. Even then, I went with 900 pixels wide on this picture.
Its default state is to show you everything, and I mean everything. Even for a font with only hundreds of glyphs, Character Map will make you scroll through thousands of blank character slots. But you can narrow things down:

First, tick the box next to Advanced view. That will bring up some additional drop-down menus. Character set should be on Unicode already, but if it isn’t, select Unicode there. Then in Group by, select Unicode Subrange.
This will pop up the separate Group By window. Scroll all the way down to the very bottom and select Private Use Characters. This is where the font designer has tucked away all of the alternate characters. As you can see up in the grid, it’s gone from showing everything to just the alternates.
Just as there’s no way to re-size the Character Map window, there’s also no way to re-size the boxes in that grid, which makes things quite hard for these older eyes to see. That’s why if I ever need to copy and paste, I do it out of NexusFont instead.
This was a long one, so thank you for sticking with me. Here’s where I make my recommendations. If you have some money available for a program, you can’t go wrong with Illustrator or CorelDraw.
They both have ample features, and can both help you get the most out of any font you own. But if you need something free, Inkscape can do quite a few of the same things that the paid programs can, although everything is just a little bit harder to find and harder to do.
And if you’re desperate, Microsoft Word has a surprisingly good set of tools to allow you to use a font’s coded-in features, although you’re stuck with straight lines of well-coded text.
Which may be what you’re going for, who knows! Or if you're just typing out a line of text and need it in a usable image format immediately, FontLab Pro can give you a decent result with a bit of copying and pasting.
While Cricut Design Space and Silhouette Studio both allow you to type intext and create a design, I don’t recommend either one as your primary design software. Almost every time, I’d advise creating your work in another program and then bringing it into CDS or SS in order to make your cuts.
For one thing, a design made in other software will be more flexible and easy to use in any other software, since you can save files in so many formats. And for another thing, every other program has better built-in text handling than either CDS or SS.
Hopefully they’ll get better with future revisions, but right now they just aren’t built for text design.


Crafter's Calendar: A Guide to Inspire You All Year Long!

The Ultimate Dollar Deal Event: What You Need To Know

5 Cool Graffiti Font Styles That Are Trending