Posted 15th August 2017 •
By Design Bundles
Monograms are a simple yet elegant way to personalize letterhead, towels and assorted gift items. Learn how to design unique monograms using Affinity Designer, a powerful, budget-friendly alternative to Adobe CC. This new software offers an Adobe-quality arsenal of tools and effects for creating professional-grade vector and pixel graphics.
The workspace is intuitive and accessible for beginners yet sophisticated enough for seasoned pros.

What You'll Need:
- Affinity Designer
- Fonts
- SVG files (optional)
Affinity Designer is available for Windows via download directly from the Serif Affinity store. Mac users can purchase through the Mac App Store.
Place and Arrange Your Type
With Affinity Designer, you can use and customize any OTF and TTF font file with ease. Your fonts are accessible via a drop-down menu in the Character panel -- similar to the one used in Adobe CC apps -- where you can select and change fonts and resize letters. Set your type color to black so you're not distracted by color schemes while building your design.
In a blank Affinity Designer document, type in each initial separately, so it appears in its own layer. Then, choose your monogram font based on your design concept. Display fonts like ornate Kahir and Invitation Script are designed to be used in monograms. For modern, chic designs, Von Bond and Violet are versatile enough to be used in logos and supplemental text for business applications.

Once you've chosen your font, click and drag the initials into place and adjust size and position as needed. While there are rules for initial arrangement -- the first initial of a surname goes in the center of a three-letter monogram, for example -- the letters do not necessarily need to be evenly spaced.
Even traditional monograms have interlocking or overlapping letters, often making for dynamic and dramatic designs.
When the initials are in position, combine them into one group by selecting the text layers in the Layers panel on the right-hand side of the workspace and right-clicking on Group (keyboard shortcut: control/⌘ + G).
Grouping layers will keep the Layers panel organized and make it easier to resize, apply effects or change colors to the batch.
Add Decorative Elements
With your initials in place, you can add design elements like hand-drawn laurels or vintage frames. Affinity Designer can open and edit SVG, EPS and AI vector files. If your premade decorative elements are colorized in their SVG or EPS files -- like the images in the Nature Mandala vector art and pattern set, you can set the color to black once you've copied it to your working document if you wish to continue working in one color.
Use the pen tool to draw simple strokes or the shape tools to create borders. When you've drawn your line or shape, you can set the stroke width and shape opacity/color. To make the center of your shape transparent, select your object and go to the Color panel, where you'll set the fill to transparent and the stroke to black.

To alter your line width and appearance, select the line from the Layer panel and go to the Stroke panel, where you can adjust the stroke width by point size and change the end cap of the line to square or rounded.

Import elements from SVG files by opening the file in Affinity Designer and copying the desired layer into your working document. If the SVG file contains multiple images, these may be grouped and nested in the Layer panel. Click the arrows next to the groups' names to display and access the individual vector layers. Select the vector shape or image you want, copy it and paste into the monogram document.

If you need to make alterations to the SVG file, use the Node tool to adjust curves and anchor points. You can also use the Node tool to customize text if you want to shorten a line to fit better within a circle or smooth out the curve of an S.
Select your initial group, expand the group folder and select the individual letters. In the top menu bar, under the Layer menu, click Convert to Curves (keyboard shortcut: control/⌘ + return).

The curves and anchor points of the individual letters can now be manually adjusted.

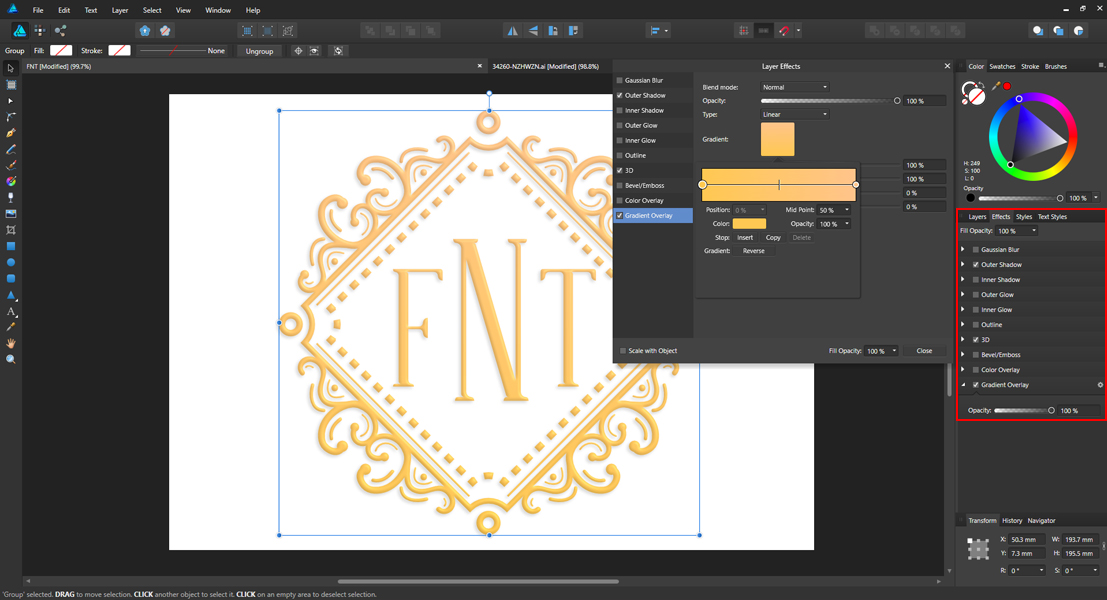
Once you're satisfied with your design, you can add colors, gradients and other effects. Use the Gradient tool in the sidebar or in the Effects panel to add the effect to text, strokes and vector elements. Access the full Effects dialog box by clicking the fx icon at the bottom of the Layers panel, where you can also add shadow, glow and embossing.
These design effects cannot be replicated in files that require black-and-white line art. If you are preparing the monogram for use in a stamp or stencil, save your original line art before adding embellishments to your design.

Save Your Files
When you save your file, it will automatically save the original editable document as .afdesign, which cannot be opened by Adobe CC or other apps. Through the Export menu, Affinity Designer files can be saved as Photoshop-compatible and editable PSDs. Files can also be exported as PNG, JPEG, GIF, TIFF, PDF, EPS and SVG.
Once you've created your first monogram in Affinity Designer, you may never want to use anything else. Whether you're creating a monogram using premade graphics, such as the Victorian Monogram font with alternative frames, or designing one from scratch, customizing typefaces and vector graphics is fast and easy in Affinity Designer.


