Posted 5th January 2017 •
By Design Bundles

I’ve done a couple of working-in-computer posts lately, so I figured it was time to switch things up and get our hands dirty! I was working on a new set of letters for a new font using my old homemade folded pen, and I pressed too hard and bent the tip. So while I was making a new one, I figured I’d share the how-to with all of you!
A folded pen is a relatively new style in the history of pens. (It first showed up in the mid-’90s.) The folded pen is a distant evolved relative of the
ruling pen, which kind of looks like a little pair of tweezers. This homemade variation is usually called a “cola pen” (I'm guessing to avoid the classic soda vs. pop controversy.)
This is a totally easy pen to make, and I’ll bet you have everything you need already in your house!

Here are your ingredients. A rinsed-out aluminum can, good strong scissors, a chopstick, and some plain old masking tape. You could also make some substitutions here, and we’ll go over those as we discuss the various parts.
(These parts are laid out on a cafeteria tray, which we got at the restaurant supply store for a dollar each. We keep it classy in our house!)

First off, we’re going to deal with cutting open the can, so we can get a solid sheet of aluminum. Be careful, because the edges here can get really sharp, with stabby little fragments hanging around. And be sure to rinse it out, otherwise you'll splatter cola droplets around.
You can cut off the top and bottom of the can with scissors, or a box knife, or kitchen shears. I wouldn’t recommend using a kitchen knife, only because the can might dull your knife blade. (Though I’m remembering back to TV commercials in the ’80s where they’d use a knife to cut through a can, then immediately slice a tomato with it. Was that the Ginsu knife? I don’t remember the brand, but I can sure picture that tomato.)
(Follow-up. Yes, it was the Ginsu knife, in this 1980 ad. It was a magical time to be alive.)
In order to get started, I just stabbed the tips of the scissors into the can, near the top. Be careful. Then I cut around the can to remove the top, then cut downward toward the bottom, and then cut around to remove the bottom. Again, be careful.
(Did I mention to be careful? Please do.)

Now we’re going to cut a small rectangle out of the can. I didn’t measure this, but it’s around 2x3 inches or so. I cut this piece out of the part of the can with the writing, so you can compare that to your own cola can and estimate.
I’ve included the chopstick here for size reference as well, which seems silly looking back on when I took the pictures yesterday. I mean, chopsticks come in all sorts of sizes, so really, it isn’t all that helpful.
(It’s accuracy like this that makes me a professional, everyone.)
(Also, be careful with that aluminum.)
You may ask here, does it need to be metal from a cola can? Heck no! You may even have some aluminum (or brass, or copper) sheeting hanging around the house from a craft project or a home improvement project. If you do, you can totally use that! Just make sure it’s a light enough weight that you can fold and cut it, but sturdy enough to hold up to being pressed against paper on your desk without bending too far.
(Cola cans have gotten progressively thinner over time, so they’re actually JUST on the cusp of being too thin to be useful here. I think I’m going to head out to the home improvement store and get a couple of squares of aluminum sheeting for future pens; maybe then I won’t bend them so much when I’m using them. I've also heard that certain cans for tasty adult beverages, like Guinness or Sapporo, have thicker cans.)

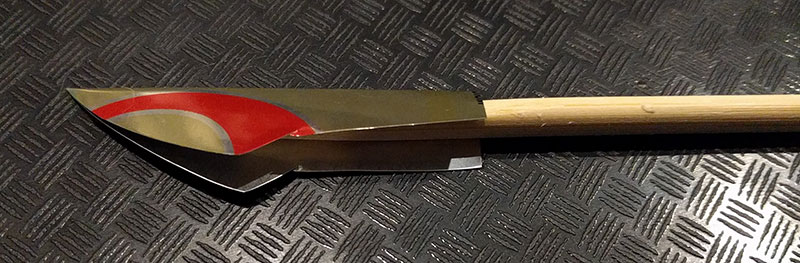
Fold the metal rectangle in half the long way, so you’re left with sort of a square. Run your fingernail down the fold, to make it a sharp crease. Then cut a shape similar to this shape out of it using your scissors. (The long side of this shape is the folded edge.)
How big should you cut this shape? Depends on how big you want your pen to be. It’s always better to cut it larger, then cut it down smaller later if you feel you went too large to begin with. The curved, knife-like looking part on the right is what you’ll write with, while the straight part on the left is what will secure the metal to your chopstick.
Fit your folded metal around your chopstick. You’ll want the straight stem-parts just long enough to go around the chopstick and meet in the middle; you don’t want too much overlap. The chopstick here is going a little over halfway up – you can see it goes a bit past that halfway point where the curved portion meets the straight portion of the metal.
You may need to stick a knife edge into your folded piece of cola can in order to pry the sides apart a bit. No prob! (Just be careful with that knife.)
Now, do you need to use a chopstick here? Heck no! Especially if chopsticks are too skinny for you to comfortably write with them. You could use an unsharpened pencil here, or the handle of a paintbrush, or a chunk of wooden dowel – you could even use a stick out of the backyard if it’s relatively straight and a comfortable width. It just needs to be something firm enough (so don’t use a drinking straw . . . or if you do, fill the drinking straw with cement first) to hold up to the pressure of writing. I just happened to have a bunch of chopsticks in my junk drawer, so that’s what I used.

Now it’s time to tape everything together! I did my tape in two pieces here. First, I wrapped some tape around just the metal base, making sure that the metal closed firmly around the chopstick. Then I took a second piece of tape at an angle, and taped the taped-up metal farther down the chopstick, to keep everything nice and firmly connected.
Does it need to be masking tape here? Heck no! You could use blue painter’s tape, duct tape, Scotch tape/Sellotape, or whatever other tape you have hanging around the house. It just needs enough stickiness that it won’t unravel on its own.
Comparing the picture above and the one before, you can see how just taping up the base has made the two curved bits come back together. That’s good; you’ll want them touching each other. There’s still a wee gap between those blades up near where the metal meets the wood, and that’s totally OK – you won’t be writing with that part.
In a perfect world, you’d actually have a large, empty volume of space inside the pen (to hold as much ink as possible), while keeping the curved edge pieces touching.

All right, let’s get ready to write! I’ve poured myself a little bit of liquid watercolor here. This bottle is from a small sampler set I got of Sargent Art liquid watercolors. They were very cheap, but the colors aren’t that bad. The only color I have a problem with is the black, because it’s a medium gray at best.
Does it need to be liquid watercolor here? Heck no! Any non-clear fluid will do. India ink, watered-down gouache, watered-down acrylic paint . . . even food coloring mixed with a splash of water! Just know that if you’re using a thicker medium (like gouache or acrylic) it might get sticky inside the pen, so you’ll need to pay extra attention when cleaning things. I like the liquid watercolor because all I have to do is run some water on the pen (and into that wee gap between the metal and the wood) and it cleans everything right out.
As for paper, I’m using ordinary cardstock, which I got in a big ol’ package from my nearby warehouse store. I just checked the packaging, and it’s 110lb weight. You know what rhetorical question I’m going to ask here, and you know that the answer is “Heck no!” You could use watercolor paper, Bristol board, a big ol’ roll of butcher paper, regular old printer paper, or whatever else you like. Try a variety of papers to see what you like! (Though if you’re using thinner papers like printer paper, be sure to stack a couple of sheets, so your ink/paint doesn’t soak through and color your desk.)

Dip the blade of your pen in your ink, and you’re ready to write! There’s a learning curve to how you need to hold the pen the right way for you. You can see here, for these thick lines, I’m using a part of the curve up near the tip. You can also get a really thin line from the tip itself. It may help to know a little of the science here – the ink is held inside the pen without leaking thanks to the magic of surface tension, and the paper’s absorbent nature is basically sucking the ink out of your pen through capillary action.
This pen is guaranteed to splatter. And catch on the paper if you’re holding it at the wrong angle. Or suddenly gush out way more ink. These things are all part of this pen’s charm and character! (If you want extra splatters, you can fill the pen with ink, then just flick the tip. Though that might get messy.

Here’s my finished page, with extra custom splatters. You can see, I need to work on my angle a little bit when I’m pulling the pen down and to the left (like that first stroke of the H, and both stems of the Ys), because the stuttering of the pen over the paper left jittery edges. A little practice, and I’ll be ready to get back into creating a set of letters for a font!
BONUS: Vectorizing!
Since I’d already taken a picture of this piece, I decided to see how it looked in vector.

First, using Photoshop, I turned it black-and-white, and then boosted the contrast so that the paper was a bright white, and the blue ink was as dark a black as I could get it. Then I saved it as a JPG, and brought that over into Illustrator.

Using Illustrator’s
Image Trace function, I messed around with the settings until I got a preview I liked. I ended up dialing the number of paths way up, and the number of corners and amount of noise way down. I wanted to keep as many of the jagged edges as I could, and I think these settings did it well.
I also checked the “ignore white” box down near the bottom; doing that causes Illustrator to just give me black shapes over a transparent background. If I hadn’t checked that box, it would have made shapes out of the white parts of my JPG as well, and I would have had to go in and delete those all manually.
Once it’s traced, you have options. You can save this as an SVG (Scalable Vector Graphics) file, which can be opened in tons of different programs and can be resized however large or small you like. Or, if you know exactly what size you want, you can save it as a transparent PNG.
(A side note about the trace feature here, because it's come up a few times on various Facebook groups. You can trace your own work as much as you want, but taking someone else's image [from, say, a Google image search] and tracing it is totes uncool. Just like not cutting yourself with a sharp edge of a cut-open aluminum can, don't do this either.)

Here I took a transparent PNG version back over into Photoshop, applied a gold foil style to it, and then put a painted background behind it. (That background came from a bundle I got a couple of years ago, but if you’re anything like me, you have a folder full of similarly cool stuff you’ve acquired over time.)
I did the same thing with the word “lettering” in the header image for this post. (Which, I figured for the new year I’d change up the color scheme of the header. What can I say, I love orange!)
I still have some pieces of can left over, and plenty of chopsticks in the junk drawer, so I'm going to go make a few more pen nibs to see what I like. Then it's time to make more letters!


