Heat Transfer Vinyl - Siser Holographic Gold Glitter
Blank T Shirt
Baking Paper
Iron (or Heat Press)
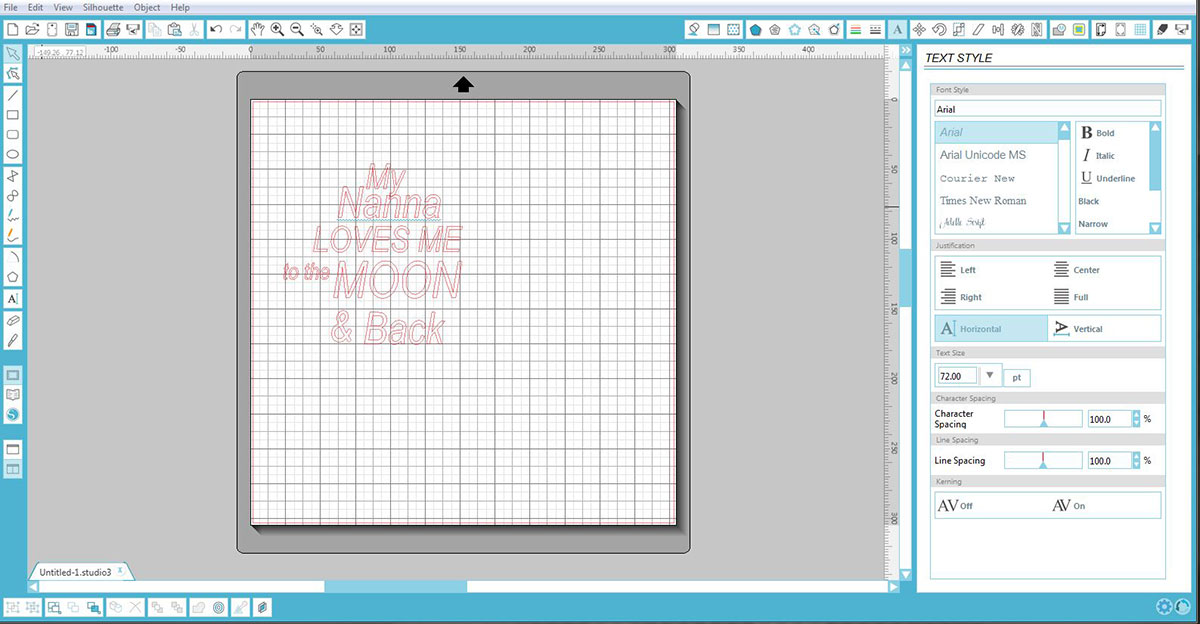
1- Open up Silhouette Studio. Type your quote. When typing the quote, ensure every word or group of words are separate so you can change each font easy.
2- Arrange your words how you would like them to fit on your T Shirt.
3- Select the first group of words you would like to change the font on. Once selected, click on the text style icon and select the font. In this case, the font is Michael from the Calligraphy Bundle. Your selected words will change to the new font.
4- Now the words are in the correct font, we can open the Character Map program (Font Book on a Mac) and access the Glyphs we need for our project.
Accessing the glyphs you need to do the following - Open up Character Map (Font book in Mac). Select the font you are using in the drop down box. Once selected, click on the "Group by" drop down box and select "Unicode Sub range". A new box will appear. Scroll all the way to the bottom of the box and select "Private use characters" This will access your Glyphs for the font you are using. Select the Glyphs you would like to use, then copy and paste into your document.
5- Once you have done this you will see your new glyphs in your word. I have changed the letter "y" in the word "My".
6- Repeat steps 3-5 on the other words you have in your quote. I am using the font Lovely Melissa next.
7- Use the Glyphs again this time choosing your next font Lovely Melissa.
8-I changed the letters "n and a" in "Nanna", changed the "&" symbol and changed the letter "k" in "back"
9- Next choose your next part of the quote. I am using the font Captain Jack.
10- The last font to be used is Script Calm. I used this on the word "moon".
11- The word "moon" needs to be changed. Select the word and click on the ungroup icon. Once the letters are ungrouped, you can move them. I have decided to overlap the "O" letters and move the other 2 letters closer.
12- Once you have them where you want you will need to weld the "o" together so they are one object and will cut as one object. Select all the letters in the word "moon" and click on the weld icon.
13- Double check all your other words that you have no overlapping letters. If you do, ungroup the word, then while all the letters are selected use the weld tool again. This will create one complete object (word) with no overlapping lines.
14- Re line up all your words to where you would like them to be and re adjust the size of each word to fit together. Once you have your quote how you would like it, select it all and click on the group icon. Resize the quote to fit the T shirt you are using.
15- When cutting Heat Transfer Vinyl (HTV), you cut on the wrong side of the vinyl. Because of this we need toreverse the quote, so when you iron it on it is the right way round.
To do this, select the replicate icon, then select the icon "flip right" Once you have done this drag the original quote of the cutting area.
16- Place your HTV onto your cutting mat. All HTV has 2 sides there is a side with a carrier sheet on it and one without. The aim is to cut the side without cutting through the carrier sheet, as the carrier sheet is how you place the quote in one piece onto your clothing to iron on. 99% of HTV has a very clear right and wrong side. In most cases the shiny side is the carrier sheet side and the matte looking side is the one we want to cut. If you’re not 100% sure try lifting a corner of the HTV, and that will determine which side is which. In the picture below you can clearly see which the shiny and matte side to cut is.
17- Move your quote to where you will be placing the HTV on your cutting mat. Once in place you can select the "cut" icon. At this point ensure your file is highlighted in red so you know it will cut. Next you need to select your cutting speed and thickness. If you are using a Silhouette brand of HTV there are pre-set cutting speeds in the drop down box.
17- If you are not sure of the cut setting because you are using a different brand, I recommend doing a test cut first. By doing this in a corner of your HTV you can ensure you have a clean cut. I have also found that when you do this test cut (using the test cut feature on your software) you can see if it will cut through the carrier sheet or corners will get stuck when trying to weed out the unwanted HTV. A top tip I use is to do this test cut, then if it is hard to weed, select double cut to get a crisper cut to weed. You can see the test cut below.
18- Once you are happy with the cut setting, send the file to the silhouette to cut.
19- Once cut you will find it hard to see the cut lines on the HTV but rest assured it is there.
20- Leave the HTV on the cutting mat. Take my word, it will be a heap easier to weed with it on a flat mat!
21- With a weeding tool (or other thin tool like a darning needle or thin tweezers), start weeding the vinyl. Take your time when dong this to ensure you do not remove the quote words themselves. If you do, slowly place the vinyl back and reattach the word or part letter that lifted. As you go you can cut off any loose weeded material to make the process easier.
22- Once totally weeded, double check for any missing bits you have not weeded. These include the inside of letters and even the left over piece from your test cut.
23- Once you have finished this, remove off the cutting mat and place somewhere safe and non-stick.
Trim any excess unwanted carrier sheet off.
24- Pre heat your Iron to a cotton setting. (This may vary depending on the HTV you are using) If you have a heat press set that to the correct temperature. I'm not lucky enough to have a heat press but an iron works just as well.
Iron the T shirt flat so the HTV quote can be places without any creases.
25- Place the HTV quote on the carrier sheet, onto your T Shirt. Ensure it is in the middle and even on both sides.
26- Place a piece of baking paper over the carrier sheet to protect the HTV.
27- Pressing very firmly on the iron slowly iron over the HTV. I recommend using slow movements. I usually place the iron, hold it firmly on the same spot for 10 seconds, and then move to the next part of the HTV and repeat. This seems to really work well. If you use fast ironing technique the HTV will hot heat up enough and will not stick.
28- Once you have finished ironing on the HTV, remove the baking paper and slowly lift the carrier sheet. If for any reason the HTV does not come off the carrier sheet, carefully place back down and re iron.
29- Once the carrier sheet is removed, place the baking paper back over the HTV and re iron again to ensure it has all adhere correctly.
30- Remove the backing paper, wait to cool, and your T shirt is finished. Ensure you wash as per the HTV instructions and it should last a great deal of time.
This is a great technique and way to use many of your fonts in one project. You can do as I did and use one coloured HTV, or you could cut each different word in different coloured HTV. The options are endless!!!
A few tips-
* Make sure the fonts you pick are not too thin. Really thin fonts will cut fine but will not adhere well to your tee due to the small amount of surface area with adhesive.
* When choosing a HTV make sure the carrier sheet is sticky. Not all brands have a sticky backing (carrier sheet). Having a carrier sheet that is sticky really helps if for any reason the HTV lifts when you re weeding. Plus it makes it easier to place when ironing.
* DON'T FORGET TO FLIP YOUR DESIGN!!!
* If for any reason the HTV lifts after you have washed your garment, don't worry, grab a piece of baking paper and re iron it on. This will re activate the adhesive and it will be as good as new.
I hope you have enjoyed this tutorial and have many hours fun making qwerky tees for your friends and family!


