
So here’s a question I saw this week: “My customer wants to see what the finished product would look like before she commits to buying. How can I do that without actually making the product?”
Oh, my friend. I’m going to invite you into a fabulous new world – the world of mockups.
I use them all the time when I’m making promo images for my fonts – they allow me to create fake products to show how fonts can be used, without having to physically create those products. For example:

I have no way of making t-shirts in my home, but thanks to the magic of mockups, I’m able to show what t-shirts would look like with my fonts on them. And it’s as easy as slapping some text down in Photoshop!
You can purchase mockups of just about anything, and there are quite a few decent freebies out there as well. But in the interest of keeping things cheap, I’m going to show you how to make your own.
So if you have a blank t-shirt, or coffee mug, or Onesie, or whatever other product you’re going to put text on, you can totally make your own mockup.
First off, you need to take a picture of your blank item. You don’t need a professional photo studio for this; here’s my personal setup, tucked in a corner of my kitchen.

Thanks to a sheet of freezer paper pinned to the wall, and every desk lamp I could steal from around the house, I have a decent place to take pictures. Though it’s pretty small – if you’re taking a picture of a full t-shirt or something larger, you could put it on the kitchen table or on the floor, aim several lights at it, and you’re good to go.
Since my space is limited, I’m going to do a greeting card mockup. To make the background a bit more interesting than white freezer paper, I’ve put down a pink scarf to be the background.

The cat isn’t a necessary part of the process, but I can’t do any of these type of things without her investigating the area and giving it her sniff of approval.
I started with a blue envelope, but I ended up switching to yellow – the blue just didn’t work as well against the pink background. And I photographed the back of a card, since the only cards I have are patterned on the front.

So here’s my starting picture. I’ve already adjusted the color balance and levels a little bit, and I’m ready to get started. The first thing I want to do is get rid of the company logo, so I’m working with a completely blank surface.

I did that with Photoshop’s clone stamp tool. If the card had been pure white, I could have just painted white over the top of the logo. But if you look at it up close here, the card has just the slightest hint of pink to it. By using the clone stamp, I can grab a blank section of the back of the card, and paint it over the top of the logo.
If you’re starting with a blank object, you’re already ahead of me, and can skip this step.
After that’s done, we’re left with a nice blank card to work with:

Now we’re ready to throw some text down. But you can’t just type text over your image and call it good – the card is tilted at a jaunty angle, so we need whatever we put on the card to sit at that same angle.
What we’re going to do is lay everything out flat and square, so it’s just how we want it, then manipulate it to fit the front of the card.
There are two different ways you can put your text on here; which method you choose is going to depend on if this is a one-off mockup.
Or if it’s one that you’re going to want to use over and over again in the future.
I’ll go over both, so you can pick the method that works best for you.
To begin, let’s make a rectangle that’s the same size as the card. I got out my ruler and saw that these cards are about 3.8 inches x 5.2 inches. So I made a rectangle in those same proportions.

This is just a guide, and won’t be included in the finished product, so you can make this rectangle any color you like. I went with salmon because it isn’t too jarring against the bright pink background.
Now you know the size and shape of the area you have to work with, so you can put in your text.

I’ve just typed the text in basic black. You may want to stick with a solid color (depending on what your customer is requesting). But for my mockups, sometimes I like to add some texture or pattern to things. So let’s make this text look like it was made with red glitter.

I grouped all of the text together, then used my blending options (the little fx icon at the bottom of the Layers panel) to apply a pattern overlay. Patterns, like mockups, are all over the web – both ones you purchase, and ones that designers give away for free.
I bought a set of 100 glitter patterns as part of a bundle sometime in the past. You can also make your own patterns – we touched on that in my post about adding distressed effects to your text.
Once you have everything looking the way you like, it’s time to manipulate it so that it fits your card.

You’re gonna want to zoom way in for this. Get as close as you want, this is fiddly work.
Group everything together (select all of your layers, including the text and the rectangle, and hit Ctrl-G/Cmd-G). Then select the group, and select Edit – Free Transform from the menu bar (or hit Ctrl-T/Cmd-T).
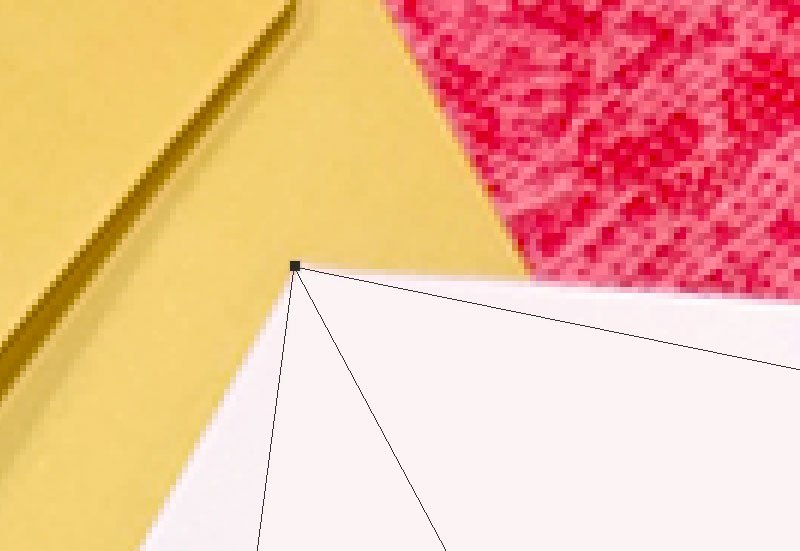
When you’re in Free Transform mode, you can hold down Ctrl/Cmd and click on any corner point, and move that point independently. (You MAY have to convert your group to a Smart Object in order to do this, depending on your Photoshop settings.
It’s easy; I’ll show how a little later.) So Ctrl or Cmd and click on each corner point, and move them to the corners of the card.

It’s totally OK if you undershoot the corners a little bit, because we’re going to be removing that salmon-colored rectangle. As you can see, I’ve left a sliver of white card all around the outside edge.
Now just make that salmon-colored rectangle invisible:

And there you have it! A mocked-up greeting card that looks totally realistic, because everything but the text is real. Some mockups are created completely from scratch, and have an unrealistic look to them.
I tend to only use ones that are created from real-world objects.
So that’s the method you can use if you’re only going to use the mockup once. But what if you want to make a mockup that you can use over and over again? Or share with your friends, so they can use it too?
Easy peasy! Most of the steps are the same, with only a few differences.
For this method, everything starts out the same: Photograph the object, clean it up so that it’s totally blank, and make a rectangle on your screen that’s the same size as the object itself.

For this one, I’m going to make the rectangle the same color as the card. (This way, I'll always have a card-colored background built in. I can make it transparent if I want, but I also have it if I need it.) I just used the eyedropper tool on my photo, and changed the rectangle to that slightly-pink shade.
Next up, we’re going to turn that rectangle into a Smart Object.
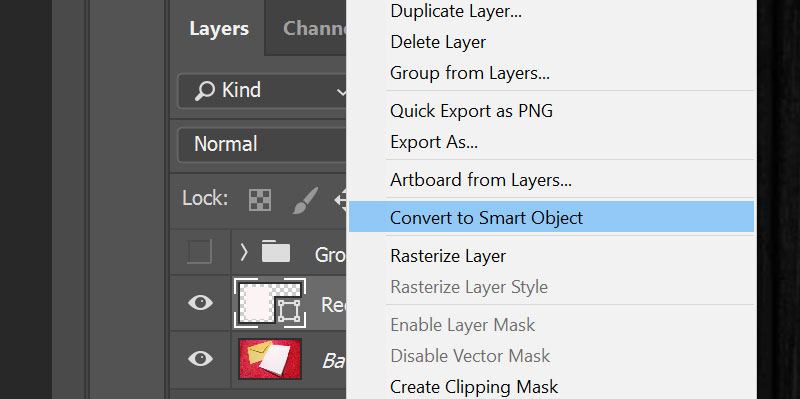
In your Layers panel, right-click on that rectangle layer, and select Convert to Smart Object. When it’s done, you’ll see the thumbnail icon change. Right now it’s a square with four small squares at the corners. When it becomes a Smart Object, that little icon changes to a sheet of paper with a folded corner, and smaller solid square. No, I don’t know what the icon means, either.
The most important thing here is making it a Smart Object before you do anything else to it. Once it’s a Smart Object, you can then do the same Free Transform move to fit it perfectly over your card:
Remember, use Ctrl- or Cmd-click to move each corner independently. And zoom in as close as you want. Closer. CLOSER!
If you get your corners right, you should have a card that looks like … you did absolutely nothing to it.

Yes, this looks just like the blank card image from the beginning of this post. But it’s totally different! This one has a smart object the same color as the card sitting on top of it, just waiting to be mocked up.
At this point, you’ve done all of the hard work in making your multi-use mockup. Be sure to save it as a full PSD file, so it keeps all of your layers intact. It’s ready to go, for you to immediately throw text at it!
Did you save it? Good. Okay, now we’ll marvel at the magic of Smart Objects.

Double-click on the thumbnail image of the rectangle Smart Object. Here you can see that funky folded-corner paper and little white square icon. Icons are weird, y’know?
Once you’ve double-clicked on it, a separate tab will pop up in Photoshop. And it’ll be the exact shape of the original rectangle! Because it’s a Smart Object, Photoshop remembers the original shape, no matter how much we transform or warp the thing. Magical!

Make whatever design you like in the Smart Object tab. As opposed to a Photoshop PSD file, this tab will be “Rectangle 1.psb”. The two file types work hand in hand.
For this version, I’m leaving a white border around the outside of the card. I’ve made a rectangle and applied a watercolor pattern to it, then put the same text over the top in white. Or in this case, I used the same slightly-pink off-white that I used for the back of the card.
Once you have your text placed in the Smart Object, just save that tab. (File – Save, or Ctrl-S/Cmd-S.) As soon as you go back to your main tab, the front of your card will have changed!

If it isn’t quite centered the way you like, or if you want to change the colors, it’s a piece of cake – go back to that PSB tab, make your changes, and save again. Every time you save the PSB, it automatically updates the Smart Object in your main image!
If you’re starting out with mockups, something flat like a card or a poster or a book cover is a great place to begin, since it’s mostly straight lines. But once you get comfortable with the basics, you can really have some fun with objects.
Here are some examples of mockups I’ve made for my own use, from freebie stock photos:

They all have the text laid out on curved surfaces; instead of just using the Free Transform tool and moving the corners, I’ve also had to use the Warp tool (Edit – Transform – Warp) to take the original Smart Object (which is always a rectangle or a square) and manipulate it around the curves.
So there you have it, mocked-up products in Photoshop! I hope this helps you make some great product images, so you can sell even more of your fabulous designs!

DTF Troubleshooting Guide: How to Fix Common Problems & Get Perfect Results Every Time

Ask a Font Creator: Stitch Text Effect in Inkscape and Illustrator

Let's Judge Books by Their Covers!