
Since I’m digging deeper into learning Inkscape so that I can share some how-to posts with you all, I figured I’d take a walk through the menu I’m sending you to the most – especially because it’s often full of the most confusing things.
The Path menu contains a ton of really, really handy features and functions when it comes to manipulating your fonts and other shapes and objects. So today we’re going to go through the menu to take a look at what everything does.

It’s kind of an intimidating list.
Coming to Inkscape as someone who’s been using Illustrator for over a decade, a lot of the features are quite similar. And I’ll readily admit here, I didn’t use Illustrator’s Pathfinder options for years. I didn’t understand them, I never knew which one to pick, and I found other ways to achieve the results I wanted.
These days, however, I keep that Pathfinder window in one of the cherished spots in my most-used-items toolbar. Everything in there is super handy, and I use these things all the time. So let’s take a look at the Inkscape equivalents, so you don’t have to go through the years of workarounds that I did.

First in the list is Object to Path. This takes an object and transforms it into a vector shape made up of points and lines. I most frequently use it on text – when you type it out, it can be manipulated as a font. You can resize, change fonts, fix spelling, all that good stuff.
But once you want to manipulate those letters, you’ll want them in true vector format so you can really mess with the points and lines.
And remember, it’s always a good idea to make a copy of your text before you start to mess with it. Copies rule!

When you put a stroke around an object, it has the same kind of editable flexibility that typed text does. You can use the Fill and Stroke window (Object > Fill and Stroke) to change the color or width of a stroke around any shape; you can even change it from a solid stroke to a dotted or dashed line.
But while it’s editable as a stroke, it isn’t a true vector object. When you apply Stroke to Path, you turn that stroke into a fully editable set of points and lines. So again, make sure you have it just how you want it before you convert it, and tuck a pre-conversion copy away in case you decide later that you want a different size or style of stroke.

Even though Trace Bitmap specifies a bitmap, you can use any raster image – BMP, JPG, PNG, GIF. Your best tracing will come from black lines and shapes on a white background.
The tracing algorithm looks for the contrast between light and dark, and creates points and lines along those contrasted areas.
Your best bet for clean tracing is to bring in the largest possible image, with as little noise or pixilation as possible.
Even in this sample image, while the lines look relatively smooth in the JPG on the left, you can see how many points it’s created in the trace on the right.
And my usual note about tracing: remember, if you’re tracing an image someone else made, you need their permission. It’s up to the creator of that image what they’ll allow you to do with it. So don’t grab an image from Google, Pinterest, or any other website and trace it. (This shark is one of my own drawings.)
![]()
This is a fairly recent addition to Inkscape, and it probably isn’t an option you’ll use that frequently. It’s meant specifically for tracing pixel-based art, like we used to have to draw back in the ’80s and ’90s. I’ve tested out Trace Pixel Art on a couple of old icons I made a thousand years ago. The trace results are … iffy.
Most of the images you make that you’ll want to trace will be other formats, so stick with Trace Bitmap.
Next section: here are the big 6 path-manipulation options. These will all be applied to situations where two vector shapes overlap, and you want something specific to happen where that overlapping happens.
For these next six options, we’ll start with the same two shapes. I’ve made the circle a little bit transparent, so you can see the pie-shaped wedge where the overlap happens.

This will probably be the most-used option in this section. Union takes two overlapping shapes and turns them into one big Frankenshape. You can use Union on shapes, lines, text that you’ve converted to vector objects by using Object to Path. Just about any vector objects you like can be merged into one big shape.

Difference is the cookie cutter of the Path menu. It takes whichever shape is on top (in this case, the circle) and chops it out of the shape on the bottom. Not surprising that it’s the second item in the list, because it’s the item I probably use the second-most, after Union.

I’ll admit, I don’t often find a reason to use Intersection. It removesthe parts of your shapes that aren’t overlapped, and only leaves behind the parts where your shapes were stacked on top of each other.

Exclusion is like the reverse of Intersection. It only removes the area where your shapes overlap, and leaves the rest of the shapes in place. I’ve put a yellow background behind the final shape so you can see – the area where the shapes overlapped is now empty, so the yellow shows through.

This one can be very handy. Division is, once again, like a cookie cutter – it takes the top shape and cuts it into the bottom shape. In Division, however, both pieces of cookie dough are left behind (whereas with Difference, the cut part of the cookie was taken away to be baked).
You now have two separate pieces of your bottom shape, which can be moved around at will.

Cut Path is very similar to Division, in that it leaves behind the entire lower shape, just chopped up somehow. The difference here is that it looks at only the two points where the circle and square meet, draws a straight line between those two points, and just cuts the path, not the object.
I’ve outlined both shapes with strokes so you can see what I mean: the two cut paths it leaves behind aren’t complete – their ends are just dangling out in nowhere.
What good is this one for? An example is if you need a perfectly curved line (maybe so you can set text along that curve). Why not make a circle, throw a larger square on top of it, and use a side of that square to chop out the perfect curve you need!
Much quicker and easier than trying to draw a perfect curved line by hand with the pen tool, that’s for sure.
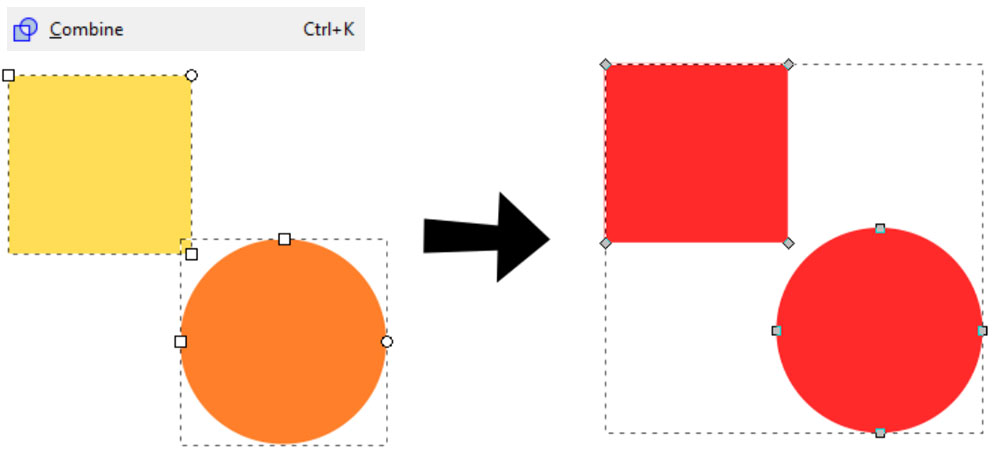 Combine
By using Combine, you can tell Inkscape that multiple shapes should be treated as one big shape. If your shapes overlap, you could certainly use Union to merge them into one. But if the shapes don’t touch each other, you can use Combine instead. Here I’ve taken our two shapes, and by Combining them, Inkscape will treat them as one object. They move as one, you can change their color as one, you can apply other effects as one.
 Break Apart
And just as you can Combine things, you also need to be able to un-combine them. Break Apart does just the opposite of Combine: if you have several independent items that have been combined as one, this will turn them back into their own separate objects.
Now let’s hop down to the next section, which deals with expanding and/or contracting your vector shapes.
 Inset
Inset
The Inset tool takes your object and shrinks it down by a pre-specified distance around all edges. In the example, the dotted line on the right side shows the original size of the square.

Outsetdoes the opposite:it increases the size of your object by that same pre-specified distance. Once again, the dotted line indicates the original size of the square.
These are great tools if you’re going to be constantly shrinking or growing objects the same amount every time. You can set your pre-specified distance deep in the Preferences menu. Edit > Preferences > Behavior > Steps > Inset/Outset by.
But what if you want to grow or shrink your object a different amount every time? Then you’d use…
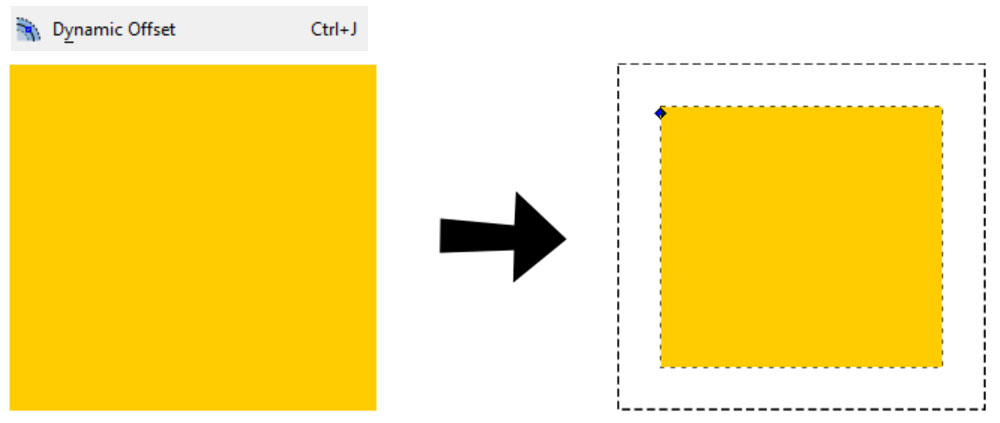
The Dynamic Offset option. It gives you a little diamond shape at the top left corner of your object. You can then click and drag that diamond up or down, increasing or decreasing the size of your object as much as you want.

Linked Offset takes the Dynamic Offset and kicks it up a notch. Let’s say you want to make a larger shape and a smaller shape, but you want them to be identical. And you may want to do some editing on them later.
When you run Linked Offset, it creates a copy of your original shape, which you can then resize using the same little corner diamond that pops up when you do Dynamic Offset. But then, you can edit your original shape, and the offset copy will also be edited right along with the original.
For example, in the image I made the copy smaller (top right), then moved it and set it below the original. When I moved one of the corner points on the original (bottom right), the little bitty copy did the exact same moves.
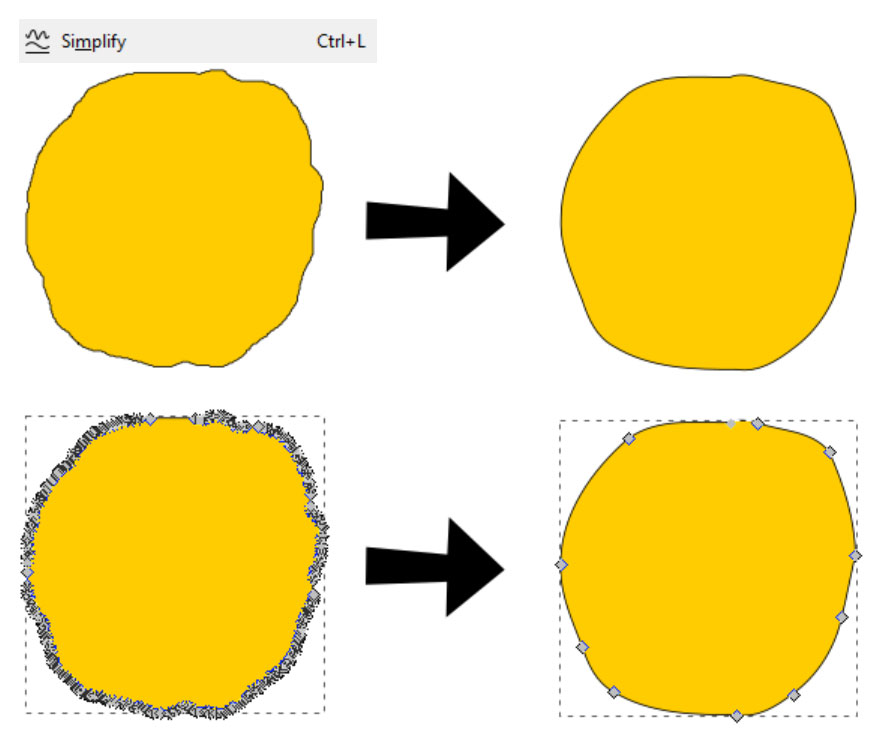
Next up is Simplify, which takes your shape and removes some of the points. Here I’ve drawn a really, really ragged circle. I then applied Simplify several times.
Each time, it removed more and more points. On the top line, you can see just the shape; on the bottom line, you can see the points around the edge of the shape. Can you believe how many points the original had?!
This is especially handy for crafters who use a cutting machine. Remember, every one of those points is a place where your blade might needto turn or move or adjust. By making your shapes simpler, it’s a much smoother line to cut. But be careful of Simplifying too much – some shapes could go from sharp and crisp to blobby and weird.

The Reverse feature does just that – reverses the direction of a path. The only thing I’ve really been able to figure out that it’s good for is flipping around text, if you’re setting text along a path.
You can really tell which of these features doesn’t get used very much – they don’t have keyboard shortcuts.
The last three items, I’m going to talk about together. Because Path Effects is the main thing – the last two are just adjustments of Path Effects. Paste Path Effects takes a copied effect and pastes it to a new object, while Remove Path Effect removes any effect you’ve applied to an object.
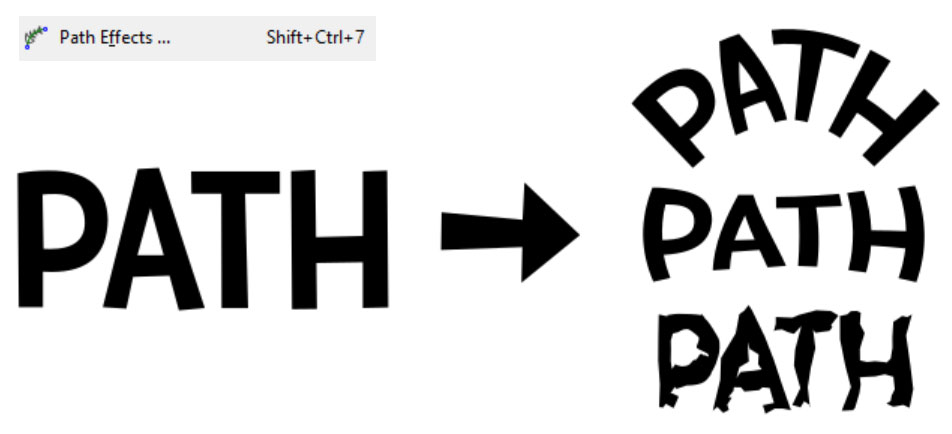
In my version of Inkscape, there are 32 different Path Effect options, so I won’t go into all of them. But they can allwarp, twist, skew, or otherwise change your paths in some way or another. I highly recommend just sitting down with a piece of simple text, and applying all of the effects one by one to see what they all do.
For these examples, I’ve applied Bend (top), Envelope Deformation (middle), and Roughen (bottom). If you took a look at my Illustrator tutorial on how to warp text for a baseball-themed design, the Envelope Deformation effect will look familiar.
After applying any Path Effect, remember that you’ll need to then apply Object to Path in order to turn those effects into usable vector shapes. Just like typed text or an applied stroke, a Path Effect remains editable and changeable until you want to finalize what you’ve created by turning that effect into its own new path.
So there you have it – quite possibly the most important menu section in Inkscape, with features that will help you create all kinds of fantastic objects and manipulate your text in all kinds of fabulous ways!

DTF Troubleshooting Guide: How to Fix Common Problems & Get Perfect Results Every Time

Ask a Font Creator: Stitch Text Effect in Inkscape and Illustrator

Let's Judge Books by Their Covers!