
We recently repainted the upstairs floor of our house and I had to remove all of the artwork I had previously hung.
I knew when it came time to put it back up I wasn't going to do the exact same thing again, I wasn't 100% in love with the old arrangement. I needed to add some more pieces to fill it out.
What's a DIY loving girl to do?!?Make more art of course!!
I'm going to show you how to make a trendy wood frame poster art piece for a fraction of the cost of buying one at the store. (Seriously, this cost maybe $2 for the materials used, you should be able to make a few from the 1 piece of wood)
The Supply List:
Let's start by designing the art print to be hung in our frame. Open up Silhouette Studio and change the paper size to match your art size.

I just wanted to make a quote saying "... and all our dreams came true!"
I LOVE the fonts in the Best Sellers Font Bundle Vol. V(guess that's why they are the best sellers huh? :) )
Type out your phrase. I'm breaking mine into 2 fonts to emphasize "came true"

To change the font, highlight the words and select your new font in the text tool. I'm using Heavenfield Typewriter for this portion.

Scale it to fit your paper then type out the next portion of your phrase.
I'm using Bhatoshine for the "came true!" This is one of my favorite fonts ever, by the way, I use it on tons of projects.

Once again, scale it to fit as you wish. Now use your align tools to line the two phrases up perfectly. I'm making mine right side aligned.

I always group my design together once I'm happy with it so I don't accidentally move things around while shifting it on the page.
As you can see, I added guidelines to the design page so I could scale it perfectly. Just click in the ruler bar on the top and side and drag to create them.
I scaled it to fit within my margins I drew.

I then used the arrows on my keypad to have the words "sit" on top of and in between the guidelines. I find that's the easiest way to make small adjustments instead of dragging with your mouse.

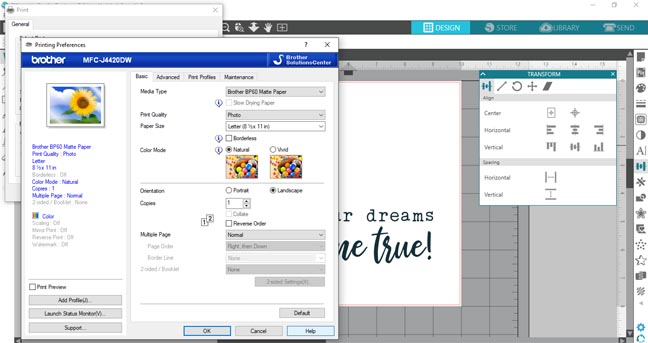
I'm going to print this out with my printer instead of cutting vinyl. Make sure to add your color fill so it will print. I also make the outside lines transparent so I get a full rendering of the final product.

Here's the final look!

Go ahead and send it to be printed, don't forget to make sure it's on the best settings.
Now let's make the frame for this. Grab your piece of balsa wood, ruler, and a sharp craft knife.
Start by cutting the length of the wood. I'm making mine 11" wide. I found doing several light score lines worked best.

Now cut the 11" wide wood into four 1" sections. This cuts with the grain of the wood so it pretty much slices like butter. Be careful not to cut your finger since it glides so smoothly!
I love cutting on my giant cutting mat too, it makes aligning the ruler very easy.

You should have four equal wood portions now.

I wanted to add a little pop of color and design to this so I'm covering the 2 front wood bars in decorative cardstock. I cut the paper into two 1" x 11" strips using my paper trimmer.

Use some double stick tape or glue to attach the paper to the wood bars.

Here's how that looks after the paper has been attached.

Next, take the two unfinished wood bars and add some more tape along the top, making sure not to go all the way to the edges. I left about 1/2" of wood on each side.

Being careful to make sure it's straight, attach the printed cardstock to the wood.

Repeat the process for the top. Now use your hot glue gun to attach the twine and the decorative wood portion on top.

Repeat the hot glue for the bottom bar too. Here's the finished piece!
What's awesome is this is also extremely lightweight so a thumbtack is strong enough to hang this with.

I used this in my family collage wall in our living room. It really is the perfect phrase because I am living my dream.

Here are a few overall shots. Do you spy some other DIY projects in there?
Here is the link to the flower embroidery hoop art, and I also am showing you how to make my "family math" art in the next post.

This is honestly the highlight reel for our family, I love being able to stare at it while eating our family meals.
What phrase would you write for your family wall?

DTF vs Sublimation Printing: Which Is Better for Your Craft Business

Beginner Cricut Project: How to Make a Paper Cut Gift Tag with Cricut
